This tutorial explains how to sew a two-piece sleeve vent on a lined tailored jacket, just like this:

This is the method you will often find in ready-to-wear, where the vent on the shell is first constructed, the lining is then attached to the hem, and finally the buttons are sewn on. Personally I don’t usually bother with buttonholes, but if you decide to insert them, do it before you insert your lining. There is no need to cut them if they are to be nonfunctional and purely decorative.
I know a lot of home sewers bumble their way through this area with bits of hand-sewing here and there, but it really is very simple to machine sew everything when you know how. The most important thing is that your pattern is configured correctly (most home-sewing patterns aren’t) and once you understand how the pieces go together, there are only 8 simple sewing steps. Preparation is the key!
Preparing the Pattern:
Have a look at the undersleeve and the topsleeve, they should look something like the pattern pieces below.


Check that you have the following notches – if they’re not there then add them in:
- hem notches – on side seams at level of hem fold line. While you are here, fold up along the hemline, and make sure your hem mirrors the sleeve. The hem width should be 4cm.
- undersleeve notch – on the undersleeve, draw a line from your hindseam stitching line to the hem edge, parallel to the vent cut edge, to position this notch.
- 2 notches for the vent mitre – on the topsleeve, fold along the hem fold line and vent fold line, and notch where their edges meet. It is best to add a seam allowance and trim the corner away as in the diagram above, but I haven’t done this in my garment because it happens to be 90 degrees and I can eyeball it.
The next step is to make two fusing patterns, just like the areas outlined in red on the diagrams:


- trace around the lower part of each sleeve piece
- draw a line 2cm above your hem fold line
- extend the hindseam stitching line, and draw a line 2cm in from it
- draw a line 3mm in from each cut edge of the sleeve pattern
Cut out the fusing patterns, then cut and apply the fusing to your sleeves, remembering that they lay 3mm in from the cut edges:

Sewing it all together:
1. Sew the hindseam from bottom to top – begin 1cm in from the vent edge to allow for a turnback, stitch along the upper edge of the vent ending with your needle down at the pivot point, lift your foot and turn your work to stitch the remaining sleeve seam:

2. Fold the top sleeve right sides together so the mitre notches meet, then sew from the notches to the fold line. If the corner of the vent is 90 degrees, you will sew 90 degrees to the fold line. Often the corner of the vent is greater than 90 degrees, and you will need to trim the corner to the correct angle as described in the patternmaking diagram above.

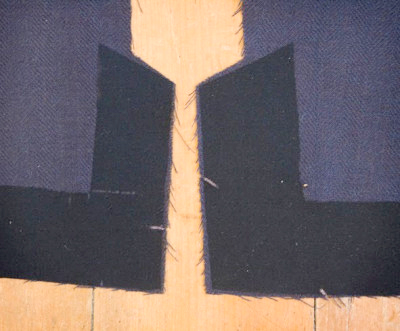
Clip away the excess and turn to admire check your mitre:

3. Now sew the undersleeve corner – just fold the hem up along the notched hem fold line and bag out at 1cm like in the top of this picture:

The hindseam will be pressed open, so clip the undersleeve into the pivot point. Don’t worry – this area is all reinforced by fusing, and clipping on the bias means it is even less likely to fray. And once your buttons are sewn on there will be no stress on this point anyway.

After pressing you should have something that looks just like this:

- the hindseam is pressed open
- the undersleeve vent edge is pressed back 1cm (3/8″)
- the top sleeve vent fold line aligns with the undersleeve notch (highlighted above)
- both hemlines align – not like this example below!

Sorry, but if you end up with this, you will have some unpicking to do! If you are a couple of millimetres out, it is possible to unpick the undersleeve bag out, and restitch it so it is level with the topsleeve. More than this, and you need to check your accuracy.
4. Once you have this area looking good, sew your forearm seam, press open and your sleeve is done!
Now for the lining:
If your hem width is 4cm, you can cut your lining to the hem fold, which allows 2cm ease in lining length. Cut your lining to this length, omitting the vent allowance but cutting parallel to it, as in the diagrams below – blue = lining pattern.


5. Sew the forearm seams of your lining, leaving a gap in one forearm seam for bagging out your jacket later.
6. Sew the hindarm seams of your lining.
7. Sew the lining hem to the sleeve hem. When stitching these together, match the forearm seams, and match the lining hindseam to that really important undersleeve notch that you really wish you’d made made sure you had earlier on (see photo above).
The topsleeve hem is often cut on a slight bias, so to the inexperienced eye it may feel like the two layers don’t fit – but if you cut your lining pattern as above and match your notches correctly it will definitely fit, but it might feel like you are easing the topsleeve in. I’ll give you permission to use pins here if you want 🙂
Sew around the cuff circumference as far as you can neatly sew. I usually have about a 1cm gap in my stitching around the vent. That is OK, it presses upwards and will be enclosed when you attach the buttons.
8. Before you press the hem you need to tack the hem up at the forearm seam first. Fold this seam along the hem fold, and from the inside grab the seam allowances lying face to face and sew them together. Make sure the hem is folded up exactly at the hem notch, line up the cut edges, and backtack about 2cm above the hem fold. This step is illustrated here in photos 10, 11 and 12. Now you can turn your sleeve through and safely press.
OK I lie – there is a step 9 – you need to sew on your buttons! It is best to attach the lowermost button through the hem layers to ensure the corner of the vent sits flat and does not curl out, and all other buttons should be sewn through all layers of the vent facing.
That’s it -who said two-piece sleeve vents were hard?!

Pin the image above for later – and happy sewing!

What a wonderful blog you have. I look forward to reading through it all.
LikeLike
I have been searching the net for Twp days so I can finish my sleeves, thank you so much for your clear instructions
LikeLiked by 1 person
It’s Rachael again about yo try the vent but don’t know the dimensions eg how much extra inches do I add to the side and how far up the sleeve and how to i add to the hem about to try the vent but don’t know how much you add on to the original sleeve sides and how high up the sleeve and also how much you add on to the hem
LikeLike
Hi Rachael – the hem on both the sleeve and vent is 4cm, and the vent extends up about 10cm (enough to accommodate your buttons)
LikeLike
Looks so wonderful. May I publish a link to your tutorials on my blog “Sewing tutorials”?
LikeLike
I will appreciate if there will be pictorial evidence on attaching the lining just the main sleeve. Thank you
LikeLike
Yes Sigrid, that will be OK – thanks!
LikeLike
you have just saved my day!
LikeLike
Love, love, love this! Will participate in the RTW sewalong and my pattern actually doesn't call for a sleeve vent. I think I'll put one in thought, just to be able to admire – ehm – check my mitre.
LikeLike
I should add something to this tutorial. When mitreing the top sleeve hem I said to sew perpendicular to the fold – this is true in cases where the corner of the sleeve is square, but this one is slightly angled and you will need to sew slightly off 90degrees. Trimming the mitre seam allowance gives you an accurate guide line for sewing.
LikeLike
What a great blog! That way of mitring the surgeon's cuff on the jacket certainly is one of those “why didn't I think of that” things. 🙂
LikeLike
This is so great that I wish I understood it better! I know that it will help me, but as a self-taught pattern maker I'm not too familiar with the word 'hindseam'. I'm sure once I google it I'll be ok. LoL! I'm looking forward to that armhole lining tutorial… or is it already here?
*VC*
LikeLike
This is so helpful! I know you said this is a trick of the trade… do you know of any books that covers this (and other more nitpicky details of construction)? I was surprised that even my Cabrera tailoring book didn't cover this – it just has you fold and handstitch the mitre, and doesn't really touch on inserting the lining.
Anyways, thanks a million for this!
LikeLike
Silly question, what is meant by “Now sew your undersleeve corner – just fold your hem up along the hem fold line, bag out at 1cm and turn corner through:”? The “bag out at 1cm” part is confusing me. Thank you!
LikeLike
I’m making a tail coat, and my pattern’s instructions don’t have details, nor are they a very clear step-by-step, so I’ve been poking through the internet to find a sort of “idiot’s guide to mitering”, and though most of your instructions are clear, I’m still confused. As the jacket is for me, I’m very strongly considering a plain sleeve, instead of vented one; if I do that, I’ll probably forgo the buttons, because I think it might draw attention to the lack of vent. My pattern pieces don’t indicate where to do the diagonal/miter seam. Is it just a 45 degree angle from the bottom corner of the sleeve hem, attaching hem allowance to vent allowance? This is what I get for trying to teach myself tailoring, I guess. 🙂
LikeLike
Thank you for the clear and easy instructions to make the vent in a jacket! I am making a suit jacket for my son using a Burda pattern and the instructions not only don’t make sense, they leave the jacket vent unfinished. I haven’t sewn clothing for several years so my skills are rusty, but because of you, the jacket sleeve vent came out perfectly!! I am doing the happy dance! Thank you!
LikeLiked by 1 person
Thank you so much for this blog! so helpful keep up the wonderful work 🙂 x
LikeLiked by 1 person
Am so greatefull to have read through this your wonderfull set of instruction to making an advanced Vent. God bless you, I have just upgraded my self.
Looking forward on tutorial of how to cut and sew a perfect Shawl Lapel.
LikeLike