Guess what – there are only three more steps to complete our jackets – sew in the lining, bag out the hem, and do the buttons and buttonholes – we’re almost there!
Don’t you love how quickly our garments are coming together? I can only estimate my sewing time because I’m always stopping to take photos, but my coat has come together in about 3 hours so far, with about half an hour to go – but I better not speak too soon! I know the time spent editing the pattern at the beginning really speeds up the jacket-making process for me – are you all finding the same thing?
Let’s get that lining sewn in:

Start at the hem – by sewing the front lining to the front facing:
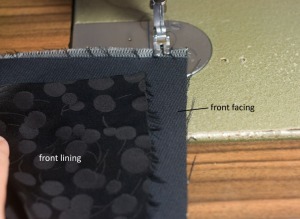 |
| Excuse the exposed fusing at the hem. Remember how I was short of cloth? Well, that fusible is part of my seam allowance! |
Sew up the front edges, right around the back neck facing, and down to the hem on the other side – matching all notches and seams:

There will be some easing of the lining to do, and it is usually easy enough to sew in while the lining is on top – if not, switch so the lining is on the bottom and let the feed dogs do the work!

To sew the sleeve hems, tuck the sleeve linings down the sleeves, and slide your hand into the sleeve that has the lining fully closed, and make sure it is not twisted and that the seams align:
.
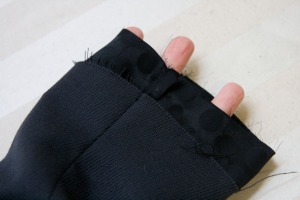
At the seam, turn the hems inwards and pinch the lining and sleeve forearm seams right sides together with your fingers near the sleeve hem:

Still holding them tightly together, with your other hand reach in between the lining and coat body at the hem, through the armhole, to the sleeve hem. Pinch the forearm seams together with your other hand, then pull the cuff out through the armhole and the hem – the right sides will face together. Whatever you do, don’t let go!
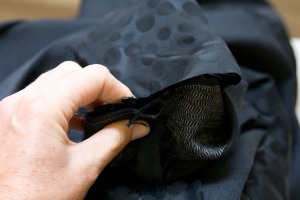
Line both hems up perfectly and then they are ready to sew:
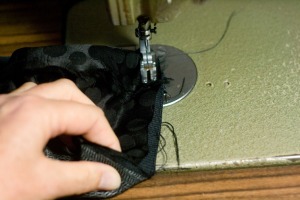
Sew right around the cuff using a 1cm seam:

If you are sewing a two-piece sleeve, check out this tutorial if you haven’t already.
Before turning the sleeve back through, the hem needs to be tacked up at the seam allowances. See the hem notches:
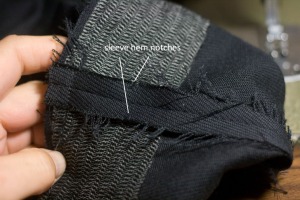
Fold the hem at that point:
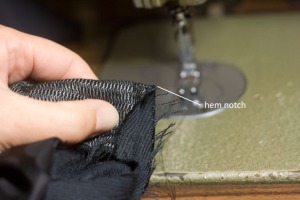
and stitch the opposing seam allowances together for 1-2cm:

Now you can turn the sleeve through, and the hem folds automatically in place because of the hem tack. If you are sewing a one piece sleeve with a single seam, some additional catchstitching might be required by hand:

The next step is to attach the lining to the armhole, this is done at both the shoulder seam and underarm.
Reach in between the lining and coat body up to the shoulder, and pinch both sleeve seams together at the shoulder point:

Still holding them together, draw them out through the hem:
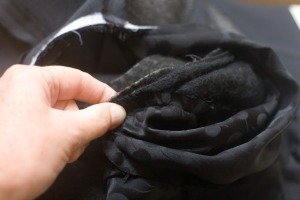
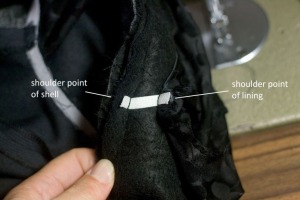
Cut a 4cm piece of cotton tape, and sew it to the sleeve seam allowance at the shoulder seam of the coat body:

and sew the other end to the seam allowance of the lining – this forms a 2cm link between the two layers:
Now reach in and pinch the lining and body underarms together and draw them out through the hem:

Lay the seam allowances of the lower armhole together, with the side seams of the body facing the side seams of the lining:

Stitch the underarm seam allowances together about 5cm either side of the side seams – you can probably just see my stitching here adjacent to the actual seam:
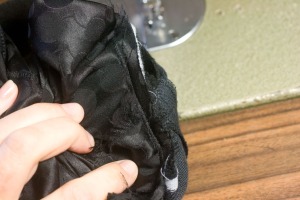
Turn through – your lining armhole is now attached firmly to the inside:

That’s the first sleeve done. For the other sleeve (that still has one lining seam left open) repeat the above steps, but it is easier if you don’t attach the lining to the underarm until after the next step. This next step is bagging out the hem, and this is detailed in the next post.


Nice post Sherry, and I learned a new lesson today! I never sewed together the lining and the shell at the armhole, but now that I see it done, it seems quite logical.
LikeLike
That is almost exactly how my old winter jacket (which I was dissecting the other day) had its lining attached at the shoulder. Can't wait!
Question: will you be covering the differences between sewing a bagged lining and a free-hanging one?
My coat has taken considerably more than 3 hrs at this point, I think…. 😉 but it is SO close!
LikeLike
Sherry, your posts have been so detailed and thorough – I'm learning so much from them! I'm looking for a better pattern to try out these techniques as my last one was a simpler design. Thank you so much for all the info!
LikeLike
I have cut out the sleeves and front and back and blockfused. So I am pretty far behind. Perfecting my muslin took much longer than expected. I am still not sure on the facing and lining adjustments so haven't cut them out yet. Hopefully this weekend I can get a lot done.
LikeLike
I am nearly up to speed (have still to set lining sleeves into the lining, and cut and sew in the sleevehead, but I have already done my bound buttonholes.
I am super excited to see this step – it is something I have never done before.
LikeLike
These tutorials are so good. You really are the best in the business. A few more blouses and I will be ready to start my own jacket using your steps.
LikeLike
I haven't gotten to the collar, but my lining and most of my shell are put together. The sleeve vents look great thanks to your tutorial! I am wrestling with the Bemberg fabric, though. It is shifty, shifty shifty stuff and seems to elongate on its own. Also, trying to break the habit of not going to the iron after sewing every seam! It's almost like second nature 😉
LikeLike
Sherry, Your tutorials are super, and the photos are so helpful. Your coat is looking really smashing, I love the subtle pattern of the lining.
I'm really behind on everything this month but my jacket is still on-going.
LikeLike
Hi Sherry! The sewing is going Really fast. If anything, I'm slowed down by rereading your tutorials after every step! just being cautious-
Question: I hope you can understand this without photos- I'll be able to post on flickr in a couple days-
I have dimples in my pressed lapels! the gorge line points right at them (my lapels point up parallel to the collar). The dimples are right where there is no seam allowance between the layers. So- is there a solution? More interfacing in the lapels? trim the SAs that are there? If I add more interfacing, should it go just between the stitching lines? Any thoughts?? I'll get photos asap- thanks!
LikeLike
~Kinbersew – I think I know what you mean. I think you need to determine whether the dimples are from the lack of seam allowance, or stitching too close to the collar, or being slightly misaligned. I'm not sure what to do if it is the lack of seam allowance, other than add a bit back in to pad it out! Maybe when clipping you could clip one layer at one angle, and the other layer at another angle. Look forward to pics!
LikeLike
Oh this is so wonderful! You explain everything so well. I love how we are connecting the lining and shell at the shoulder with that little band. One question though – you say at the sleeve seam allowance of the shell – so is what we see the sleeve head wadding on top? Because I think I attached mine to the shoulder pad… It seems to work fine. I hope to post some pictures tomorrow at Flickr and my blog, it is all coming together so nicely!
LikeLike
I am SO enjoying this process. It’s really starting to come together (see pic in Flickr). Thank you so much for taking the time to teach us. It is very much appreciated.
One thing though. I struggled with the part where you say, “… tack the hem up at the seam allowances.” Then “Fold the hem at that point:” It took me FOREVER to get my sleeve to look like the picture. I had no idea how you did that. I’m still not sure I did it right even though I got the desired results.
First, what are you tacking? Are you folding up the hem at the notches then tacking the top of the hem, that’s attached to the lining, to the SA or are you simply tacking the seam allowance at the notches? Then what?
LikeLike
~Katja – That's the shoulder pad on top, so it sounds like you've done it right!
~Jeanettec – Fold the hem up at the notches, grab the bit of the seam allowance that is now folded upon itself(just one side will do), and tack the two layers of seam allowance together. It might be clearer in the photos in the next post on bagging the lining as we do the same thing there! Off to check your pic in Flickr!
LikeLike
AH! It makes sense now. You don't actually tack until the end. Gotcha. 🙂
LikeLike
This is very interesting. I have read through it twice and I think I understand. Making my jacket has really been a stretch for me, but your instructions sure are making it doable! Thanks. On to insert my lining!
LikeLike
I know that this sew-a-long is long over, but I was wondering if you could tell me what I need to change in these steps if my coat has a skirt with a cut-on facing?
LikeLike