Here’s how to make the pattern for a skirt with soft pleats on a waistband like my Miranda Skirt:

The pattern pieces are simply rectangles, so with a few measurements you can chalk it directly onto the cloth, but you can make a paper pattern first if you prefer. It is worth doing a quick calculation to make sure your fabric is wide enough first, I needed fabric about 100cm wide for mine.
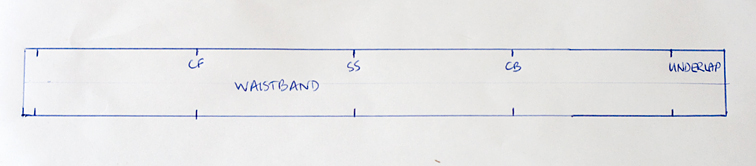
Let’s start with the waistband:
- Waistband length = waist circumference + 1cm ease + 3cm underlap + 2cm seam allowances. Eg if my waist is 73cm, my waistband length = 79cm
- Waistband width = finished width x 2 + 2cm seam allowances. Eg, if I want the finished width to be 4cm, I cut it 10cm wide.
- Chalk this 79cm x 10cm rectangle onto your cloth. I like to blockfuse, so I cut this rectangle out roughly leaving a 1/2″ margin, fuse it, chalk the correct measurements, then cut it out.
- Mark a few notches along your waistband:
- one 1cm from one end (the seam allowance)
- one 4cm from the other end (the 3cm underlap + 1cm seam allowance)
- one halfway between these two notches (the side seam)
- one halfway between the side seam and the 1cm notch (the CF)
- one halfway between the underlap and the side seam (the CB). I like to double notch the CB so I don’t have to think which is which at the machine
Now for the skirt – the front and back pieces are exactly the same.
- Skirt length = 1cm seam allowance + finished length + hem allowance. Eg if I want the finished length to be 60cm, I cut it about 65cm.
- Cut 2 panels from the full width of the cloth at this skirt length, these are the front and back. Fold each panel right sides together so the selvedges meet, and lay them up on top of each other with the foldlines and cut edges matching exactly.
- By cutting them together on the CF/CB fold, we only need to chalk notches for the pleats on 1/4 of the skirt, and you can then clip the notches through all 4 layers.
- Divide your finished waistband length by 4. Eg if my finished waistband length = 74cm, I get 18.5cm. This is what the upper edge of your 1/4 skirt must measure excluding the pleating underlay (marked here by arrows) and the side seam allowance.

- With 18.5cm, I have enough space to include 3 pleats of 5cm (15cm total) with 3.5cm remaining. I placed 2.5cm of this remainder at the CF/CB between the pleats, and 1cm at the side seam. If your waistband length is smaller than this you might need to use smaller pleats, eg 4.5cm or 4cm pleats. If your waistband length is larger, you can simply add the extra to the side. If it is much larger you might want to enlarge the pleats or move them further to the side to maintain similar proportions.

- From the CF/CB start marking your pleats and the pleat underlays, which are twice the width of the actual pleat:
- mark 2.5cm from the CF (in the finished garment there is a 5cm gap between the central pleats).
- mark 10cm underlay, then 5cm for the pleat. Do this 3 times. If you are using 4.5cm pleats mark a 9cm underlay, 4cm pleats and 8cm underlay, etc.
- add the extra at the side seam, in my case 1cm
- add the seam allowance.

- Once the seam allowance is added, you can square down to the hem, and you’re done! But before you start cutting read the next point:
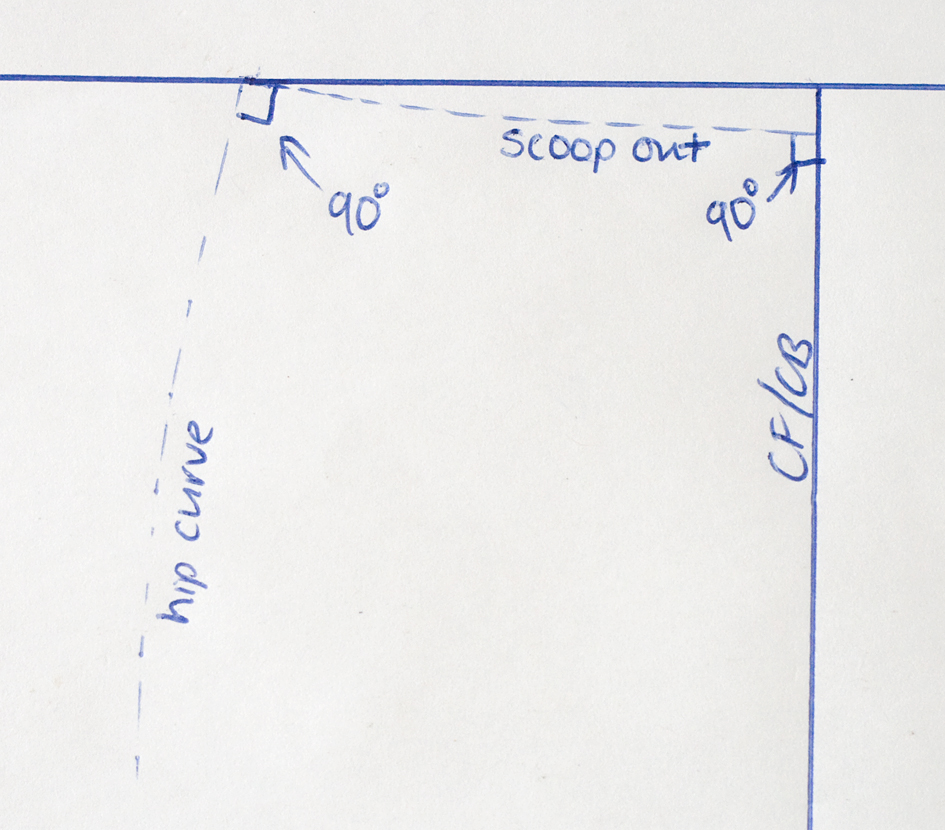
- Something else you can do is to scoop out the CF/CB waistline 1cm. I did this as it reduces the pleats splaying apart and makes them hang better – well it did on me! If you do this you will need to add a slight hip curve similar to that on a standard pencil skirt, as the side seam and waistline must meet at a right angle:
So there we have it! You can easily adjust the pleats to your own taste. Experiment with pleating the fabric on your body to find the best arrangement like I did:

With a paper pattern you can also fold the pleats into position to get an appreciation of how they will look, and at the same time you can double-check your maths by ensuring the panel fits your waistband pattern exactly!
Have fun designing your own, and happy sewing!

GREAT tutorial! I really like how the pleats hang on the skirt! thanks so much!
LikeLike
What a great tutorial, thanks for this.
LikeLike
Thank you for this great tutorial and pattern! I would love to make it. I especially like that there are no pleats on the sides!
LikeLike
I love this . I wonder if this could be an old Liberty print as they used to be 36″ wide and the pattern is rather like a liberty print. I have some lovely silk twill which is circa 1980 ( dont ask me how I know this ) I found it in a similar situation as your find. Its a lovely pattern but I am thinking that it will have to be lining for a lovely stylish jacket or coat or something like that as its just too exuberant for anything like your skirt
LikeLike
I just found your blog today- thank you for posting this tutorial! Your skirt looks great, and I can't wait to try making my own.
LikeLike
Thanks for this tutorial. I am so very grateful. 1 more project to do.
LikeLike
Thanks for the tutorial. How do you think this would work if I wanted to cut the pieces on the bias?
LikeLike
Your explanation of the pleats and the “scooping out” of the waistline was helpful. Did you put a zipper in the side seam?
LikeLike