The dress I am making at the moment, Butterick 2669, has one of each of the main dart types. So time for more tricks of the trade – about darts! Our flat pattern and fabric are only two dimensional, but with darts we introduce a third dimension so garments fit our body curves better.

Dart Types:
- Basic dart – triangular in shape, eg the back shoulder dart above
- Contour dart – tapers at each end, eg the back waist darts
- French dart – a combined bust and waist dart emerging from the side seam
Parts of a Dart:

Random Dart Tips:
- Darts usually come first in garment construction – they are much easier to do on a flat piece that is unattached to other pieces.
- The dart should point to the body part it is providing fullness for – ie the bust point, front hip, buttock, elbow tip, shoulder blade, etc…
- The dart should end before the full prominence – ie bust darts should end about 2.5cm /1″ before the bust point
- Taper your darts – Darts help the fabric conform to our bodies curves, therefore part of the stitching line must be curved. If you like to wear cone bras like Madonna, you can stitch your dart using a rigidly straight line, but for most darts we want to stitch a straight line with a slight curve near the apex to simulate our body shape. When you fold the fabric to sew the dart, fold well past the dart apex – this will help to visualise the shape required for a smooth continuous curve, from your dart stitching line to the remaining fold in your cloth. The last 3 stitches are usually directly on the fold:

Here are some dart markings on some commercial sewing patterns:

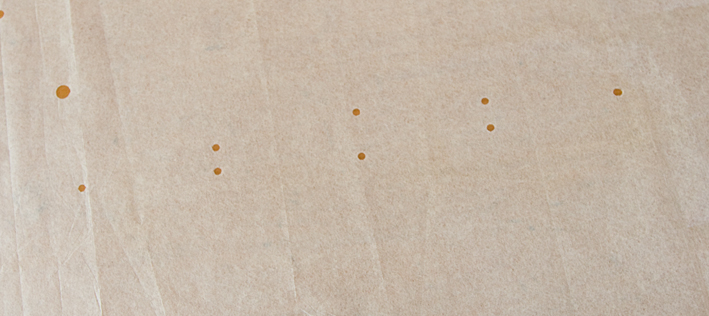


Here are some dart markings on production patterns:


They’re a bit different aren’t they? In manufacturing we make it easy by marking dots on the foldline of the dart, not on the dart legs. In actual fact the cutter drills tiny holes at these points, and they become enclosed within the dart once it is sewn. But because home sewers a) don’t have a drill in their sewing cabinet, or b) don’t have the exact dart point necessarily confirmed, it is best just to mark it with chalk on the inside. This way you don’t have to fuss around overlaying dots and pinning pins, you just start, well – sewing!
If you’d like to give this method a go, I’ll show you how I adapted the dart markings for all three types of darts on my Butterick 2669 pattern:
Basic darts:
- Clip 2 notches at the base of the dart legs
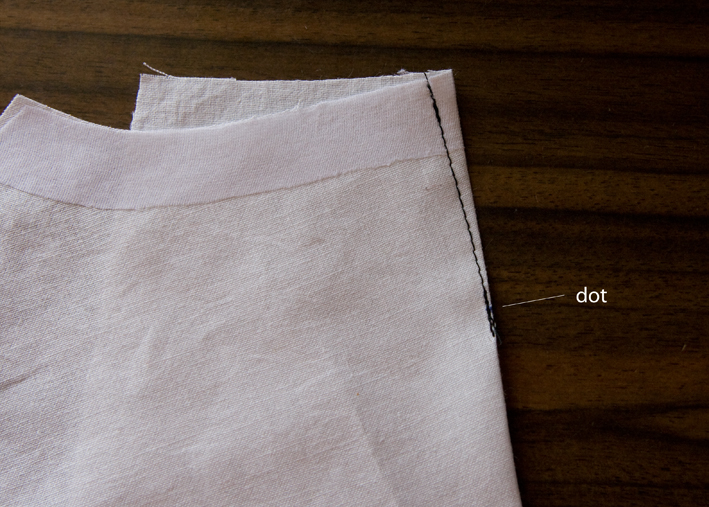
- Mark one dot 1cm (or 1/2″) short of the apex on the foldline:

- To sew, fold fabric along the foldline, bringing the notches together and folding exactly through the dot at the apex:

- Sew from the notches directly towards the dot in a straight line:

- About 2cm from dot begin your taper, finishing 1cm (or 1/2″) past the dot with a backtack.
- For a dart with a large intake you may need to begin your taper slightly further from the dot, and for a small dart begin the taper closer. For this small shoulder dart I began to taper 1cm prior:
Contour darts:
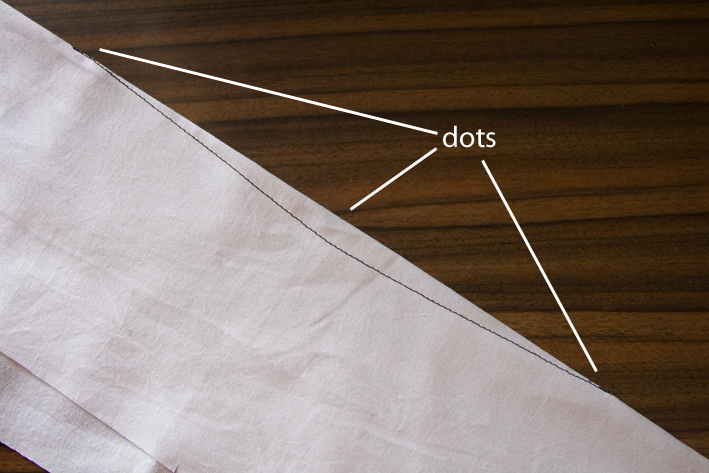
- Mark three dots all on the foldline
- Two of these dots are 1cm short of the apices, and one dot is at the widest intake – in this case the waist:

- Look how inaccurately placed the dots were on the original pattern!
- Measure the widest intake and halve it – you’ll need this figure when you sew your dart. This dart has 1″ suppression, so I will sew it 1/2″ from the foldline.
- To sew, fold fabric along foldline exactly through all three dots:

- Start 1cm before a dart apex, backtack on the fold, then taper slightly inwards until your presser foot is aiming at a point 1/2″ (half the intake) inside your middle dot:
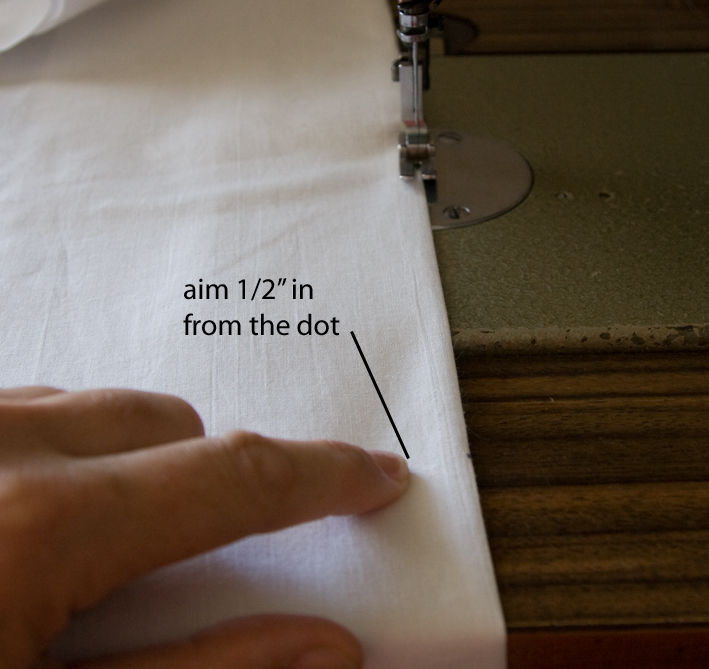
- Sew straight until about 2cm from this point, then begin a smooth gradual curve through the point to about 2cm beyond it:

- Sew straight again and taper the end of the dart as for a plain dart:

- The finished contour dart should be a smooth curve with no angular bits:
- Clip only if necessary. I don’t generally clip darts under 1″ total suppression – but I use mainly natural fabrics that press easily into shape, disobedient fabrics like polyester might need clipping.
French darts:
- Mark one dot 1cm short of the apex on the foldline
- Cut away the dart intake leaving a standard seam allowance
- Because a French dart is bias and easily distorted while sewing, it is good to have a notch halfway along the seam allowance:

- To sew, bring the side seam edges of the dart together, and stitch as for a normal seam until you reach the point where the foldline begins:


- When you reach the foldline, start tapering towards the dot, sew 1cm past the dot, and backtack:

- Clip only where necessary – a French dart is on the bias and the allowances press easily into shape, so only considerable curves or fabrics like polyester will need clipping.
Shaped basic darts:
- Some plain darts are shaped, to contour the body even more closely
- Marking and sewing these is similar to sewing a either contour or French dart
- An extra dot can be placed below the dot at the apex to indicate the area of additional intake, and a note is made of the amount of additional intake required when you sew, as you do for a contour dart:


- Or, the dart intake may be cut away as in a French dart, to provide a guideline for sewing.
Simple eh? In manufacturing everything is stripped down to the bare essentials – but once you have sewn a few darts, the bare essentials are all you need! As you can see it takes just a moment to convert the pattern markings, and I find this method much quicker when cutting, marking and sewing, with no loss in accuracy. Give it a go!
Thats all for now – Enjoy your sewing!

Awesome tutorial. Will be sharing it with my beginner sewing daughter!
LikeLike
wow, what a fantastic post. I really appreciate your tricks of the trade.
have you seen recent article in Threads mag. regarding changing the shape of contour darts – moving the widest part closer to the top of the dart?
this change makes the narrowest part closer to the underbust instead of at the waist, an interesting idea.
LikeLike
~Beth – it sounds like they are suggesting what is shown in the 2nd last photo? In my experience the underbust suppression is often the same width as the waist suppression at the front.
LikeLike
Você é um anjo, eu estou justamente lutando com os dardos de uma saia que não querem acentar.
Abraços
Eilane – Brasil
LikeLike
I love your tutorials so much! Thanks for sharing 🙂
LikeLike
Than you so much for this, I have learnt so much!
LikeLike
Oooooh, an easier way to mark and sew darts – I likeee! Thanks for all the details and illustrations.
LikeLike
Thanks so much Sherry – you post has exceeded all my wishes !! And I know what that totally enclosed inside dart is called now – a contour dart. Thanks for the insight into production line sewing, of course these high volume operations aren't doing laborious tailor's tacks on each of the 500 skirts they sew in one day.
In the absence of a drill, I'm wondering if I can burn a little hole using a lit incense stick ?? I may have to experiment.
lore
x
LikeLike
~lore – just for you! By the way, don't set the house on fire – chalk pencil is fine!
LikeLike
I really really enjoy your tutorials – they are so helpful. Thank you for taking the time to construct them and sharing with us.
LikeLike
Very interesting and comprehensive – thanks so much!!
LikeLike
Wonderful tutorial. Thank-you. Everyone needs a refresher class once in a while. Also gets one thinking outside the pattern instructions (do I ever actually read those? hmm)
LikeLike
Wow, thanks so much for these tips!
LikeLike
Very useful tips. Thanks so much for your time and effort.
LikeLike
Thanks for such a great post – this was really interesting. I was particularly interested to see that you sew a smooth, curved line for contour darts rather than sew to middle dot, pivot, sew to other end…which is what my sewing teacher taught me! Smooth curves make so much more sense!!!
LikeLike
Wow i have just found your blog and i have to say what a great useful blog. I started making vintage clothes last year and im bumbling along working it all out but having fun. I do find patterns hard and follow them to start with then i change them to suit my own needs. But i am so pleased that you are there to give useful tips. I have tryed to follow you but for some reason it wont let me at this point in time. Take care dee 😉
LikeLike
I've been making my pattern darts like this for quite some time. I make the little hole using an eyelet buttonhole cutter.
Since I don't drill the holes into my fabric, I use a China marker (wax pencil) to mark the dot on the fabric. Works like a charm!
Thanks for the tip about aiming for the dot and then tapering to the apex. I had been aiming just past the dot, but I think your advice will work out better.
LikeLike
THanks for taking the time to write all this. Very useful. Thanks!
LikeLike
Sherry, thanks for this post, just saw it, I thought I was following you, but didn't see anything in my reader, so now I got that straighten out. It's so funny you did this post, I was in the middle of writing an email to you about this very subject, darts! I hadn't sent it yet because I wanted to send pictures. Anyway, thank you so very much!!! I am so thankful for this blog you are writing! It's one of the best I have ever come across. Such excellence information!
LikeLike
Thanks for the post.
is there any set-in-stone rule about how much the dart intake should be?
LikeLike
~Anonymous – every dart shapes a different area of the body so there is no absolute rule. There are 'average' intakes, for instance a front skirt dart is usually 2cm. But it all depends on the body shape you are fitting, for instance a person with a small waist might require a larger skirt dart, or a D cup requires a larger intake than an A cup.
LikeLike
I'm so glad I've found you! Thank you! some other questions about darts- what are the guidelines about which way a vertical dart should be pressed? and I love french darts- when are they best used and when not?
LikeLike
~Kimbersew – Vertical darts are usually pressed towards the CF/CB – if you look at a garment front-on, it is less visible. I love French darts too, and can't think of any specific reason when to use/not use them. They are trickier to sew as they are bias, but they look so nice combining the bust and waist darts into one.
LikeLike
Hi Sherry, what a great way to mark and sew darts. No more trying to get those leg dots to match! lol. I just have one question please – when you say taper, which way are you tapering? Curving in towards the edge like ) or away (. I can't see it curving one way or the other, just going straight to the edge.
LikeLike
~Vicki – the taper is very slight – at first you aim straight for the edge, and as you approach you curve slightly away from it – so there is no angle between the stitching and the edge, but a gentle curve instead.
LikeLike
I just had a DUH moment. I've always sewn the taperdart with an angle at the center. It should be a curve just like you've shown. I'm curved not angled. DUH where was my head. Thanks for pointing this out. Great tutorial
sdBev -sorry Google is blocking some of my logins. I've heard it happens to others as well.
LikeLike
Thank you for this wonderful information.
I have searched and it is very hard to find good information on French Darts.
I am working on a pattern and it appears the dot for the end of the dart is not on the pattern piece. As you've instructed should my dot “end 1cm short of the apex on the foldline”.
Where exactly should the dart end?…just below the bust? or where it actually looks better on me 🙂
Thank You
LikeLike
Hi Ann – the dot should be on the dart foldline, but 1cm short of the dart apex – this is because in the industry the dot is often drilled, and so the final stitching encloses the hole. Most commercial patterns have the dot exactly on the dart apex. The dart apex is usually 2cm from the bust point to avoid a cone shape, but we know how much the bust point position varies from person to person – and from undergarment to undergarment too! The position of the dart apex does need to be adjusted to suit your figure and undergarments – one of the benefits of sewing your own clothes!
LikeLike
Thank You so much for your reply.
I did work it out and your information was very helpful.
I love reading your posts, you have a wonderful blog 🙂
LikeLike
Thank you for posting this very helpful tutorial! It's just in time, too, as I just started making a sheath dress and was petrified of fisheye darts.
LikeLike
Thanks for posting this. I learned a lot especially about the contour dart. And I also, have noticed inaccuracy with dart markings on patterns. I will be referring back to this post in the future.
LikeLike
Wow! I have that dress! I have a very early (possibly the first) edition of it (I've seen that it was re-released a couple of times since.
I made it about a month ago and similarly changed the darts to better suit me. If only I'd seen your post back then as I'd have known I wasn't in it alone.
Good work 🙂
LikeLike
Thanks so much for your brilliant discussion of darts. Just what I needed.
LikeLike
I”ve been reading your post about sewing french darts and find it very helpful, but I have one additional question. On a Sagers pattern (sweater set) the french dart ended right at my apex – which I didn't like. I lowered the dart, which makes it a steeper dart. If I read your instructions correctly – I would lower the dot since I lowered the dart and then I would maintain the 3/8″ s/a all the way to the foldline of the dart and then curve towards the dot and off the end at that point?
Since I did shorten the dart – should I lengthen the space between the apex of the dart and then dot to which I sew? If so, by how much? I'm sewing a knit and I am fairly new to sewing with knits. Should I be stabilizing the fabric to keep it from stretching?
LikeLike
This is so smart. Thank you!
LikeLike
Thanks the information was very good on darts
LikeLike
Thank you so much for sharing all your experiences. I cam across your website while searching for invisible binding and have been going through the wealth of knowledge found on every page! I love the art of how to sew beautifully.
LikeLike