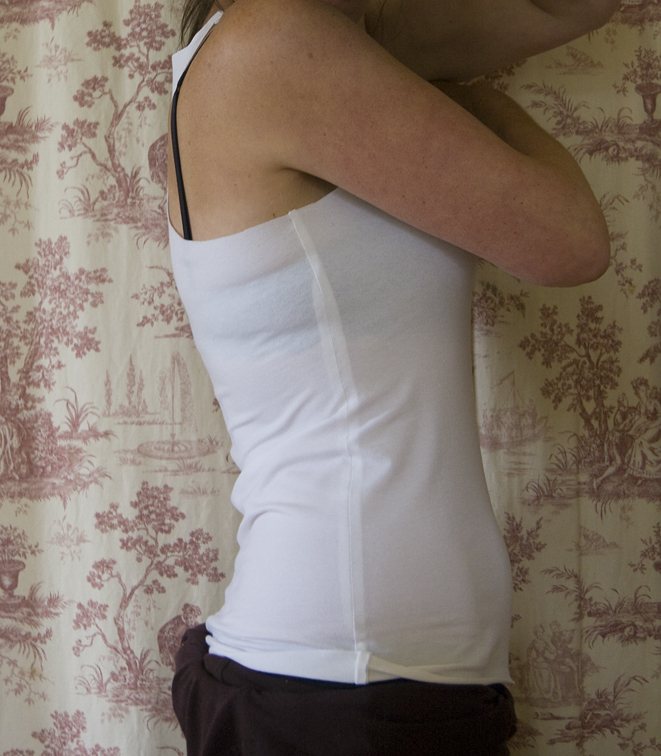
In my last post I mentioned that I did a sway back adjustment on my white tank top, and some of you asked how to do this on a back where there are no seams. Here I’ll show what I did, but I’ll cover some theory too for the geeks amongst us!
My alteration didn’t fix my wrinkles completely, so after lots of thought and reading I came to a few other conclusions that I’ll share. I’m as guilty as anyone here, but I think there are a lot of misdiagnosed sway backs, and sway back alterations are often done unnecessarily, and done where other alterations may be more effective – wrinkles at the back waistline are not only caused by a sway back!
So What Exactly is a Sway Back?
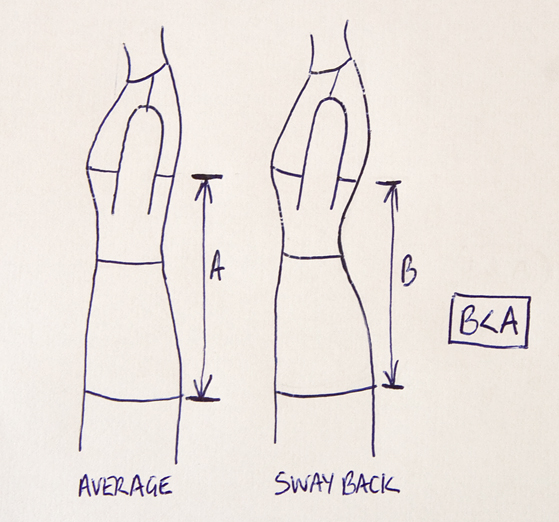
A sway back is where the natural inward curve of the spine at the back waist is exaggerated. It could be due to the backward tilt of the thorax, or the forward tilt of the pelvis, or a bit of both.
It causes the vertical distance between the bustline and the hipline to be shorter than normal at the centre back (CB). The side seam remains of normal vertical length:
How does this affect the fit of garments?
Essentially the centre back length (CBL) of the garment appears too long. The appearance depends on whether the garment is fitted or loose:
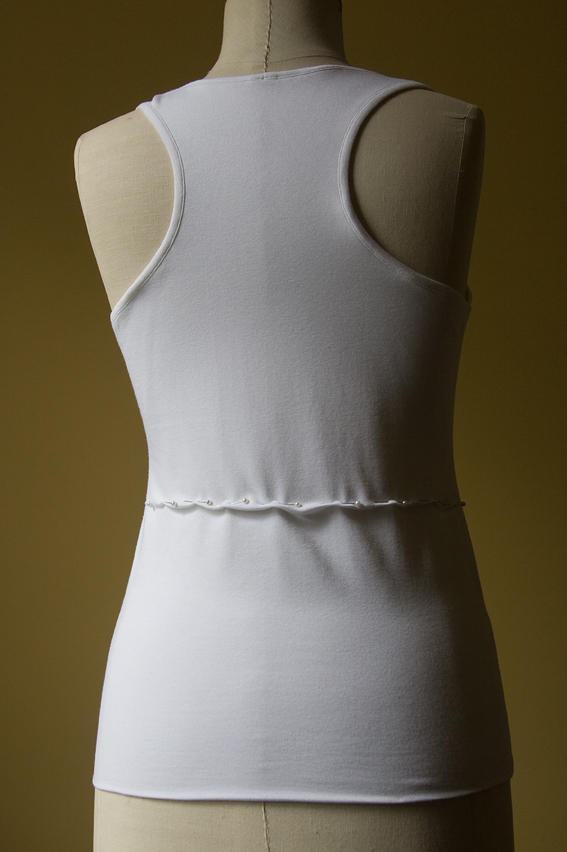
- In a fitted garment, horizontal wrinkles will form across the back waistline. With a sway back these wrinkles will be most pronounced at the CB, and they will stop short of the side seam which remains flat.

- Looser garments may balloon above the back waist, or the hipline/hemline falls longer at the centre back while the side seams swing forward.
Other issues easily confused with a sway back:
Browsing online, I have seen the following fit issues frequently confused with a sway back problem:
- A short (high) waistline – on a fitted garment this causes horizontal wrinkles that extend into the side seams and front bodice. To fix this the whole bodice needs shortening, not just the CB.
- A large back high hip, or prominent buttocks – tightness in these areas causes the fabric to “ride up”. The garment needs to be made wider in these areas to prevent ride up.
- An erect upper back – excess fabric length in the upper back may drop down to the waist area, and to prevent this the complete upper back requires shortening.
- A prominent front or bust – insufficient fabric length in the upper front may pull up the front waist, causing drag lines towards the back waist. The front needs to be lengthened to solve this, and often widened also.
- Looseness at the back waistline due to insufficient waistline reduction. The vertical dart shaping should be increased or sculpted for a closer fit.
- Diagonal wrinkles – these can be caused by strain from another direction, eg a prominent bust, or overshaped side seams. Waist reduction should be relatively evenly spaced around the body, not just at the side seams, to prevent these.
However a sway back can exist in conjunction with these fit issues. I also have a short waist, erect back, and a large back high hip. On my tank top, all these issues were contributing to wrinkles across the back waistline. In fact, a sway back was probably the least of my worries!
I recommend fixing these other problems before determining whether a sway back adjustment is required – it may not be necessary after all!
So – how do we adjust for a sway back if it is necessary?
Simple – we reduce the centre back length! The side seam remains unchanged.
First try the garment on and pin out the excess fabric in a horizontal tuck, beginning at the CB and tapering to zero at the side seams:
Measure the total length that you need to reduce – it is usually about 1 – 1.5cm (1/2″). If you need to reduce much more than this, I would definitely check that some of the fit issues mentioned above are not present.

In this example my folded tuck measures 6mm, so I need to reduce the CBL by 12mm in total.
The pattern alteration undertaken depends on whether the garment has a waistline seam, a CB seam or no seams.
For skirts or trousers:
Scoop out the upper edge of the back – this corrects the CB waist to hip measurement:

Before you cut, fold the darts closed so they maintain their correct shape:

At the CB, ensure the waistline and CB seam remain square:

For garments with a horizontal waistline seam:
Scoop out the bodice panel as well as the skirt, enough on each so the waistline seam remains in the correct anatomical position. Fold the darts closed before cutting and square the waistline at the CB like above:

For garments with a CB seam and no horizontal waistline seam:
Slash along the waistline and overlap your pattern at the CB seam the same width as your horizontal tuck:

Smooth the lines of the CB and side seams (blue dotted line):

The grainline will need to be redrawn – here I have maintained the grainline of the skirt so that it hangs correctly, for a top I would probably maintain the grainline of the bodice:
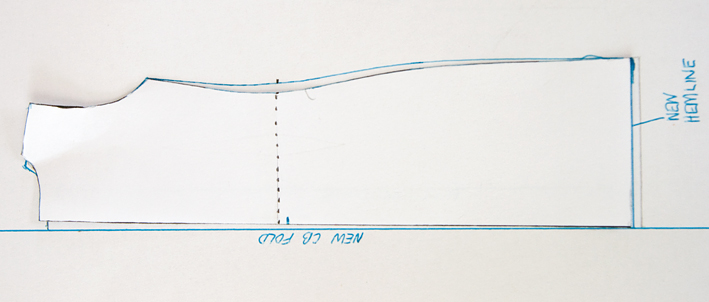
For garments with no back seams:
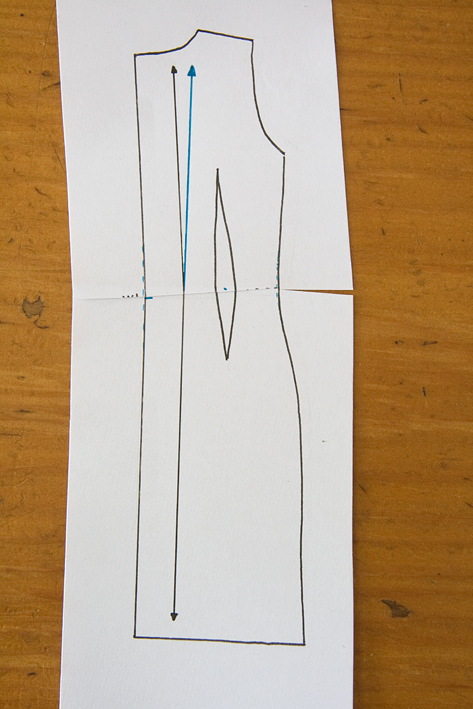
On the half-pattern, slash and overlap your pattern the width of your horizontal tuck as above.
Redraw the CB fold between the CB neck and CB hem:

Square the hem to the centre back:

Trace around the side seam to the CB neck. The CB neck should be square to your new CB fold if it previously was:

You can see the old outline in pencil, and that the back waistline is now larger. To alter this, match the underarm point and side hem points like so:
And redraw the new side seam shaping (line with a tick):

This method is basically what I use for seamless backs, and is the same as that described in Aldrich. But see how it also increases the back bodice width? To prevent this I usually redraw the side seam shaping from the hem directly to the shoulder point instead.
There is also another method I discovered, documented here. This produces a very similar result to mine, but I find the shoulder angle becomes too square for my liking. You might like to try it out to see what you think though.
More for pattern geeks:
If you study the end result of these last two methods for a seamless back (my modified Aldrich and the online one), you will notice that the pattern below the back armhole is actually unchanged in shape. All the change occurs in the shoulder and neck region, and the excess centre back length is effectively being eliminated from the top. This surprising (to me) revelation led me to discover an even quicker way – my adjustment is the equivalent of simply changing the angle of the shoulder and back neck to the rest of the pattern!
Here’s how – draw right around your pattern from hem to shoulder point. Then pivoting at the shoulder point, swing the CB neck point downwards by your required adjustment (ie 12mm) and then square the CB neck to the CB fold:

Done – you end up with exactly the same result, only more quickly!
I am really interested in hearing your feedback and experiences with sway back alterations too. What I do works for me – but I know we are all different shapes and sizes, so please comment and criticise as you see fit – pun intended! I think a lot of instructions are vague and confusing, and I want to compile a clear summary for everyone’s reference, so do ask if I have overlooked something or you have a query.
Let the discussion begin!
~ Sherry

Thanks so much for your detailed analysis and post. I usually resort to sewing separates for myself since I have both an erect and sway back. When I can deal with the amount of alteration needed on two pieces, it seems to work okay. But I have this lovely fabric, and really wanted to do a real dress with princess darts. After tucking out the excess length, I'd tucked out 2″ and had added significantly to the concave curve of the center back seam. Needless to say, the top of my dress pattern now looks horridly off-grain. I'm hoping one of the other suggestions you've supplied (misdiagnosis) will solve my problem… Thanks again.
LikeLike
Thanks for this post! I am making my first dress in many years and have a small fit issue in the back. Someone suggested I may need to do a sway back adjustment (something I've never heard of) and came to your post when searching. I would love it if you could take a minute to check it out on my blog and give me some advice. I have the body shape that it could be a sway back but the lines are diagonal and I'm thinking its from the shaping at the waist? TIA!
LikeLike
So would the swayback account for my front waist needing to be raised less than my waist at center back?
LikeLike
This has saved my day. Thanks Sherry 🙂 I hope you're doing well – you've been missed around these parts!
LikeLike
Thank you thank you thank you!
I have measurement-based instructions for a custom wrap skirt, and just in reading through them, I realized that I would have the same trouble I always have: the big old pucker just below the waistband. Personally, I like the curve of my back — it helps create the optical illusion that my butt is the same place it was when I was twenty. Which, of course, it is. (Shut up, it is too.)
But the pucker makes the skirt look tight across my hips, not to mention masking said optical illusion. It doesn't do anything helpful for the “yeah, so I've had children — you want a graphic description of what pregnancy does to your abdominal muscles? Picture the Red Flippin' Sea, OK? And the baby is Moses. So cut me some slack. Sheesh.” curve at the front, either.
But with the excellent visuals and instructions on that pattern and this tutorial, I feel very confident about making clothes that actually fit, with a little tracing paper and a minimum of mishegas.
Can you recommend a tutorial for short waist and full bust adjustments? (Yes, I am a rounded Missy Petite — I believe the technical term is “Scrumptious Dumpling”)
Thanks again!
LikeLike
What a good blog you have here. Please update it more often. This topics is my interest. Thank you. . .
Alterations
LikeLike
Thanks for this tutorial. I was fitting a corset and had wrinkles across the back. Your tutorial helped me realize it I was confusing a swayback adjustment for a hip adjustment. So I added hip gores to my corset and it solved the problem. I'm sure this isn't what you expected to help others with, but you did! Thanks. http://costumingdiary.blogspot.com
LikeLike
Hi. I really anjoyed this post about alterations, but I don't really get the one about altering for Sway back without a CB seam. When I have slashed, overlapped and redrawn the CB line, I don't really understand the part about squaring the hem to CB. When I do that I have to add the same amount of fabric that I just took out. What am I doing wrong???
LikeLike
It sounds like what you are doing is right! It might seem counter-intuitive, but you need to level the hem so it does not up at the CB.
LikeLike
Thank you for your illustration on how to true up the dress pattern after taking out the excess back fabric. You have made it so clear. I have spent ages reading other web sites and watching U Tube demos. but have been unable to find such a clear explanation.
LikeLike
Thank you Caroline – I’m glad you found it helpful!
LikeLike
Thanks, this was such a useful tutorial! I used your instructions fot the dartless version when making my Alexander McQueen dress. https://seedesignmake.com/make-sew-alexander-mcqueen-inspired-dress/
LikeLiked by 1 person
Hi- thanks for a wonderfull tutorial- the Aldrich book you mention looks very good !
I tryied to find the edition with fitting issues, but I am not sure what book it is- could you please make a link to it ?
(-: Zanna
LikeLiked by 1 person
Hi Zanna,
My 1986 edition has the fitting section near the front, before the drafting the blocks, and from what I have seen the later editions are similar. The fitting notes are only a few pages, very minimal!
LikeLike
This is so helpful – thank you!!! A quick – probably stupid – question: when you do the adjustment for a back without any seams then how much extra space do you end up creating around the shoulder blades? I think I need both a broad back and a swayback adjustment and I’m trying to work out which to do first or whether I should try to combine them…
LikeLiked by 1 person
Hi Astrid – I’d do the swayback adjustment which is lengthwise, before any width adjustments. Glad to have been of help!
LikeLike
Hello,
I’m not sure if this is my poor visiospatial reasoning, but I did the away back adjustment and I still have the exact same wrinkles. If we take length out at the small back and then replace it at the hem, aren’t we just recreating our same issue? I’m going to retry with removing the length from the hem and if that fails I’ll try a full bust adjustment, but my pattern is meant to accomodate my bust. Help!! 😦
LikeLike
Hi Jessiandcalista – the length isn’t replaced at the hem, instead the hem is levelled so that it goes straight across at the CB. If the wrinkles still remain your fit issue may not be a sway back, it could be some of the other issues I listed at the beginning. Good luck!
LikeLike
Your final observation about simply redrawing the neckline and shoulder are PERFECTLY in line with the recommendations from my book, “Sewing Made Easy” by Mary Lynch and Dorothy Sara. On page 116, they write, “If the blouse is baggy at the lower back—This should not happen if the blouse pattern has been carefully fitted, though you may find it in ready-made clothes. The side seams and the shoulder seams should be opened and the back raised. Pin-fit the side seams. Recut the back neckline and shoulders from the pattern.”
LikeLike
Thank you! I was searching around to see if it would be ok to change the grainline after a 1/2″ wedge dart – seems that’s ok to do. But now I see that I can just take the dart at the waistline seam (duh) – not sure why I missed that one. I guess it was because the excess was higher than the waistline by a bit so I assumed I needed to wedge it out at the point of the pins. Anyway, I’m just now working on a princess seamed dress with a waistline seam and thankful that I didn’t start cutting until I searched around for the proper pattern work for this sway back business.
LikeLike