The Ruby Slip bodice is drafted for a B cup, and in this post I’ll show you how to enlarge the cup size for a larger bust.
For each increase in cup size, you need to add an inch to the front. Because the pattern pieces are only half a front, we need to add half an inch total to the pattern pieces per cup size. If you regularly do an FBA, you are probably already aware of how much to add!
Altering for a full bust involves adding not just width to the pattern, but length as well. This is because a larger bust has a longer Neck Point – Bust Point – Waist length than a smaller bust.
Here are the pattern pieces:
 |
| I’ve cut my pieces directly from the pattern sheet, so excuse all those lines! You can ignore all lines except the Centre Front Line. |
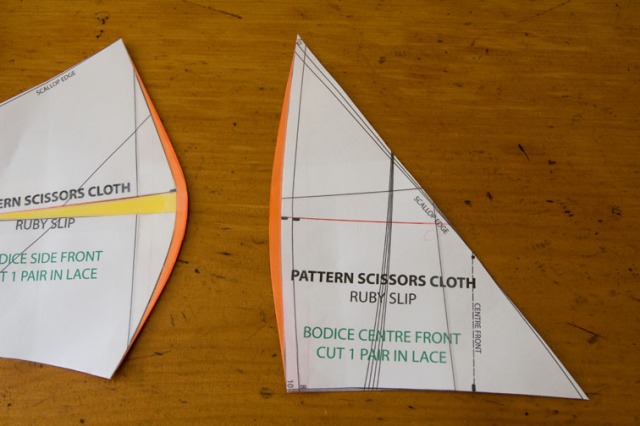
On the Bodice Centre Front, square across from the Centre Front Line to the notch at the bust point (red line):
Do the same thing to the Bodice Side Front, this time squaring from the side seam:
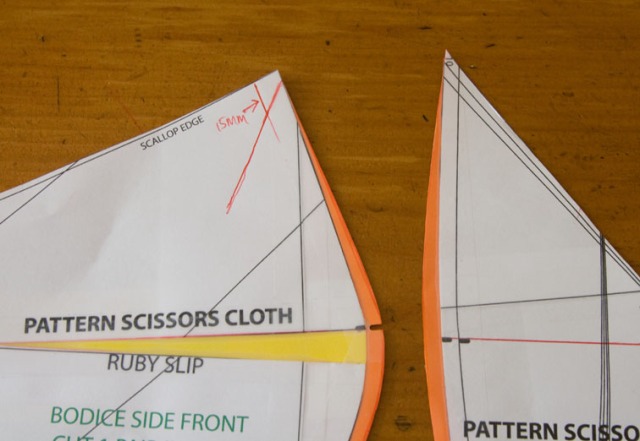
Mark the 1cm seam allowance at the side seam, and slash to this point from both sides:
Spread the pattern the amount you need to add vertically to the cup, and tape in place:
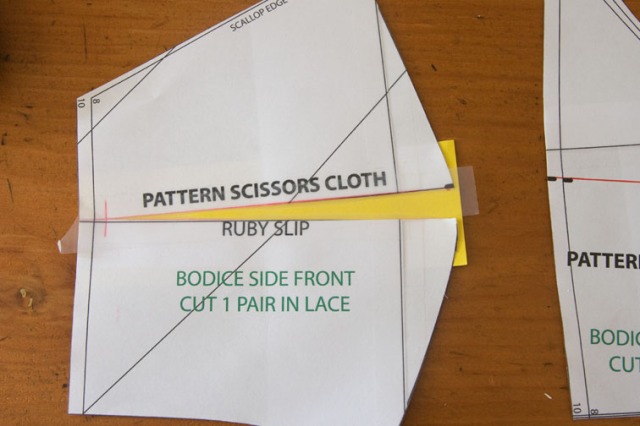 |
| About 1/2″ per cup size should do it. |
The next step is to add some width to this piece:
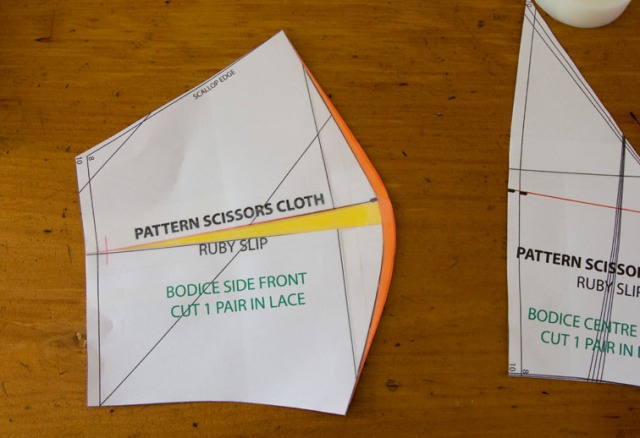 |
| Add 1/4″ per cup size to the bust point, tapering to zero at the upper and lower edges. |
The same amount of width is now added to the Bodice Centre Front:
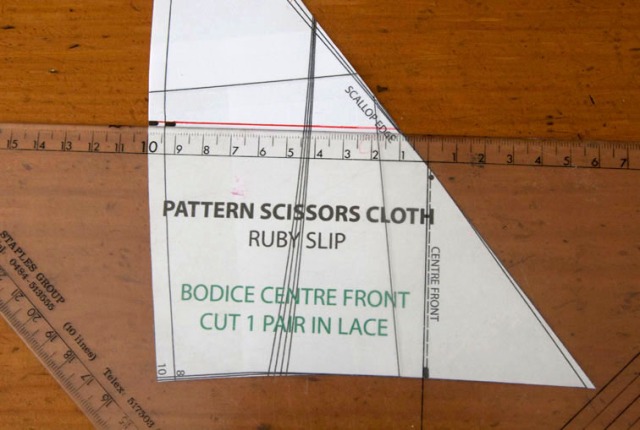
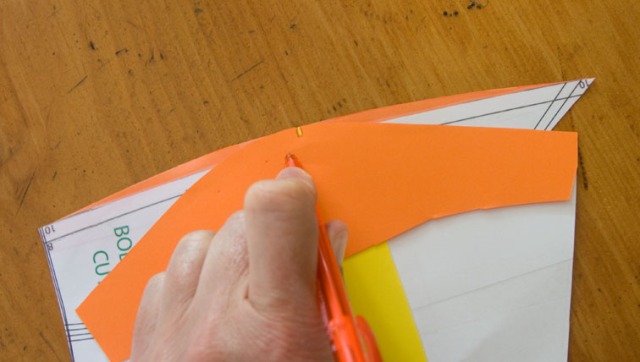
The last major step is to increase the Bodice Centre Front length. Determine the amount it needs to increase by first lining the pieces up at the lower edge as if you are beginning to sew…:
…then pivot the pattern along the seamline (not cutting line) – I press down with a pen on the stitching line as I pivot the upper pattern piece along the seam:
When you reach the end, the difference in length of the stitching lines is the amount we need to increase the CF length by – in my case 15mm:
Slash along the red line and spread the pattern by this amount:
 |
| Square a line up from the slashed line (arrow) so you don’t move the piece sideways as well |
Redraw the CF neckline, starting at the upper stitching line, and intersecting the CF dot – so this point on the body does not change:
Notch the Side Front at the bust point:
And pivot along the seamline to determine the notch position on the Centre Front:
Here are the final pieces:
The angle at the side seam should really be filled and smoothed into a gradual curve – this example only needs about 1mm but larger increases will require more.
Sidenote 1:
Now, if you are enlarging by more than a couple of sizes, the new shape of the seam on the Bodice Centre Front will start to look too accentuated. The shape of this seam is important as it will be how the seam appears on the body. If this is starting to look too curvy for your liking, add the 1/4″ not just to the bust notch but to the upper edge as well, like I have done in green:
To retain the same fit along the upper edge, you will need to shave this additional wedge off the Bodice Side Front. Yes, this piece gets even curvier, but that is cool – it is your shape!
Note that this also widens the strap placement, so consider that if you have narrow shoulders.
Sidenote 2:
Another important point to mention for larger cup sizes is that the underbust seam has to be large enough to slip over your bustline.
To check this, measure the pattern from the Centre Front Line to Centre Back Line, omitting seam allowances, and double it.
Wrap your tape measure around your under bust area and holding it fixed at the pattern measurement, slide it up over the bustline. If it doesn’t go, you need to add more to the underbust line!
To add an extra 1″ total to the underbust, add 1/4″ all the way down to the underbust seam, as shown in red here:
If you do this you will also need to alter the Front Skirt by cutting the part above the waist in the next size, and tapering the side seams gradually to your true skirt size at the waist/hip.
Well, that must be one of the most colourful patterns I’ve produced!
Don’t forget you can whip up a quick bodice calico if you want to check the fit before cutting into your lace – it will only take a few minutes and will ease any lace-cutting nerves.
Good Luck!









how to make it smaller?
LikeLike
darlene – to make the bust cup smaller, you would overlap the pattern instead of spreading, and remove width instead of adding.
LikeLike
Sherry – I love this. I did a post yesterday where I showed my version (I couldn't wait to try to figure it out.) Admittedly, I'm increasing this pattern by a number of sizes – 4 or 5 – but my “solution” was quite different. Needless to say, I think I'm going to use yours! Actually, I got the side back piece in the right shape. It's the front piece that confounded me. I'm going to do your method and see if I can get my piece to look the same by moving the dart out of the way.
The interesting thing about the FBA (and the kind of shape that requires it) is that the narrower one's frame, the less of an FBA is actually needed, despite the size of the chest. The back size takes up some of the slack, in my experience with both homemade garments and RTW.
Anyway, thank you for the tutorial!
LikeLike
Fantastic! I was sitting here with my cup of coffee (it is 10 in the morning here in Florida!) adjusting my pattern and thinking about your skills as a designer and seamstress. This is a post I'm going to print (with your permission) and keep it in my library. Thank you for your generosity!
p.s. my pattern is ready for my muslin or bodice calico as you say!
LikeLike
I forgot to mention that you should write a book girl!!! I would buy it in a flash!
LikeLike
Sherry you are so thorough and so generous with your time and talents. I agree, write a book!
LikeLike
Thank you for such lucid instructions on making a full bust adjustment! Your photos are much more understandable than the meager illustrations in my pattern books. And, thanks for reminding us that extra length as well as extra width may be necessary. I always feel so sorry for those girls and women wearing rtw tops with a seam bisecting their bosom horizontally, the seam that was supposed to snug up underneath to showcase the narrowest part of their torso. Looks uncomfortable.
LikeLike
Excellent tutorial.
LikeLike
I have done my wearable muslin in viscose lining and stretch lace. I had to widen the skirt with 1.5 cm at both sides and lengthened the shorter version with 5 cm. The upper bodice was too wide in the upper part so I took in it 2.5 cm:s. Now I am satisfied and think it will be perfect with my new jersey dress.
LikeLike
Hello Sherry, thank you for sharing your nice pattern. In Holland we have a forum, how to sew lingerie, we would like to sewalong.
http://www.zelflingeriemaken.yourbb.com
Can we send our pics, when we are ready?
Kind regards,
Diana from http://www.poetsie.blogspot.com
LikeLike
Diana – yes, I would love to see your pics! I will start a Flickr group, and maybe a reader gallery too!
LikeLike
Hi Sherry, I’ve just come across your blog. Fantastic and I will use this method to make a bodice for a wedding dress. I was wondering how much extra do you need for say DD cup size please? Thank you in advance, Clare
LikeLike
Thanks for great FBA. I’m G/H cup. 39″FB, 28″UB. I might be able to make it loose enough to fit over my bust (at my age my bust is pretty squishy), especially for a night gown where I don’t need close fit. If not, could I make skirt in knit, with elastic under bust maybe)?
LikeLike
I think elastic under the bust is a great idea Karey! You could add the room you need and draw it in with the elastic, and it need only be on the front.
LikeLike