What started as a cute-dress-to-whip-up-quickly-on-a-whim-out-of-stash, turned into a time-consuming-extravaganza-of-couture-construction! But it’s worth it don’t you think, just to have this in your wardrobe?
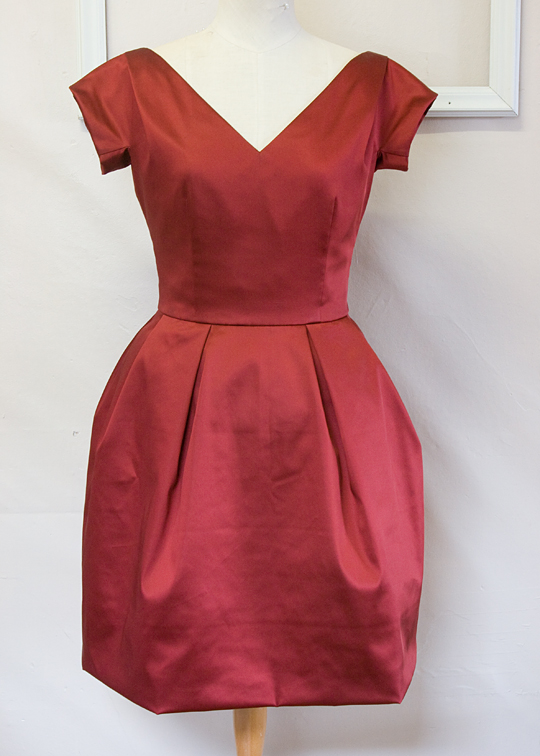
Even if you have absolutely no proper occasion to wear it – lol!
I’m really pleased with the outcome – no toile, a complex fitted bodice – and it fits perfectly! (As opposed to three toiles, a simple loose fitting shift – and blah.) I was worried about the length and the fact it shows my knees, but the full skirt is sufficiently doll-like to draw attention away from all that – I hope!

For sewing fanatics I have more construction details, following on from these earlier posts about this dress:
- The Totally Unnecessary Cocktail Dress
- Underlining with Silk Organza
- Kimono Sleeve Gussets
- Progress Report: The Totally Unnecessary Cocktail Dress
A handy cutting tip
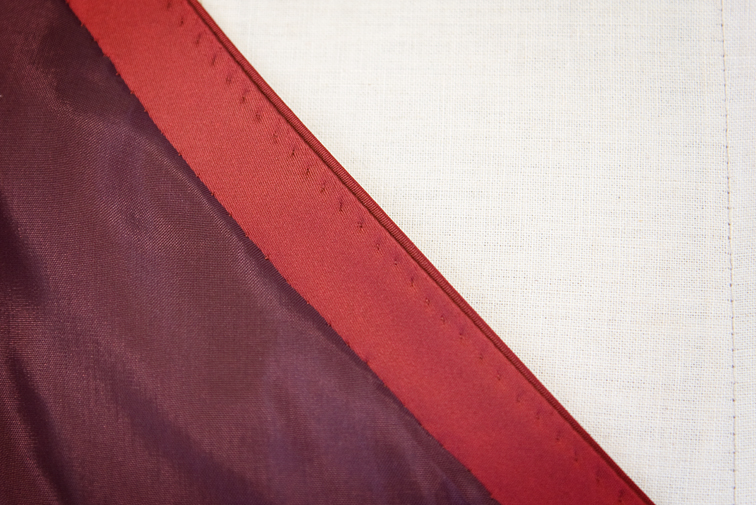
When I laid up the fabric, the selvedge was tight and prevented the fabric from laying perfectly flat – see the wrinkles along the selvedge:

This can cause inaccuracy in marking and cutting, so if you clip the selvedge at intervals along the piece it releases the tension, and voila – flat fabric:

You only need to cut the selvedge, not into your useable width. This fabric was quite distorted, so my clips are quite close together, usually you can space them further apart.
The hem

There was no lining pattern with this dress but you can make it easily – here’s how:
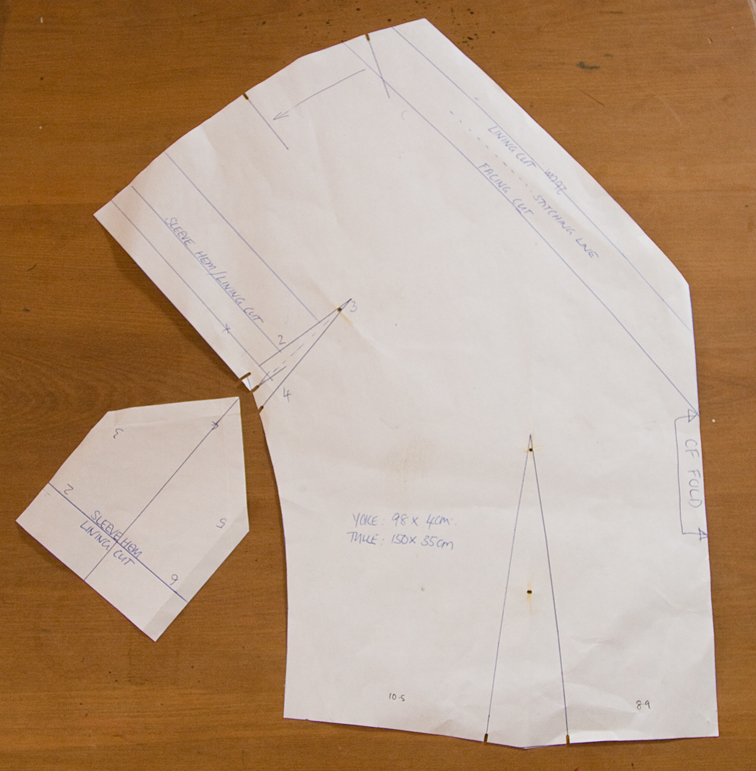
Mark the edge of the neckline facings on the bodice patterns. As this line is the cut line of the facing, we need to add two seam allowances to it to arrive at the cut line for the lining:

You’ll need to do the same for the sleeve hem and gusset panel too. Then cut the excess away along the lining cut lines and you will end up with your lining pattern.
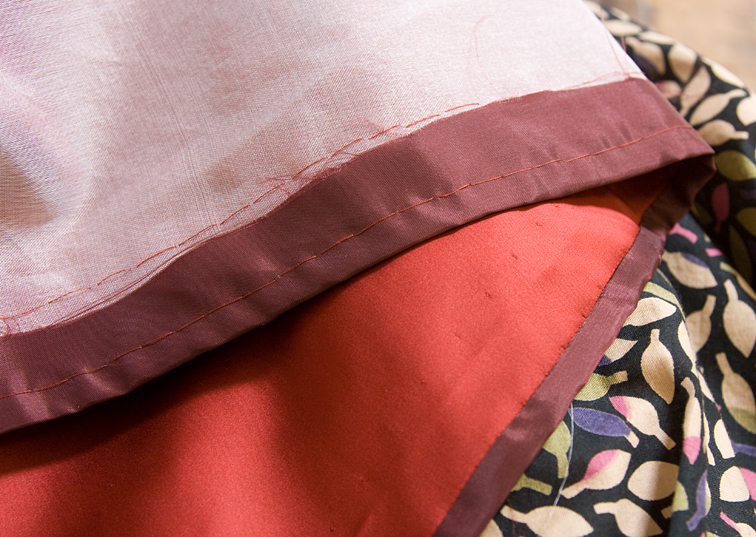
For the skirt lining, use the same pattern as the shell, but shorten it the hem width, ie 5cm. And then you’ll need to shorten it a further inch. Why? Because I found out through personal experience, that’s why! The skirt stands away from the body so much that the lining naturally hangs a bit lower.

In this picture you can see how much the underskirt fills out the upper layer, and consequently the lining looks too short. But turned right side out with the netting over top, it is the correct length. I didn’t quite have enough lining, so I added a border of lace to the lining hem.
Make up the lining the same way as the dress – yes, that means sewing all those gussets again! The seam allowances of the gussets were edgestitched down this time:

Don’t look too close – I sewed them at night under poor lighting so they aren’t very neat!
Previously I had understitched the neck facings by machine, but then decided I needed to tape the neckline, so I unpicked the understitching, inserted tape to the pattern measurement, and redid the understitching by hand – using a pickstitch:
I had to handsew the lining in because the facings had all been catchstitched to the organza underlining. I pressed under the sleeve and neck edges on the lining and fell stitched them to the facings.
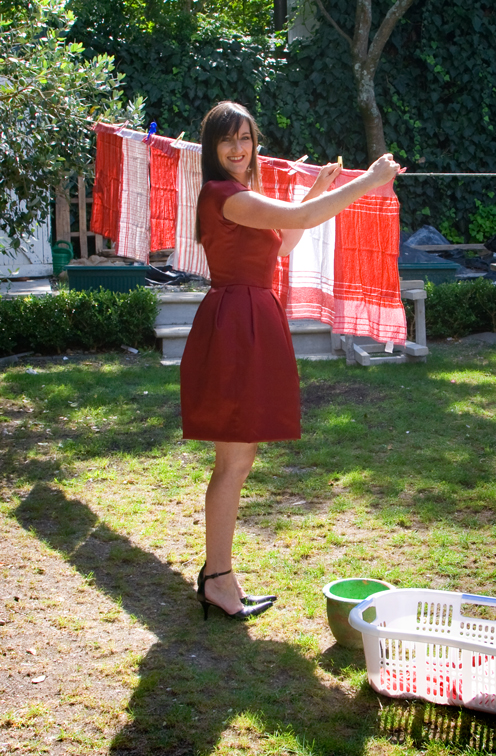
I did all this handstitching out in the back garden one idyllic sunny afternoon, laying a picnic blanket out on the lawn, and the dress out on the blanket, and I sat there handsewing like a happy tailoress – it was fun! The cat lay next to me for a while until she decided the net underskirt was just too tempting, and with one eye on me and one eye on the net she sneaked onto it and curled up into a happy purring ball. When I tried to move her she growled, and let me tell you past history has proven it was best to leave her be. A shake of her food-bowl a little later did the trick!
The underskirt
I followed the Burda instructions – cut a rectangular yoke in lining and attached net to the bottom. The net is considerably shorter than the skirt, giving the skirt it’s bell silhouette:

Two rows of gathering thread were used to gather up the tulle. I quarter it, which makes it easier as you have thread ends marking your CF/CB/SS, and with the shorter threads you are less likely to have them snap on you! Backstitch at the start of each quarter, and leave tails at the finish – so when you draw up the tails the backstitch holds one end fixed and you don’t pull a thread right through!
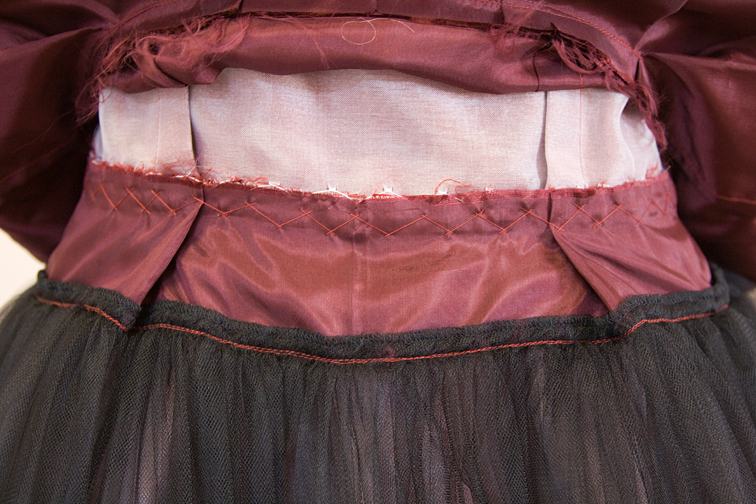
The underskirt yoke was then catchstitched to the waistline seam, placing the tucks at the same position as the skirt tucks. Perhaps I should call this the Dress of Many Colours – I was a bit lazy about changing thread colour throughout this dress, and the white organza just adds to the rainbow effect don’t you think?!
The zip
I hand-picked the zip in this dress, partially because I happened to have a 60cm dress zip in my box from decades ago that was close in colour, but also because I thought this dress was crying out for such a vintage detail. I was a bit concerned about the stitches being really obvious in the satin, but they sunk into the cloth quite well, although it was difficult to get them looking regular:

I wasn’t happy with gaping at the top and the waist seam, so I removed it and resewed leaving room for a hook and eye, and more overlap at the waist. My verdict on the zip – it makes the dress look homemade, I should have used an invisible zip.
My verdict on the dress – I love it, and it was such fun to make!


WOW!!! The dress looks absolutely STUNNING! I love it so much! Thanks for documenting all the amazing steps you took. I love seeing the couture details! And I love the photos as well! You look fab!
LikeLike
AMAZING! It is gorgeous, and you look stunning. I love the inside details too. So worth your effort.
LikeLike
Sherry, the dress is over-the-top gorgeous and you are stunning in it. The color is perfect for you. I can understand sewing something time-consuming and enjoying the process. Sewing outdoors in the sunlight? Um, yes, please!! And I adore your naughty cat! My favorite photo includes kitty and the fun juxtaposition of a cocktail dress and linens hanging out to dry.
When the occasion arise, enjoy wearing this beauty!
LikeLike
This dress looks fabulous on you. Not to short at all. The inside of the dress looks just as fabulous. Great work.
LikeLike
Awesome, awesome dress – well done and thanks for sharing!
LikeLike
It's gorgeous even on the inside. You look fantastic in it too. I hope you have somewhere sufficiently fabulous to wear it soon- you deserve it and so does the dress!
LikeLike
This is totally beautiful, inside and out. And it looks perfect on you.
LikeLike
Sherry, you are so generous. I know how much time you must have put into illustrating and writing those post. Your dress is a gem. I am so happy I found your blog. I will learn a great deal from you. I love that picture with those dishcloth !!! Wonderful blog thank you again !!
LikeLike
Lindo de morrer!
Girl, with this dress, the occasion is you!
LikeLike
Beautiful! It looks just as fabulous inside out. I like the handpicked zipper. I've always like the way they look.
LikeLike
That is totally gorgeous!
LikeLike
Fantastic dress, and what great photos you take.
LikeLike
Wowzers! This dress is STUNNING!! You should throw a party as an excuse to show it off.
LikeLike
Beautiful dress!
LikeLike
That is a gorgeous dress and so inspiring. Thank you so much for details of the make and tips like cutting into the selvage. I would love to attempt something like this one day. One day…
LikeLike
Sherry — this dress is perfection (including the hand-picked zipper, which you seem not to like)! And thank you so much for the super-awesome intermediate construction step posts — if I weren't a sewing nerd before, they made me into one. I read them like a “smut” novel — delicious! I have had this dress ear-marked as “to make” for, ehm, a couple years now, and it's going to be so much more fun to work on it while following your tutorials, which will make the process just as enjoyable as the final product.
LikeLike
What a great dress! i love the tulle underskirt and the lining, thank goodness for blogs so we can enjoy details like that, as you can;t very well show that off when you do get to wear it to the theatre!
LikeLike
This is amazing! I especially love the skirt!
LikeLike
Beautiful colour and what a fun photo shoot that must have been to dream up! I love the fitted bodice and the contrast of the full skirt. Now you and your husband will have to think up a dream date to take it out on!
LikeLike
I am blown away by all the details in this dress. The fit is superb and the color is incredibly flattering on you. If I had this dress, I'd almost want to leave it out on a dress form all the time and use it as art. That is…when I'm not wearing it!
LikeLike
Your dress is so beautiful, inside and out! You definitely need somewhere to wear it. ;]
LikeLike
Wow! Beautiful! I love that your dress could be worn inside out because of your workmanship. Lol you hanging up laundry while wearing your dress. Funny girl! Oh maybe you will get invited to a ball or something! Congratulation on a stunning garment!
LikeLike
Beautiful! I hope you find lots of occasions to wear it!
LikeLike
Absolutely stunning – perfect pattern and colour for you. Please do wear it out. A dress like this cannot be left in the cupboard – too beautiful, and the construction details were so informative – a great post, yet again, and inspiration. Thank you.
LikeLike
Sherry your dress is amazing – as is that colour on you! Fab work :)! And thank you for sharing all the photos and steps with us.
LikeLike
I think it's the perfect backdrop for a lovely dress!
LikeLike
Wow! The dress looks amazing. Thanks for taking the time to take photos during the process and writing it all up.
LikeLike
Beautiful. Thanks for the construction notes.
LikeLike
Beautiful dress! looks wonderful on you
LikeLike
Absolutely spectacular! Most important – you look wonderful in it. And now, should an occasion arise – you're ready to party.
LikeLike
What an amazing dress! So much detail and careful time put into it.
LikeLike
I think it is gorgeous and so are you . When I went to the National Gallery of Victoria a while ago and went to the fashion section I saw a collection of Haute Coutue Cahnel suits which had been donted by a lady whose mother had worn them EVRY DAY!!!!! So go ahead and wear that extraviganza to the supermarket . Maybe you could have some fashion fun by adding some Doc Martens and leggings . ?????
On another front I have signed up for your coat sew along and am looking forward to this greatly . I also have a great yearning to understand how to get the sixties stand away collar using a basic bodice block . What does one do to an ordinary flat collar pattern to get that standaway look. Do you know ?? ,Thanks for you great posts Mem
LikeLike
Simply Stunning.
I love the color and your generous tutorials.
You will wear it!
I have made this dress twice and I am planning on making it again some day!
Thank you.
LikeLike
Oh my gosh. It's amazing! Ah-may-zing.
Love the colour and I like the detail of the hand picked zipper! superb 🙂
LikeLike
You really look like a doll 🙂
The dress is amazing!
LikeLike
The dress is beautiful and it looks wonderful on you. You will definitely have to come up with a place or occasion to wear it.
LikeLike
This is absolutely stunning. The sophisticated cinnamon color and shorter length definitely keep this from being doll-like. Here's hoping that you get a chance to wear it soon outside of your backyard!
LikeLike
Love it, of course. It looks like you'v found the perfect event to wear it too, as well! Well, I think it would be perfect for vacuuming, too… 😉
LikeLike
Hear Hear to all of the comments above! It is stunning! One question…is there any chance you could briefly discuss what a particular stitch is ie. you mention prickstitch and I have no idea what that is! Im in the coat sew-a-long am am really looking forward to learning from you (as long as the vintage coat pattern arrives here from the US post haste!
LikeLike
Lovely dress!! I don't think the zipper makes it look homemade at all!
LikeLike
The dress looks beautiful! I really think you should make a booking at some swisho restaurant, just because!
I'm a lover of invisible zips too… and don't really understand the fascination with pickstitching a dress zip purely as a “vintage detail” when invisible zips are available and so very superior! Even on genuine vintage dresses I've seen in exhibitions I feel the zip often lets the whole dress down. But you did a really beautiful hand-stitching job of your zip, so congratulations!
LikeLike
Its fabulous Sherry. What an amazing amount of detailed work … the end result was so worth it! Now you must find somewhere suitably special to wear it. Thanks for sharing the journey, I really enjoy your blog posts.
LikeLike
If only I could sew as beautifully as you. That dress is stunning!
LikeLike
You did a lovely job on this! And hey, even if it's totally unnecessary, I think you're justified since you're using up your stash to make it!
LikeLike
Your dress is a work of art and you look fabulous in it!!
LikeLike
My Dear, you should have absolutely no regrets on this dress! Superior sewing, wonderful fit, the fabric is beautiful and you look stunning in your couture detailed garment. BRAVO!!
LikeLike
The dress looks great! The color and the style really suit you so well. I think you'll find an appropriate occasion to wear it, without a problem!
LikeLike
This dress is stunning, and you look fabulous in it.
LikeLike
Sherry-It's so refreshing to meet someone who cares as much about the inside of a garment as the outside. I've constructed both RTW, couture & costume and I can really appreciate you attention to detail. You were obviously desiring to learn and instead of taking 'shortcuts', you dove into the pattern and made it the way it was designed.
Some of those skill are lost on some of the new designers. Don't get me wrong…I love a quick made outfit just like N E one, but the attention to finishing, even w/o couture details is much appreciated even in RTW.
I made Vintage Vogue's 2903 and it had some very interesting techniques going on with the yoke and sleeve set ins.
http://voguepatterns.mccall.com/v2903-products-4894.php?page_id=850
And one other thing….
You could wear this dress even 1.5 in shorter!!
You've got great legs!!! ala Jennifer Hudson…http://concreteloop.com/tag/jennifer-hudson (see video from DWTS)
LikeLike
I adore your dress.
And I love the handpricked zipper. I put in all my zippers by hand.
Just a beautiful post.
Thankyou.
LikeLike