Earlier this year I made this dress in a dark plum viscose georgette, and I have never shown you, because other than trying it on for size, I have never actually worn it!

It really needs boots to give it an edge, and my wardrobe lacks a pair of them at the moment, so the poor thing sits there in the back of my wardrobe a bit lost and lonely and semi-forgotton…..
Anyway, I took a few photos while making it so I could make a tutorial on how to attach a shirt style cuff. This is a method used in manufacturing – there is no handsewing involved and it is so quick you’ll be wondering if you left out a step!
The cuff I am attaching is a narrow one piece cuff, where the lower edge is folded, but you can easily attach a two piece cuff the same way.
- Press the seam allowance of one long edge of the cuff to the wrong side. This edge will be on the outer cuff when finished, and often on shirts it is simply stitched down at 6mm.
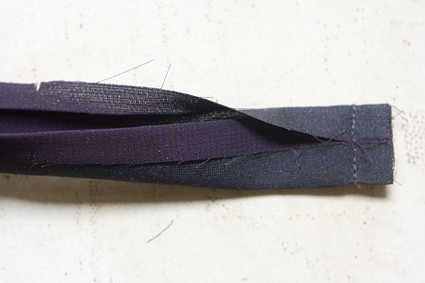
- If your cuff is one-piece like mine, fold it in half lengthwise, right sides together. Then fold the seam allowance of the unpressed long edge around the pressed edge, towards you, as shown. Stitch across the end, and do this for both ends of the cuff. (You can see I pressed both long edges by mistake, it is best if you don’t do that!)
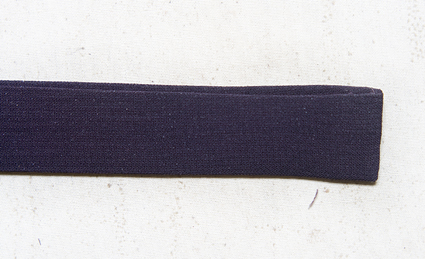
- Turn the cuff and press – the inside edge should be 1-2mm wider than the outside edge:
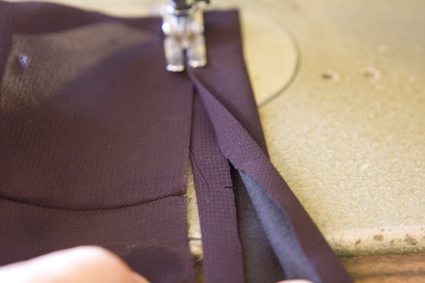
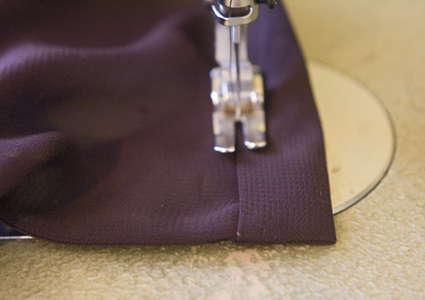
- Slot the lower end of your sleeve into the cuff to begin edgestitching. Because the inside edge of the cuff is slightly wider, it will automatically be caught when you edgestitch. Make sure the end of the cuff wraps around the sleeve vent neatly, and that the raw edges are lined up inside the cuff so your seam allowance is accurate:
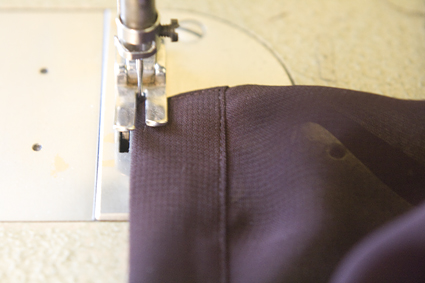
- As you edgestitch the cuff to the sleeve you can align any notches, such as this one for the sleeve seam:
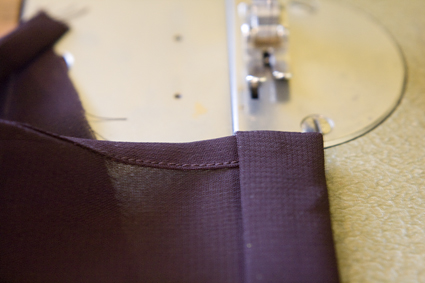
- As you reach the end, ensure the end of the cuff wraps neatly around the sleeve vent again:
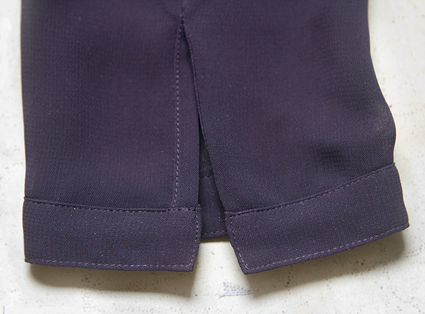
- You can either stop stitching at the sleeve vent, or continue edgestitching right around the cuff:
- Just as I did on this one:
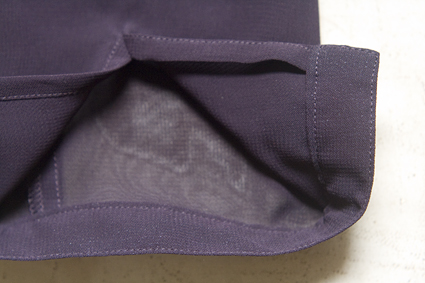
- And see the inside? The inner cuff is automatically caught in your edgestitching and looks really neat – no handsewing required!
-
Check your pattern pieces fit accurately! Line up your cuff pattern with your sleeve pattern and make sure they match – you will be surprised how many patterns don’t. Remember to account for the sleeve vent and any pleats.
-
And blockfuse your cuff pieces for cutting accuracy.
-
Note the lack of pins in these photos – you don’t need to pin everything before you sew it! Not only is pinning time consuming, it is also less accurate as it prevents the fabric layers from lying truely flat. Scandalous, I know!

That looks very neat. And you have a point about the pinning. I pin everything, but many times those pins are getting in the way more than they help 🙂 I can't wait to see that dress on you, I think it's gorgeous!
LikeLike
(Sorry a typo, estrou using a google translator.)
Sherry Hello, my name is Eilan, I'm Brazilian, and I follow your blog every day, I am very glad you're posting again, I love the way you do the finishing of parts and as the details are perfect. You inspired me to try to tailor pieces to me, with quality and good taste.
Hugs
Eilan
MT – Brazil
LikeLike
Wonderful technique – thank you for sharing…and please, please show us the dress – it must be gorgeous, love the design and colour!
LikeLike
This method is just a tad different from the way I attach cuffs, but this looks even easier and better. Next shirt – I'm trying it your way! Would love to see the actual dress!
LikeLike
this is slightly different from how i do, may be i shall try it this way when i sew one for my hubby dearest
LikeLike
Thanks for the tute, I have always done cuffs like waistbands, sew one edge to garment, fold over and ditch stitch from the right side, but now you have elimated one step for me thanks!!
I also agree that no pins is the best way to sew, I almost called my blog Look Mum No Pins!
LikeLike
Great tutorial – thanks so much. I think it's very tricky to get cuffs looking neat – I'm definitely going to try this way.
LikeLike
Nice tutorial. Some weeks ago, I took apart one of my boyfriends old shirts and noticed that the cuffs where sewn in the same way as you describe. It looks much easier than the way I have usually done this – I wish I had known about it a couple of years ago when I sewed a lot of shirts and always struggled with the cuffs and collar stands. I think you can do something similar with the collar stands?
LikeLike
Thanks for the tutorial! Can't wait to see your dress!
LikeLike
Thanks so much for this . I have been workingf on perfecting collars and cuffs . I have just worked out plackets and have been getting lots of collar attachment methods happening . Could you use this method to do a collar stand onto a shirt? I would really LOVE a tute on that too. How do you do it?You have so much to offer us amateurs . Thanks for taking the time and effort to do this . Marianne.
LikeLike
Ooh – I forgot to mention that you can also attach the cuff with this method by stitching in the ditch from the right side, for when you require no topstitching.
~Gry and mem – I do use a slightly different method for collar stands, and will do a tutorial one day. I find it easier to attach the outer collar stand to the neckline before edgestitching, as the neckline is curved.
LikeLike
Hello , Thanks for answering so quickly.So you attach the outer collar and then stitch down the inner collar to cover the seam allowance ? I have tried that and find it hard to get really even stiching on the inside and outside collars.Any advice ? Mem
LikeLike
~mem – I press under the seam allowance of inner collar, stitch both together with collar between, stitch outer collar to neckline, then edgestitch everything in place. Ensure folded edge of inner collar meets stitching line of outer collar and your edgestitching should line up on both sides!
LikeLike
Hello Sherry!
I'm well aware this counts as blog necromancy, commenting on a post three years later, but it's just burning under my nails… do you still remember what pattern you used for this dress? I kind of fell in love with the picture while going through your archives (no half-measures here!), but haven't seen you talk about it or show off the finished garment anywhere. A pity, I'm sure it's lovely. A bit ambitious for a beginning slap-dash sewist, probably, but who doesn't like a challenge?
I'd like to thank you for all the tutorials and tricks and resources you provide with your blog. It's much appreciated!
Cheers from a German girl who spent half a year in NZ and would love to go back some day!
– Charleen
LikeLike