Yesterday I managed to get my trenchcoat cut and fused. There are so many bits and pieces! I almost completely forgot the epaulettes and the belt – luckily there was still a piece long enough to cut it in one piece. I thought I had plenty of cloth, but there is practically none leftover. Plus there is a couple of muddy cat footprints on the L front facing. I am sure Tiggi thought I laid the fabric out just for her, she walked straight down the middle like she was on the red carpet at the Oscar’s.
I’ve chosen to have a collar with a separate stand on my trenchcoat, rather than having the collar and stand cut as one. It is going to have hooks and eyes to fasten the CF collar stand and will look something like this, so I can wear it open (L side) or closed (R side):
Then I can live out my spy coat fantasy!
I thought I’d share how I drafted the collar and collar stand, and just in case you prefer this style collar to the one on your pattern you can do it yourself – it’s really easy!
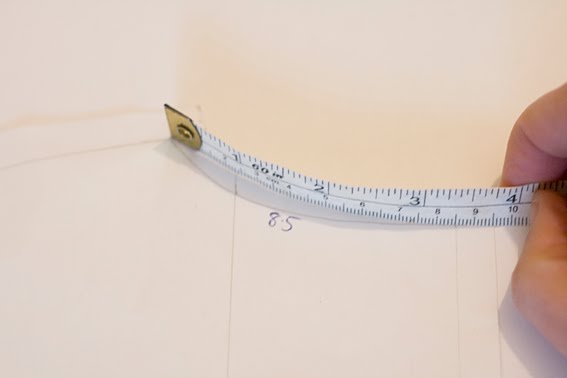
First measure your front and back neckline:
Measure the stitching line only excluding all seam allowances (I needed an extra arm here – the tape measure wouldn’t stay on the stitching line and it looks like I’m doing it a bit wrong!). My back neckline measures 8.5cm from shoulder seam to CB seam, and my front neckline is 12.5cm from shoulder seam to CF:
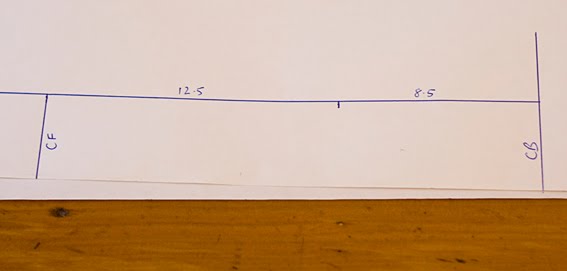
For the collar stand, draw a rectangle 8.5cm + 12.5cm long (or whatever your necklines measure), and 3-4cm wide:
You need to shorten the upper edge slightly so it sits in towards the neck a bit. Mark your slash lines – I have more in the front neckline as I want more curvature there. I marked these 2cm apart and another one 2cm behind the shoulder. Slash to within 1-2mm of the edge leaving a hinge.
Overlap each slash 3mm and stick them together:
This is essentially your collar stand pattern without seam allowances, so try in on your stand to check how it sits:
All is good, so time to start on the actual collar. Trace around the stand pattern, then sketch the collar outline over top. My collar is 2.5cm longer at the CB and shoulder seam, and about 4.5cm longer at the CF – this is to allow for the roll of the collar, and enables the collar to cover the neckline seam.
The lower edge of the collar needs to be widened, so I have added 3mm to the CB and CF edges, and marked four evenly spaced slash lines. Cut these leaving a 1-2mm hinge at the top:
Now trace around this piece, with each slash spread apart 3mm, to get your basic collar shape. In total the lower edge of my collar has been flared 18mm:
Cut it out and try it on the stand, your collar and collar stand should meet perfectly along the upper edge because one was traced from the other. You can add more or less flare to the collar if you like – you are the designer!
Now all you need to do is add your seam allowances, turn of cloth allowance and notches, and you’re done!
It is best to make a toile in calico to check the final shape before cutting your actual cloth. You can make this as easy or as complicated as you like. I make it easy, and trim off all bag-out seam allowances such as the outer edge of the collar, and this gives me enough idea of the end result.
Happy sewing!


Thank you so much for posting this – I've never seen this method for drafting the collar from the stand and I LIKE it!
LikeLike
Thanks for the post, I'll bookmark it for later. Collar looks great.
LikeLike
Great tutorial, thanks for sharing!
LikeLike
That trench coat looks very promising. And ofcourse you look really super spy-ish 😉
LikeLike
It looks fabulous! Do you mind telling me what fabric you use for your “draft”? Is it a roll of white cotton or similar?
LikeLike
Hi Lisa – I use 120gms kraft paper for patternmaking, and ordinary old calico (or muslin if you are American) for the toile 🙂
LikeLike
hey! any tips for shortening a trench coat? i found an old one that goes to my calf, and i want to shorten it but have no idea how to DIY. It's thin, made of a silky, slightly water-proof material.
LikeLike
Hey! Do you have any tips for shortening a trench coat? I found a beautiful and cheap-ish one online that's pretty long – up to my ankles or thereabouts but fits well otherwise. it's made of a thin, silky, slightly-waterproof material that would be easy to cut and hem (i'm assuming), but I don't know how to go about doing it. Anything would be appreciated.
LikeLike
Thank you for showing it!
I love trench coats. I like it.
Double Breasted Trench Coat
LikeLike
This was so helpful!! Thank you very much 😊😊
LikeLiked by 1 person