
I’ve been participating in House of Pinhiero’s SewPhotoHop on Instagram this month, and one of the days focused on sewing tips. As I searched my blog looking for something to put up I realised how many handy little one-liner tips are hidden within larger posts in my blog, never to be seen or heard of again – sad! As a result I thought I’d introduce a regular monthly feature, highlighting 5 sewing tips that only the most intrepid sewing explorers would discover within the pages of Pattern Scissors Cloth. I hope you enjoy reading them and learn something new!

Try using an ordinary one-sided zip foot to sew an invisible zip – you’ll be able to sew much closer to the zip coil, and no zip tape will show on the right side. The aim of an invisible zip is to look like the rest of the seam – and be invisible!


Have you ever sewn rouleau loops that ended up a teeny bit too small for the buttons? This problem is often easily solved by slipping the tip of your scissors into the loop, then opening them slightly to stretch the loop. This trick can save a lot of fiddly unpicking and resewing!


Cut one way whenever you can. By this, I mean cut with all your pattern pieces laying in one direction on your fabric, with the top end of the pattern all to the ‘top’ end of the fabric – in this picture that is to the right:
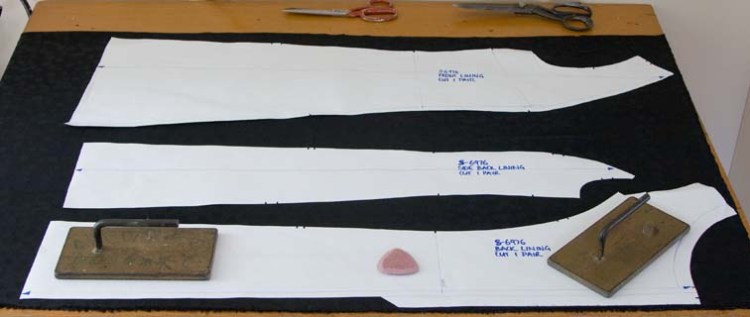
Cutting layouts often have pattern pieces top and tailed to minimise the amount of fabric required. If you have the available fabric, rearrange your layout so they are all laying in one direction. Many fabrics have slight directional shade differences that are barely discernible until – Murphy’s Law – it is sewn up and finished! I never take this risk and always cut one way.

If you are not going to start sewing straight away, gently fold all your pieces into a bundle so you don’t lose those important small parts. Add your zip and other notions to the bundle too, and tie it up with a strip of selvedge or waste fabric. This keeps your work organised and ready to sew when you are.


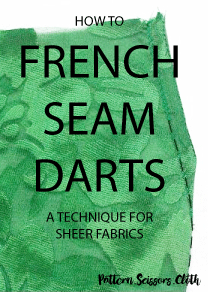
Have you ever had to sew a dart in a sheer fabric, only to be faced with an unsightly dart wedge showing through your beautiful lace or chiffon? Arrowheads aimed at your bust point – no thanks! Your answer lies here – How to French Seam a Dart
That’s it, 5 Sewing Tips for September – edition one! Do you use any of these tips in your sewing, or do you do things a bit differently?

Some great tips! (Though I’m probably going to keep putting my pattern pieces up and down to save fabric whenever possible. 😉 ) I always install invisible zippers your way! (As a direct result of reading your posts on it, and I’m much better at invisible zips now than regular ones. 😉 ) Though I have found it’s definitely easier with some zipper feet than others. 😀
LikeLike
I agree saving fabric is a priority! I usually buy more than I need so I often have the luxury of cutting one way, then I get annoyed at having enough left for another project altogether!
That is interesting about the zipper feet. I noticed that the Bernina ones at school don’t get very close, but I think you can move the needle on some domestic machines, I didn’t manage to figure that one out!
LikeLike
My favourite is the adjustable zipper foot I bought for my first Janome—it’s long and thin and I can put it wherever I want relative to the needle. Some of the other ones I’ve used seemed wider and “stubbier” and were just not as easy to keep straight and even somehow.
LikeLiked by 1 person
I’ve picked up quite a few good tips from you over time! Grouping them together like this is a wonderful idea.
I think I’ll stick to my own system for keeping one project’s pieces all together. I like to cut several projects at once, so that I always have something to stitch when I have a few minutes. I have shallow plastic baskets that I keep all the bits and pieces in. One basket – one project. I also try to layer in the pieces in the reverse order that I’ll be sewing them in. Each new piece is on top of the pile in the basket.
LikeLike
Ooh I like the sound of your system Irene. It sounds like it requires space though – something I don’t have! Bundling is sometimes done in the industry, and to minimise handling the pieces are usually placed in sewing order just like you have been doing.
LikeLike
Wonderful idea. Thank so much for the tips; knowing how to french seam darts will be very pertinent to my next project!
LikeLike
Awesome – do let me know how you get on Sue!
LikeLike
I always use a normal zipper foot for invisible zips as I have a Husqvarna machine and buying a new foot for it is far too expensuve ( wish I’d thought about this before I bought it!) My own particular way of keeping project pieces together is to place all the pieces for each one in a large food bag which I then hang with a clip on a hook from a cafe curtain rod which hubby has fixed to the bottom of a shelf above my cutting station. I also store all my PDF patterns I have printed off in the same way. I make it easy to find things by placing either the pattern envelope in the front or for the PDFs a picture of the finished garment.
LikeLike
That sounds like a great storage solution Jenny – PDF patterns can be a real pain to store neatly!
LikeLike
These tips are fantastic, Sheryll! Thank you so much for sharing. I certainly haven’t read through the blog archives deeply enough to find all of them 🙂
Right now I’m really loving the rouleau loop tip. So far I’ve only ever used one loop at a time in my sewing (I think…) and I’ve been eyeting a pattern that uses those in a front closure — so even and fitting loops are the key there.
LikeLike
The real secret is getting them exact at the sewing stage, but we all know that doesn’t happen all the time! Go on – tackle that pattern!
LikeLiked by 1 person
This post is so helpful I’m bookmarking it! I’ve often thought about french seaming a dart but stopped for fear I wouldn’t do it right. I was thinking actually about serging the dart first with wrong sides together then flipping it to right sides together 🙂
LikeLike
Glad you liked it Kathleen! I have seen darts serged too, but in a french seam the edge is enclosed and doesn’t really need it – plus serging adds bulk!
LikeLike
1. A zipper foot gets closer than an invisible zipper foot? I don’t know about that.
3. Agree. No one likes wasting fabric, but sewing, especially on a small level is not a thrifty process. No point in false economies.
4. A good idea, but I would hold off on the cutting the lining fabric or any fabric that frays.
LikeLike
1. My zip foot definitely gets closer, but as a previous commenter suggested it can depend on your machine setup – it’s a tip worth trying if you are unsatisfied with your results so far!
3. I agree too – home sewing is not thrifty with fabric like industrial sewing is. Often I buy fabric without a clear idea of what I am going to make, so add a bit extra in case!
4. Great point. It would be a good idea to wrap delicate stuff on the inside to protect it.
LikeLike
I like all your tips. Thanks for sharing your ideas. 🙂
LikeLike
My pleasure LindaC 🙂
LikeLike
Great post – thanks! It’s always nice to get someone else’s tips to compare against my own experience. Thank you for all the inspiration your blog provides for my sewing.
LikeLike
My pleasure Ruth L – I enjoy reading other’s tips too!
LikeLike
Nice plan to make this a monthly feature, thanks!
LikeLike
Thank you Marianne!
LikeLike
I will definitely be using your French dart tutorial, thank you. I have learned so much from you. So happy you’re back.
LikeLike
Hello again Ginny! I’m glad to be back, albeit intermitently!
LikeLike
Great tips, and what a fab idea to post groups of tips! I have had nothing but success with my invisible zipper foot, so I will probably stick with what I know there. I never thought about cutting all pieces in one direction, but I do tend to buy too much fabric, so I may adopt that one! I love bags, and I have a billion (+/-) small bags, many from promotional giveaways (ie, buy so much makeup and get this cute bag!). I put my projects into a bag. I have a plastic tub full of bags of projects…a decidedly sad group of UFOs that I need to tackle soon! 🙂
LikeLike
Thanks Lisa G! Re invisible zip foot – if it ain’t broke, don’t fix it!
I tend to buy a little extra fabric too (just in case). I’d rather have too much than too little, and sometimes I get two things!
LikeLike
Thank you for your little tip about putting all the pattern pieces together after their cut out and tying it up with a piece of ribbon. I’m sure I’m not the only one that has cut out and unfinished projects all over my sewing Room! And when I returned to the months later I find that a piece or 2 is missing… Which is super frustrating. So thank you again for the practical tip!
LikeLiked by 1 person