
I recently sewed this shirt (le 604 from DP Studio) and it has quickly become a firm favourite. The fabric is Liberty silk chiffon and is gorgeous to wear – I am an official addict of this fabric, and looking forward to cutting into another gorgeous piece that I have!

As you can see by the technical drawing of this shirt, there are a lot of intricate details – however the sewing instructions are not quite so intricate! There is nothing wrong with the instructions, rather this pattern is rated experienced and presumes a certain level of sewing knowledge. While sewing my shirt I thought I might elaborate on some steps, like the front dart and tucks, the front band, and those ever-so-cute sleeve ruffles! So here goes:
1. Sewing the Tucks
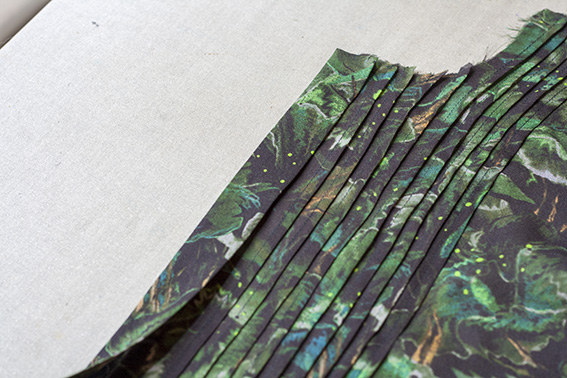
I started at the outer tuck next to the dart and worked towards the centre. But first the front dart needs to be sewn, and I french seamed mine. This is one of my favourite techniques for sheer fabrics, resulting in a strong stable dart that is discreet in appearance. Once all the tucks were sewn, I pressed the dart towards the centre front so it was hiding directly behind the outer tuck:

I mark only the foldline of the tucks – at the top with a notch, and at the bottom with a pin or chalk dot. If the front edge is accurately cut and perfectly on grain, then each tuck will be on grain too as they are parallel. During sewing, I give the fabric a gentle pull towards me occasionally, so it becomes taut and folds automatically on grain. I never pre-press the foldline, as fixing it in place with the iron before sewing makes more difficult to make these minor adjustments at the machine.
Before sewing it is best to measure the pattern to check the intended width and spacing of each tuck. For this pattern, each tuck is 5mm when folded. Every time a tuck is made, there is a slight take up of extra cloth, so the secret is to sew the tuck at a scant 5mm. If you don’t, and especially with this number of tucks, you could easily lose 1-2cm across the front of your garment – leaving less room for your bust!

The tucks also need to be evenly spaced. I usually sit at the machine with my tape measure around my neck, measuring the space between the folds as I sew. For this pattern there is 20mm between each foldline, so I periodically check that as I sew.

After sewing each tuck, I first pressed it flat in the same position it was sewed, then pressed it to the side. I didn’t press below the tucks, preferring them to release in soft folds. Note that each tuck gets 6mm longer as they near the centre.

Ideally you should end up with a 2.5cm gap between the last tuck and the front edge. This is quite important when you come to sew the front bands as you will see next.
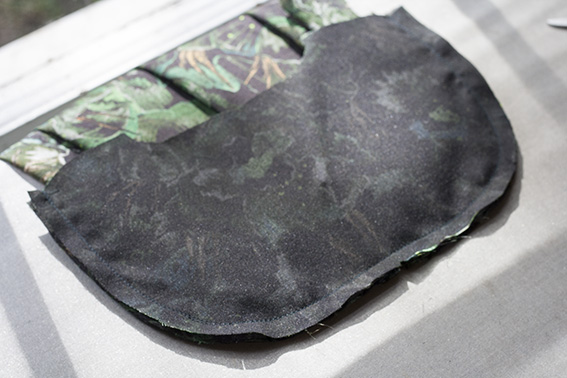
2. Sewing the Front Band
I pressed two folds in the front band before sewing it. The first was 1.5cm from one long edge, so those two notches in the photo below met. These notches denote the band topstitching line by the way.

Press a second fold so that the other long edge extends out from the first fold by 5mm:

This extended edge is sewn to the Front, right side of band to wrong side of Front:

Press the seam allowance towards the band:

Fold the band over the seam allowance. It will extend past the previous stitching by 5mm:
Topstitch the band down at 5mm, this way the band gives the illusion of another tuck:

When buttoned, the edge of the buttonhole band meets the topstitching line of the button band underneath, giving a rather neat finish as you can see below:

3. Sewing the Back Yoke
The back yoke is cut twice and both pieces were fused, so a lightweight fusing is necessary here. I highly recommend blockfusing – the resulting accuracy is important for sewing around those curves and getting the two layers to match evenly.

I sewed the outer yoke to the back first, taking care to match all notches, then I sewed the inside yoke in the same line of stitching:
Notch the corners to eliminate bumps and enable smooth curves once the yoke is turned through:

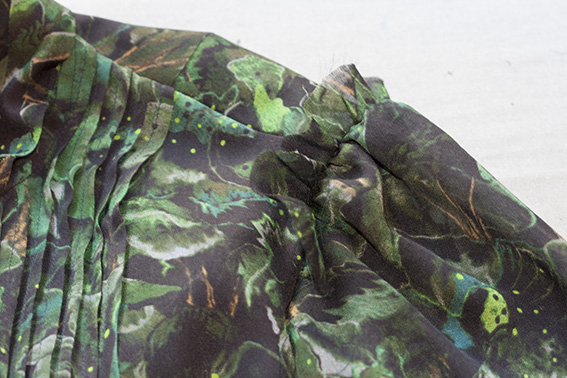
4. Sewing the Shoulder Ruffles
This is the part where I wasn’t sure exactly what to do, so I zoomed in close on DP Studio’s images and used a bit of creative license – it seemed to work!
There are four pieces to each ruffle, two large and two small:

With right sides facing up, lay one small one on top of a large one, aligning the centre rim:

Lay another small one on top, but turning it over so it lays right side down:

Follow with the final large piece, turning it over so it lays right side down too:

The two lower circles are right side up, the two upper circles are right side down, with the two small ones sandwiched in the middle.

Next I sewed all four layers together along the inner circular edge at 6mm, and pressed the seam open with the tip of my iron. It was kind of tricky, and the flounces looked quite irregular, but I decided that was part of the appeal 🙂

Next step was to gather the seamline to form the ruffle. Holding it open with pins, I sewed a row of gathering stitches either side of the seam:

pulled up the threads and voila:

Am I the only one having visions of The Very Hungry Caterpillar?!
5. Sewing the Sleeve Head
Just to complicate things, the sleeve head has a ruffle too! Gather it up with two rows of gathering stitches, then set in the sleeve, letting the ruffle extend by 2cm:

Once again it was difficult to get everything looking even due to the bias parts, so I stuck with the homemade look!
I used french seams for my armhole, so sewed the sleeve to the armhole wrong sides together, then right sides together:

The result is a set in sleeve with a ruffle sticking out!
With the sleeve ruffle angled towards the sleeve, centre the caterpillars over the sleeve seam, and sew down the centre of each ruffle by machine to attach.

While on the subject of sleeves, here is a tutorial for the continuous bound sleeve placket. I sewed mine at 4mm instead of the 6mm referenced in the tutorial, for a narrower finish.

6. Sewing the Collar Ruffle

The collar ruffle is made in exactly the same way as the sleeve ruffles. I wanted to attach them to a self fabric tie but there was literally nothing left of my fabric after cutting, so I attached them to a piece of velvet ribbon instead.

Although I adore the look, I won’t wear the collar ruffle in reality. Too late anyway, as the cat has claimed it as her new toy…

As long as she doesn’t get her paws on my shirt!
Hopefully some of these tips help others in sewing this style. The work is totally worth the effort!
Also, I’m very excited with my other DP Studio pattern (the flounce skirt) – I hope to have that photographed and blogged soon!

What a gorgeous shirt and so beautifully made. Thank you for sharing your expertise
LikeLiked by 1 person
Perfect fabric, it looks lovely.
LikeLiked by 1 person
This is absolutely stunning! Thank you so much for your detailed tips as well. I want one exactly the same but I doubt I have the patience to sew one in silk chiffon.
LikeLiked by 1 person
Thank you! I understand your worry about silk chiffon, but I think it is worth testing the patience for because it is such a lovely fabric! I really like the look of this style in cotton too, like DP Studio’s version – a much easier sew!
LikeLike
What a stunning tunic! So beautiful in this silk chiffon – a work of art 🙂 Lovely to be walked through your process.
LikeLiked by 1 person
Such lovely details (and great close up photos too). I love the front tucks!
LikeLiked by 1 person
Your work is amazing and the tutorials incredibly helpful. Thanks so much for the time you put into presenting your blog; it is a wonderful resource for those of us who have to learn online.
LikeLiked by 1 person
Those tucks are so beautiful. & good tips on sewing them with precision! Thanks! I foresee many a pintucked yoke in my fall wardrobe this year…
LikeLiked by 1 person
Wow we need to see more pictures of you wearing this blouse! Such intricate work: it’s easy to see why you get such pleasure from wearing it! Beautiful.
LikeLiked by 1 person
Thank you! Sorry – I failed to provide the link to the last blog post with pics:
https://patternscissorscloth.com/2018/06/09/dp-studio-shirt-le-604-in-liberty-silk-chiffon/
LikeLike
So, so intricate. This is an incredible post. I can’t believe what you did with ths chiffon. Just masterful.
LikeLiked by 1 person
So delicate and thank you so much for all the wonderful tips with this pattern, but more importantly with this fine fabric.
LikeLiked by 1 person
This Is really stunning. And of course the cat claimed the collar 🙂
LikeLiked by 1 person
Sheryll, I’m just back to say that I nominated you for a fun Mystery Blogger Award. It’s a nice way of celebrating other bloggers. Here is the link to my nomination post : https://www.dreamcutsew.com/blog/2018/07/14/random-fun-facts-for-the-mystery-blogger-award
Don’t worry if you don’t have time to do it though. xx
LikeLiked by 1 person
Thank you so much for this post and the photos. It helped me to sew my one dp le 604 shirt.
Mema
LikeLiked by 1 person
Thank you Mema!
LikeLike
Hi Sheryll,
Thank you for this detailed review as the instructions are so sparse. It will definitely be helpful
LikeLike