I’ve had my Mum’s 1955 Elna Supermatic for a long time now, and I know I’ll always keep it. Mum bought it when she was at teachers college, and it was the machine my sister and I learnt to sew on.

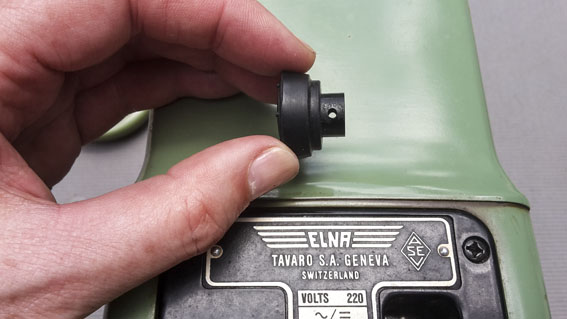
It hasn’t worked for several years. The first problem was that the coupling knob on the flywheel was stuck and would not disengage to wind the bobbin. You could still wind a bobbin – but only in sewing mode with the needle still going up and down! Then the flywheel became ‘sticky’ and needed a little push to get moving – annoying, but I got used to it and the machine would still sew with this little bit of encouragement. And then it got more and more unresponsive and finally stopped altogether.
I really missed my Supermatic. My main sewing machine is an industrial straight stitch. Yes you read right, it only sews straight stitch! This means no zig-zag. No buttonholes. No three step zig-zag. No twin needle. Nothing ‘fun’.

Although I’ve been lucky enough to have access to a buttonholer at work but there is nothing like the convenience of being able to do this at home. And I’d really like to start making my own lingerie, for which zig-zag is pretty much necessary. I decided to make the effort to get Miss Supermatic 1955 fixed.
There is a group called Elna Heirloom Sewing Machines, where I discovered the secret to loosening the bobbin clutch. I bought myself a new pair of multi-grips, and with Jim’s advice to insert an allen key in the hole behind the needle bar to immobilise the flywheel, and a bit of brute strength, it soon loosened. I should have used a cloth though because I scratched it slightly – oops! My next step was to sort out problem two, the unresponsive flywheel.
During my research I read that this was a common problem with this model. The motor turns the flywheel by means of a friction pulley that rests against it, which when left for extended periods of time, can form a flat spot. This means when you try to sew, the motor goes, but the flywheel does not turn and drive the needle mechanism. The solution is to replace the friction pulley.

I found a YouTube video of a guy replacing the part which was very helpful. There is another one here. This gave me the confidence to take my machine apart and have a look. Yes, there is a definite flat spot there!

The next step was to find a replacement part. I wondered if this was even possible for a 60 year old machine! A search online revealed one for US$25 plus exorbitant shipping halfway around the world, and while I was thinking about that, I found one for sale on TradeMe with a $1 reserve. I lost that auction, but won the next one and $6 later had a Very Important Part on it’s way to me.
It took me a couple of weeks to get around to replacing the part, and boy was it fun! I did it outside in the sun with the cat’s help. Here’s what happened.
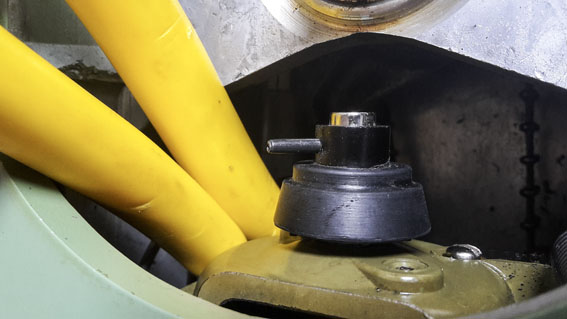
First I removed the flywheel again to reveal the pulley. The next step is to remove the pin holding the pulley in place. The pin is 2mm wide, so I had to rummage around in the garden shed for a while to find something suitable that was 2mm wide, and finally settled on a small nail. With a hammer I blunted the point so that it matched the pin.

Before I could try to remove the pin I had to secure the motor unit from wobbling every time I tapped it, so I jammed the handle of my multigrips in there somehow and it worked.
I tapped away at the pin and nothing budged. Back to the garden shed to look for some CRC and surprise, I actually found what I wanted. A quick spray and tap, tap tap… still nothing budged. I was worried about damaging the end of the pin. Goodness knows where I would find a replacement one of those!
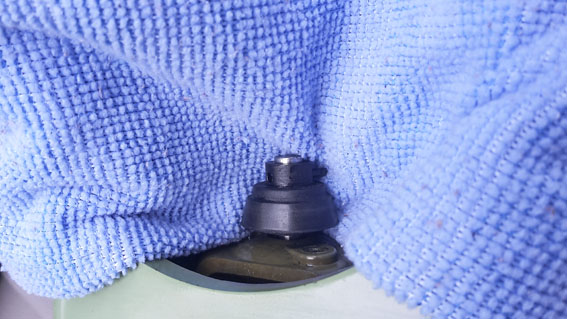
Next step was to blast the heck out of it with CRC. As I wasn’t sure about the safety of this stuff on the rest of the machine, I positioned a cleaning cloth underneath. Finally the CRC loosened the 60 year old bond, and the next few taps started to move the pin. I kept the cleaning cloth in place just in case the pin dropped down into the machine never to be seen again. Can I say that finally getting the pin out was very exciting?!

The pin is like a hollow tube with a slit down it’s length. At this stage it started to rain and I had to move everything quickly indoors, paranoid about losing the tiny pin…!
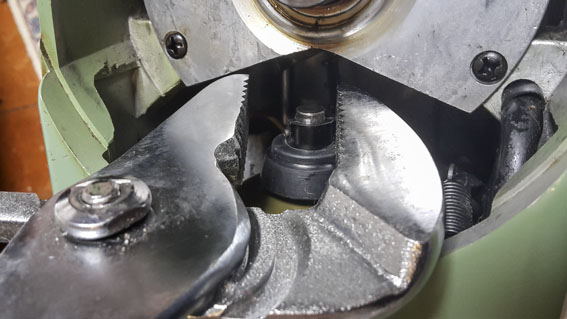
Once the pin is removed the pulley slides off the metal post, and the new one is soon in place. I used a baby allen key to line up the holes in the post and the new pulley:

And then the pin can be re-positioned. I started it off with a couple of light taps:
then simply squeezed it back into place with the multigrips. Job done!
The real test was to come – did this process actually fix the problem? I replaced all the flywheel parts, plugged in the power, found a test scrap, – and she sews!
I’m so excited! I now have zig-zag! And three-step zig-zag! Now I can sew bras and undies! And have fun with all those Elna cams and their fancy stitches!
So pleased with my success, I’ve already ordered another part for this machine which has the same problem. It will be good to get that one going again to keep the Greist buttonholer attached to.
Have you ever explored the inside of your machine, or done any sewing machine repairs yourself? I haven’t in the past, but I am tempted to learn more about how it works now!

Wonderful! Can’t wait to see the lingerie that you will make with that 3 step zig
LikeLike
I’m excited to start making lingerie too Natasha! I’m very inspired by all the bloggers versions, including yours. Plus I think lingerie is having a bit of a moment with some interesting styles around, so I’m on a materials acquisition spree at the moment!
LikeLiked by 1 person
Yes there are 10x as many patterns out now than there were a few years ago. It’s all so exciting. At least for me. 😀
LikeLike
I repair machines and usually use a 2mm punch on the pin works like a charm also a small clamp works well to hold the motor securely when working on it…usw one with rubber grip…I have 4 supermatics of my own and they are great machines…I place a small block inside to keep the rubber drive wheel from flattening out over time if not used regularly.
LikeLike
Well done you. I congratulate you on your resourcefulness and hope you enjoy many more years on your lovingly renovated sewing machine.
LikeLiked by 1 person
I hope it keeps sewing for a long time too! When you look inside you can see they really were built to last.
LikeLike
This is amazing! I’ve got almost exactly this same machine (the two tone version, a year or two newer, although mine is an heirloom of someone else’s family, adopted through Trade Me about a year ago).. she still sews beautifully but makes that ‘helicopter sound’ they’re known to make as the friction wheel goes flat, so this replacement is definitely on my to do list! Also, if yours is anything like mine you’ll love it for lingerie! For such workhorse machines I find the supermatics have an incredibly delicate touch.
LikeLike
Replacing the part is quite straightforward, and the YouTube tutorial was very helpful, it’s worth giving it a go. Last time I looked there was still a part available on TradeMe, so snap it up!
LikeLike
Well done! I’ve only investigated mine briefly, when I used a hair dryer to loosen a sticking part. (Advice from Theunis Kok, who was a sewing machine technician in wellington, now in Hawkes Bay I think). I must get my 1950 Singer going again as it does buttonholes and all sorts of fancy things. You are inspiring me to be brave.
LikeLike
Yes I really missed those fancy things! There is sure to be a YouTube video or two out there to help you with your Singer.
LikeLike
Congratulations on your fix! Isn’t that the most satisfying thing? Good for you on your innovation and success. I hope you enjoy many years of sewing on her.
LikeLike
Thank you Becky – I was so happy with myself I wrote a blog post haha! The videos really gave me the confidence to go ahead and do it, and it was totally worth it to hear her humming away again!
LikeLike
I am so proud of you! This should give all of us with mechanical brains the confidence to tackle machine repairs on our own. To those of us who do NOT have mechanical brains: there is no shame in paying a trained technician to do machine repairs.
LikeLike
Exactly – I’d get a professional the instant I didn’t know what I was doing! (Or ‘thought I knew what I was doing’ – sometimes we can be blissfully unaware of what we don’t know!)
LikeLike
Congratulations! That was such a satisfying story to read and see 🙂 I LOVE these sorts of stories – of course I am a huge Elna fan and have been since I was 18 (1973) when my mom bought the first sewing machine “for the household” although I was the only sewer in the household! It was a Lotus which my father broke the following year and refused to have fixed (I know another story that is far too long to elaborate here). I own an Elna today but it’s much newer and I admit rather fancy and is “really” a Janome but what can I say? Every time I sit at I’m thrilled with how wonderful it sews and all the truly fancy things it does for me 🙂
LikeLike
That’s great you love your “new” Elna! What model do you have? I love the look of the new (well, 2012) Lotus – so cute!
LikeLike
Great job! I’ve done some clean-ups and repairs on my Singer treadle and vintage Vikings. It is very satisfying, especially since it means they don’t have to leave me to get worked on. 🙂
LikeLike
It is satisfying! I’ve found out how little I know about how sewing machines actually work, so that is my new quest. Next I want to clean under the bobbin case because it is a bit rattly and apparently that is fibre buildup!
LikeLike
Oh yeah, I have a supermatic like this waiting at my sister’s house (her boyfriend found it at a garage sale for me) and I’ve read those same maintenance posts in anticipation, don’t know if it comes with any cams yet – fun! ;o)
LikeLike
Ooh exciting! Most Supermatics I’ve seen have the cams (I think that was a major selling point at the time) but there are a few around without, and I think there is a zig-zag only model too!
LikeLiked by 1 person
Well done, this must have felt so satisfying. I haven’t played with my Elna Lotus, the power cord was the problem so I had the professional look at that one.
LikeLike
Excellent advice Sharon – I wouldn’t touch anything to do with electricity either!
How do you like the Lotus – is it your main machine?
LikeLike
I grew up sewing on my mum’s supamatic too … the same model. I’m wondering if my Bernina 125 has the same flat spot.
LikeLike
I detect a lot of fondness for the machine we learnt to sew on!
For some reason I think this is just an Elna problem, but I could be wrong!
LikeLike
You are brave! But what satisfaction at having fixed the problem. Congratulations!
LikeLike
I am very happy, but could not have done a thing without YouTube!
LikeLike
How clever you are! Nice work! I’d be too scared to dissect the guts of my husky….
LikeLike
If it ain’t broke, don’t fix it! (But I’m sure there are instructions online somewhere showing you how to do it anyway!)
My main worry was replacing everything correctly, so I was hyper-diligent about the order I removed each part!
LikeLike
I learnt to sew on an Elna too, slightly newer model probably that yours, but I don’t have it any more sad to say. and I also have nearly the same industrial you have, DSN-165 but looks the same! I worked in a garment factory when I first came to live in the Philippines 30 years ago and they gave it to me. i don’t use it as much as I should, but it’s great at sewing any difficult fabrics which my home sewing machines hate and all skip stitches on. wAs just wondering if an upgrade would be worth it, or maybe just a new coat of pint?
LikeLike