
I can’t believe October is almost over. Here are my five sewing tips for the month – quickly, before it turns into November!

If you have ever done quilting, you have probably done chain piecing:

This is a technique where you butt multiple short pieces up to each other while sewing – and it needn’t be reserved just for quilting! Here I am preparing welts for bound buttonholes, but I also use chain piecing for jet/welt pockets, and any other seams that you can run on together, like cuffs, or sleeves – you can even do it when overlocking. It is a great way to save time and thread!

Do you have a sway back? Do you really have a sway back?


A sway back can cause excess fabric pooling at the back waist, but more common causes are:
- short upper back
- prominent high hip
- prominent buttocks
I often see people making a sway back adjustment when they should consider one of the above adjustments first.
In the above photo you can see I have an erect back that is shorter in length than my front, causing excess fabric to bunch in the lower back. I also have a prominent high hip (seen more from a back view) that causes fabric to ride up and bunch at the lower waist. These issues are best solved before considering a sway back adjustment.

When you are cutting lace and need the pattern on each side to be perfectly symmetrical, try this. First cut one side, then position it over the lace with right sides together so that the pattern matches perfectly, then cut around it like so:

You can even use this trick for cutting stripes and checks or plaids, but remember to always cut a pair!

This is my breaking point…

… on the inside of my coat! The break point is where the lapel starts to fold on the front edge of a jacket/coat. My secret here is to clip into the seam allowance at this point to help it switch sides. If you then understitch above the clip on the front piece, and understitch below the clip on the facing, your lapel will practically turn by itself.

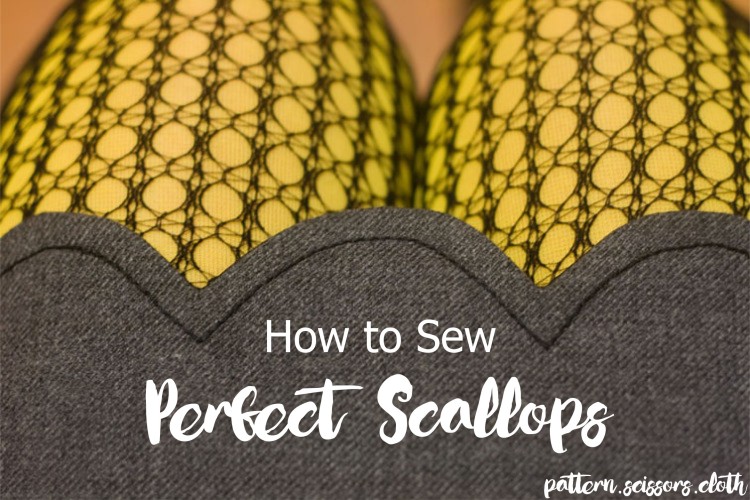
The smoothest scallops aren’t formed by snipping tons of notches around those curves. Let me show you an easier way that gives better results here: Sculpting the perfect scallop
That’s it – my 5 Sewing tips for October just in time – I hope they help make your sewing happy!

You can chain-piece every single part of your garment if you use a little scrap of fabric as a filler between seams, I’ve been doing it that way for years and it is WONDERFUL to never ever have to trim any threads!
LikeLike
I agree Emily, thread trimming can take up so much ‘real’ sewing time!
LikeLike
I don’t know how I found your site, but I am glad I did. I’ve learned so much from you. Thank you!
LikeLike
This makes me happy – thank you!
LikeLike
Thanks Sheryl, always find your posts interesting.
LikeLike
Hi Evelyne – glad you found it interesting!
LikeLike
Great to be reminded of these tutorials. I have referred to your sway back tutorial for years! And may I say again just how happy I am to have to back blogging again, it’s just such a pleasure to read your posts, even though I’m often just lurking and don’t always have a chance to comment, I’m always reading!
LikeLike
Thanks Janelle, I’m enjoying being back even if it is a little irregular! And I wish I had time to comment on every post I read!
LikeLike
Once again – a brilliant line-up of tips!
LikeLike
Thanks Irene – even the little tips can be a game changer!
LikeLike
Thank you thank you thank you for your comment about sway backs! I have a short back and prominent high hips, and have always made pattern adjustments based on that since I learned to sew! The trendy sway back adjustment was news to me when I discovered the online sewing community a few years ago, and the one time I tried it in a muslin, it was a disaster. 😉
LikeLike
Hello fitting twin! I think the sway back adjustment is so popular because it is easy to understand and gets most people half way there, even if it is often wrongly diagnosed.
LikeLike
Brilliant tips and thank you for the reminder about the sway back, I still think I have one but need to have a look at where the fabric is pooling from again.
LikeLike
I’ve got a butt–not hips–a butt (OMG Becky–it’s just so round, and so out there!), and I’ve always wondered if a sway back adjustment will get me there, but I’ve never been bothered enough to actually *try*, LOL! Now I know, that it apparently will not. Thanks for the tips, these are great! 🙂
LikeLike
Glad you enjoyed! A sway back adjustment might help a bit, but it is best to deal with the real issue – make the back wider (and maybe longer) to accommodate the butt, and taper into the back waist as required.
LikeLike
Sort of like an FBA for your butt then? 😉
LikeLike
Yes, exactly!
LikeLike
These are some awesome tips Sherry! Now I have no idea what I’ve got! I’ve generally done my version of a slight sway back alteration but am not 100% sure that is what I have but it does seem to work in getting my clothes to fit better… hmmm.
LikeLike
Thanks Carolyn! I’m sure whatever you are doing is right if it is fitting to your high standards!
LikeLike
Thank you, those are all excellent tips, especially the lapel one.
LikeLike
Thanks Susan – a sample machinist I once worked with taught me that one. (and if you make more of a notch than a clip, it is easy to feel where the break point is once bagged out – very handy for button and buttonhole placement!)
LikeLike
I have a short upper back and can’t find any tutorials for an adjustment….what do you do for this problem?
LikeLike
Hi Nancy – I might save this for a future blog post so I can cover it properly. My short answer is that you would shorten the back above the waist, but make sure the front and back side seams still match. Hope that helps in the meantime!
LikeLike
Thanks for the great sewing tips Sheryll! I will definitely be using the one on scalloped edges soon!
LikeLiked by 1 person