Last summer I finally plucked up the courage to cut into this red geometric/floral fabric that I have had in my stash for a long time. Prior to my stash, it was in my mother’s stash for a long time too – since about 1970 in fact! It is a cotton sateen in the perfect shade of red and such a nice quality – it is so precious I even blogged about the fabric a long time ago here.

I always planned to make a skirt out of it, but that idea evolved into a shift dress as I became ‘braver’ in my fabric choices. I thought it appropriate to use a vintage pattern, and chose one I bought a few years ago, Butterick 4348, the one with the disintegrating pattern envelope:

I had made a Butterick shift dress from the same era and knew that the size 34″ bust fitted well, so I cut straight into the fabric. In hindsight that seems a little risky but I compared the patterns and they did look like the same size and fit.
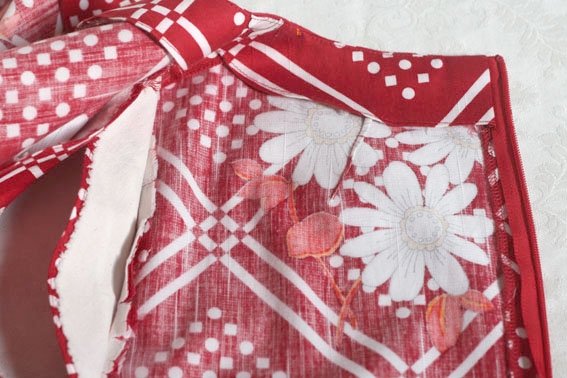
The pattern on the fabric had to be matched at the side seams and horizontal seams, not only the white diamonds but the placement of the flowers too! This fabric was really narrow (?90cm) and and the pattern was of such a large scale that there was quite a lot of waste by the time I matched everything. I had more than two dress lengths but needed every last centimetre! (And now I have a lot of scraps leftover for my red and white quilt that I plan to make one day).

I was concentrating so much on matching the pattern that it didn’t occur to me that I didn’t really need those horizontal seams under the front bust and back waist. One of my regrets with this dress is that I didn’t eliminate them. Although the pattern has design options using this line (colour blocking, topstitching, trim placement, etc) it is unnecessary for my boldly patterned fabric.
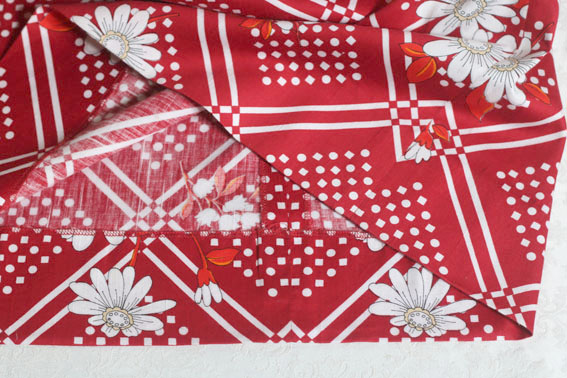
If I had the forethought to eliminate those unnecessary seams, I would have avoided this problem:

This was the best I could do with the placement of the floral at the time, and I’m kicking myself that I didn’t think of getting rid of those seams when cutting because I may have been able to plan a better placement instead of this compromise. Oh well. At least I planned it well enough to not look like I sat in something!
The actual pattern fitted perfectly. One thing I have noticed with patterns of this era is that the armholes have a lot of coverage. Nowadays armholes tend to be more cut away, but this cut is really flattering if you are conscious of your armscye crease.

I think the bust darts would be high on most people though, so you might want to check that if you ever make this one up. I have quite a high, prominent bust which happens to suit this era when the fashion was for a ‘young’ look. Luckily that ‘young’ look also includes minimal waist shaping because that happens to suit my minimal waist too!

When you sew such a short pointy bust dart you really need to get it right. You can see on the inside I sewed a couple of passes before I got a really smooth curve. If you are not sure what I mean about getting a smooth curve on a pointy dart, check out this tutorial – Get Smart with Darts!

I didn’t have any white fusing, so I rummaged around for some calico, cut it to the facing pattern, and sewed it as one with the facing. It is a bit heavier than I prefer but does the trick.

Except after a few washes the clipping is fraying on the calico so it looks a bit messy inside. Next time I won’t be so lazy and I’ll go and buy some more fusing instead.
There’s not much more to say about this dress, except I inserted an invisible zip using these techniques here and here, and hand sewed a generous hem using this technique.
If you can pick up a copy of Butterick 4348, I highly recommend the pattern. There are lots of cute variations too – I reckon I could have a couple more renditions in my wardrobe – be warned!


I’ve got stashed fabric that seems impossible to cut into… however when I buy fabric with a purpose I’m quick to pick up the scissors. I am eternally fascinated by what we stash & what we don’t – these fabrics with history are the hardest to cut of all.
That’s said, I think you have picked perfectly & this looks fabulous. Now I’m off to read about bust darts…
LikeLike
What was a fabric with history is now a dress with history – even better! I’ve had the fabric for about 20 years, and was prompted to cut into it when Mod looks became popular – the time finally seemed right.
Enjoy the dart theory!
LikeLike
Love the dress Sheryll: the style, the colour, the fabric and especially the cut of the armscye (yes, I’m very conscious of my creases!)
LikeLike
I never gave armscye creases a second thought until I began custom bridal, and every second bride wanted that area covered. I couldn’t see an issue most of the time, but people do seem to be self=conscious of the area!
LikeLike
super cute, I love a great shift dress for summer and this one is perfect. plus red is a good color on you.
LikeLike
Thanks Beth! I do love this rich dark shade of red. And shift dresses!
LikeLike
My dear old Ma gifted me a few bits of 1970s fabric recently, but no garments as spectacular as your red dress will result from them! Well done, you! I even like the bouquet of daisies on your back shelf, which happy accident would not have happened with the deleted horizontal seam.
Now I must just restrain myself from throttling Ma for throwing away all her vintage patterns. Not even recycling them, or burning them in the fireplace for warmth, but throwing them away. Ah, mothers, bless their dear little hearts!
LikeLike
My friend loves the ‘bouquet’ too, but I wasn’t sure if she was just being nice!
Have fun with your 70’s fabrics!
LikeLike
I like your matching on the back – it seems intentional and not like you had to make do! It’s a pretty and bright shift dress perfect for spring and summer!
LikeLike
Very cute. I actually like the horizontal line in the front I think it adds something to the design. Sort of a resting place with all the geometry going on. And your matching is perfect there.
LikeLike
I am always a fan of red and what a bonus that the fabric has such history! Shift dresses are such a classic look. I am looking forward to seeing what else you come up with using this pattern.
LikeLike
Ah I love it Sherri! The fabric still looks contemporary, the sign of a perfect vintage design! Love that shape on you too, it suits you perfectly. x
LikeLike
That fabric is so gorgeous, I can absolutely see why you saved it for so long. One of my favourite things is when a treasured stash fabric is transformed into a really cool garment. Sometimes the fabric needs to marinate in stashdom for a while though! By the way I like the groups of flowers on the back, I think that they add quite a cool look!
LikeLike
I just realized you are posting on your blog again – how great to have you back! I loved reading your blog, look forward to more interesting and informative postings. And, the dress looks great!
LikeLike
Gorgeous dress and flawless in my opinion – no issues with pattern placement.
LikeLike
I love this so much! It’s beautiful!
LikeLike
Crikey I remember that dress first time round when I made it in the 60’s, then I looked as good as you, now I’m two sizes up. A simple pattern that I made many times over. Nice to see it looks as modern as it did then.
LikeLike
Hello and Happy New a Year! So nice to see you again! I’ve been a follower since I happened across your blog while looking up Dior Darts many moons ago. I loved your coat posts a few years back and finally was able to find the pattern on etsy. Now I’m on the hunt for this butterick dress! You look great in these 60s styles. And being a child of the 60s I’m partial to them myself…part nostalgia, part feeling better in empire and shift styles! I’m enjoying looking back over your years of posts. Best wishes for a wonderful 2016! Ironically a good friend of mine just took off for New Zealand this week. It’s a good haul from RI here in the states!
LikeLike
It looks just gorgeous, just flawless, as Gail said! I like the pattern placement, it looks just right to my eyes. A beautiful use of your mother’s fabric 🙂
LikeLike
I don`t know why I miss your posts every time! This dress is really beautiful, love the color and the print too.
LikeLike
Absolutely love this dress. Both pattern & fabric are fab. Well done
LikeLike