I’m a big fan of using piping as a trim on garments, and recently I have been sewing it into the waistline of dresses:
 |
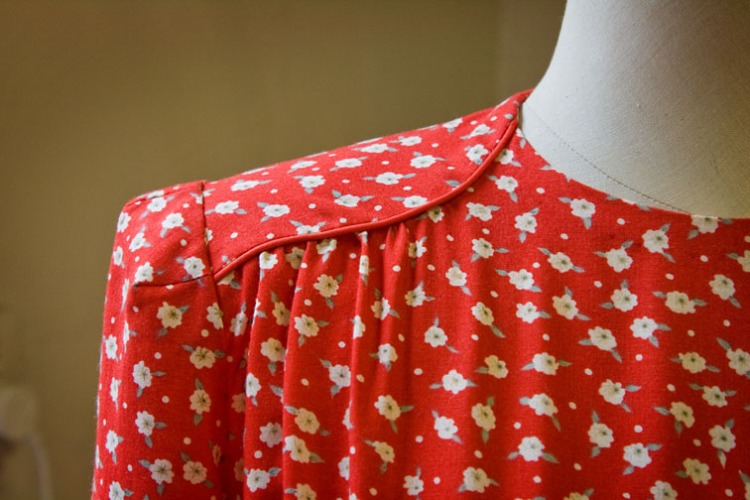
| Piping in the waistline of my Aurora Dress |
 |
| Piping in the waistline of my 1950’s Red Spot Dress |
One reader asked if I had done a tutorial on this, right before I was about to sew piping into the waistline of a red tartan dress – the perfect timing!
You can buy piping ready-made, but it is usually fairly cheap polyester/cotton or polyester satin stuff:

or you can buy piping cord and cover it yourself:
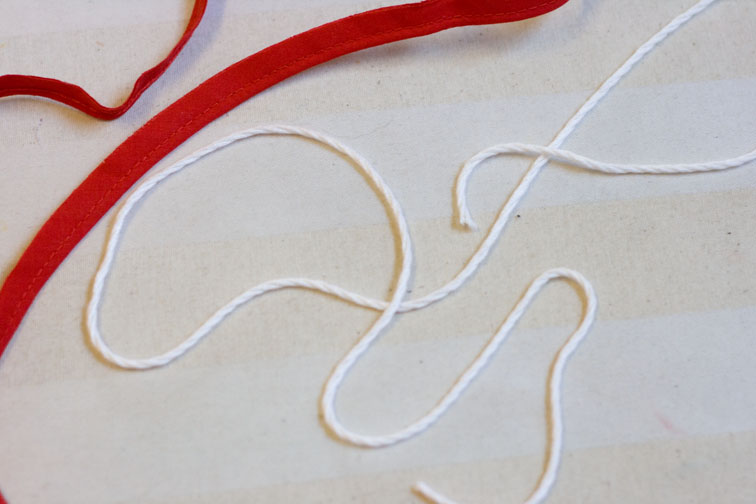
or do what I did – stash bust and take the cord out of some old piping you no longer want!
Next you need to cut bias strips to cover your piping cord. I’m using self-fabric, and have marked a line 45degrees to the selvedge. You will need a strip about 3cm wide and slightly longer than your waistline. My metal ruler is the correct width, so I plonk it in place and chalk around that to make it quick and easy:

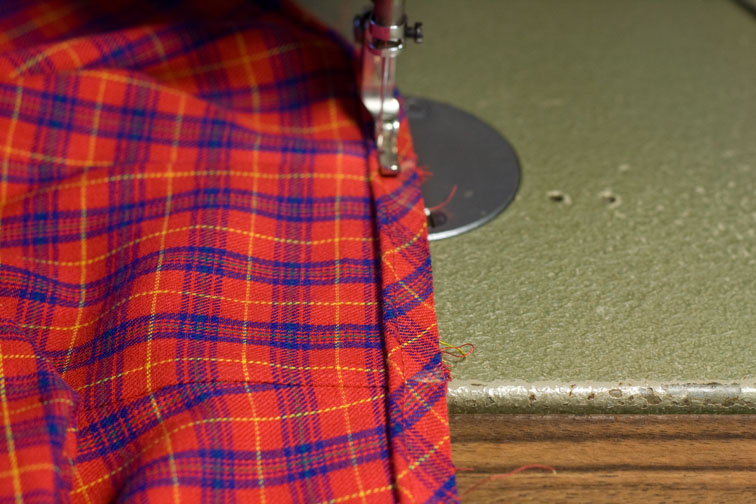
I cut this out, then remembered I was using a checked fabric! Most checks aren’t true squares but are rectangular instead, so you need to cut slightly off the true bias to pass through the same part of the check pattern. I recut the strip at the same angle as the line in the left corner – thank goodness I had enough fabric!
To sew up your piping you’ll need a zip foot on your machine:

Wrap the fabric around the cord, right side facing out, and stitch as close as you can to the piping cord:

Voila – pretty piping!

Some people sew the piping straight into the waistline, but I like to measure it against my pattern for more accurate results. Lay the piping on your pattern and chalk the piping at the CB, darts, seams and CF, remembering to skip the dart intake and seam allowances:

Now you can sew the piping to the bodice. Stitch along the same line of stitching you used to form the piping, and match your chalk marks to the relevant seams:


Nice eh? I’m glad I recut the binding, it was worthwhile to get it looking symmetrical. When it comes to checks, I am definitely a matchy-matchy person! (by the way, I’m still working on my article about check matching – it keeps getting bigger…..)
There are so many fun things you can do with piping – edging collars and cuffs, accenting style lines, etc – and I think covering your own always looks classy.
Piping could be made from self fabric, a contrast colour, or a texture contrast like satin. Whatever you choose, piping is simple and effective. Are you a piping fan too?

I love the way piping helps “crisp up” the design details of a garment. But, I've never tried to add any. Your tutorial makes me think I could give it a go sometime. Thanks for all the great pictures!
LikeLike
I totally agree that piping add a level a quality to garments. It's a detail that says, I care for this garment, I spent time on this garment.
LikeLike
thanks so much for this post! I love the look of piping, and am definitely going to try to make my own!
LikeLike
I love piping. It totally makes sense to mark the piping to sew it in accurately.
LikeLike
Thanks for your tute. There's always lots of piping methods to learn and use for that beautiful finish.
LikeLike
I love piping too, and this is a great tutorial. I think I am ready to try it now. thanks
LikeLike
Great idea! It makes a very fine finishing. (sorry my english…)
LikeLike
Thank you for this tutorial…this is a design element I will surely use.
LikeLike
Thanks for this tutorial. I have made so much self-made piping for all the slipcovers I've sewn over the years, but inserting into a garment must be much more careful so I'm glad for your tips.
LikeLike
thanks I would never have thought about creating pattern matching marks and measureing against pattern. looks great.
LikeLike
I've been thinking about trying my own piping to add it to the outside of patch pockets, so thanks a lot for your tutorial! I think piping adds a little interest without it being *too much*
LikeLike
I love piping too! 🙂 Thank you for the tutorial, it looks so simple. I made my own piping once before, but I seem to recall using cord that had fusible attached, so it ironed on to the cover fabric. But the result was not nearly as nice. Thanks for sharing! I can't wait to add piping to a waist line now.
LikeLike
muito obrigado por colocar este post , estava atras , para saber como se faz, agora ja posso colocar no casaco que estou fazendo , aqui no Brasil o outono esta com cara de inverno, muito obrigado ..beijinho
Jubi
LikeLike
Gosh that plaid is so pretty. I'm still admiring it ;). I should really try piping again and this looks so good. My one and only experience with quilting involved putting some piping around the perimeter and I used a piping foot from my old Bernina. I can't remember why I needed one because this looks simpler! Thank you for sharing!
LikeLike
What a great tutorial, thank you so much! I just cut out a great dress and after seeing this tutorial, I am definitely going to give it a try!
LikeLike
Thanks a lot for this tutorial! Piping is great, I'm definitely going to have to try it out – I had been wondering about how to put it at a waistline.
LikeLike
Thanks! I love the idea of piping in self-fabric, I always think of piping in an accent colour, and that makes it too loud for most of what I make. Self-fabric is a great solution.
LikeLike
Thanks. I'm mad about piping!
LikeLike
Thanks – I love piping too!!
LikeLike
Love it love it love it, Sherry! I do think it's so special–different & pretty & cool, too, and something you NEVER see in stores. Thanks for another wonderful tutorial. I've been using your bound buttonholes lesson quite a bit recently.
LikeLike
Whoaa! How about googling “continuous bias strip” (I'm pretty sure about.com has a good tutorial) and making the bias at least a lot zippier? Quilters are very efficient at things they do on a grand scale :-).
LikeLike
I like piping, too. It adds a professional detail and interest to most any garment. Piping from plaids and stripes are so interesting.
LikeLike
Piping certainly does give a nice “finish” to a garment. It's one of those details that you do have to plan for. All too often I think of it when it's already too late!
LikeLike
Hey, my waist isn't that big!!
Seriously though, I have a thing against joins in piping, and try to cut a single strip whenever I can – that method is great if you don't have much fabric leftover!
LikeLike
I haven't used a piping foot before, I imagine it would speed things up if you were doing a lot of piping though!
LikeLike
You're definetely my hero…
LikeLike
fantastic tutorial, thanks!!!
LikeLike
I too love piping details….your dresses and piping all look perfect and beautiful 🙂
LikeLike
Great post! Thanks for teaching!
LikeLike
Great tute. Thank you so much. It truly is a lovely finish and one I should start incorporating!
LikeLike
Great tutorial. Thank you for sharing.
I've added a link to your tutorial on the Sewing Tutorials blog. Hope you're ok with that.
LikeLike
Yes, that's fine Sigrid – thanks!
LikeLike
Thank you su much for sharing this. It's wonderful to take a walk on your gorgeous blog.
Have a nice day
Roswitha
LikeLike
This is such a useful tutorial – thankyou very much xXx
LikeLike
Thank you Sherry, for another great and relevant tutorial. I wanted to ask if the piping cord is a special cord or I can use something I got under hand? For example is it a bit flexible? Streachy? Or will any type of cord do. Thank you, again. I am loving your blog.
LikeLike
I love that! What is the size of the teeny piping cord you used?
LikeLike
I'm a big fan too. Such an easy way to make things special
LikeLike