I’ve already posted a tutorial on bound buttonholes, but I’ve made a few refinements to my technique while sewing the buttonholes on my cape so I’ll share them with you here. There is a small amount of hand sewing involved, but it does reduce a layer of bulk around the buttonhole edges so it is worth it!
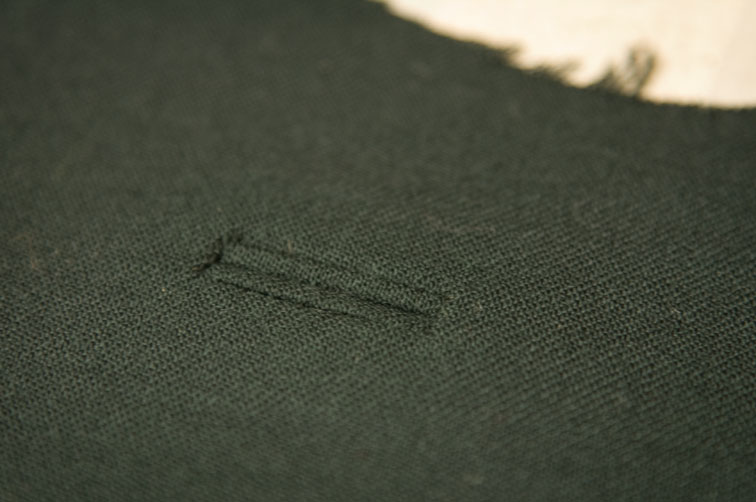
This time I machine tacked the buttonhole positioning – I tacked a horizontal line through the centre of each buttonhole, and vertical lines marking either end:

This gives an accurate guideline where to start and stop stitching. It is especially helpful when doing a line of buttonholes – it helps to keep that line straight, and to achieve parallel buttonholes of equal length at an equal distance from the front edge – I won’t skip this step next time!

Next cut a square for the buttonhole welts – I have decided it is better to cut a slight rectangle, or mark the top edge or something, to avoid this! I like to cut mine on the same grain as the front, so the buttonhole is less conspicuous. You can cut them across the grain so they contrast a little more, or cut them on the bias which is nice if you have stripes, or whatever – just cut them all the same way!
Cut width of welt = (finished width of welt + 1cm) x 4
I am working on the collar stand, which I have blockfused. This helps prevent a) a frayed disaster, and b) frayed nerves! I fused the welt too, but you don’t have to.

With right sides together and the square centred over the soon-to-be-buttonhole, tack it into position along the horizontal guideline:

Shorten your stitch length and stitch the top and bottom edges of the buttonhole. Start with the needle exactly on the vertical line, 3mm (1/8″) above the horizontal line (this is half a foot width for me):

Stitch parallel to the horizontal line, finishing with the needle exactly on the opposite vertical line:


Stitch again on the other side of the horizontal line:


You can remove the horizontal lines of tacking now as they are no longer needed, keep the vertical ones though:

When weaving in the thread ends, but be sure to weave the ends away from the soon-to-be-clipped area or you will cut them, and your buttonhole will start falling apart!

I usually do all my buttonholes to this stage, then check they are all the same size/shape/parallel/etc before the cutting stage.
Cut through the width of the buttonhole welt between the stitching lines:

I found it beneficial to press the welts (but not the ends) toward the buttonhole at this stage:


Now cut the buttonhole opening – cut to within 6mm of the ends:

…then clip into the corners. I found this is where those vertical guidelines are of real benefit as they mark the exact point to clip to!

Turn the welts through to the wrong side, taking care not to strain the corners:

Fold the welts around the edges you have just cut, so they ‘bind’ those raw edges:

The reverse will look like this:

It is tempting to press at this stage, but don’t! Instead stitch in the ditch to position the welt evenly 3mm all the way across:

I used a hand backstitch so my stitching was invisible, manipulating the layers between my fingers as I stitched to form a firm and even 3mm wide welt:

You could probably machine this part if you think your thread will be well disguised, like in a tweedy fabric for instance. Here is the reverse after stitching in the ditch by hand:

Now close the ends, by folding back the front edge, and stitching across the clipped triangle. Give the triangle a slight tug to square the corners:

Here the advantage of cutting your welts in one piece is revealed – make sure the cut ends of your welt line up for a really square end, like the picture above and not the picture below! I like to stitch across the triangle once just to check everything is square, then backtack across it to secure more fully – having to unpick backtacking at this point is no fun!

See how the seam allowances at the ends (the green bits) unfold to become a single layer – this reduces bulk at the ends so they are flatter. The finished buttonhole should be square at the corners:

I hand overcast the welts together for pressing. Sometimes the welts can look slightly wider in the centre than at the corners, and you can draw them in a teeny bit with hand overcasting to correct this before pressing – this improved the squareness of mine:

Alternatively you can trim 1mm off the inner raw edges before binding – this might be necessary for thicker cloths.
I gave mine a good press, then trimmed the reverse like so – you could pink the long edge if you like:


Well, almost – you will need to make holes in the facing to make the buttonhole operational. I made windows using an organza patch and slipstitched them to the inside – this method is demonstrated in this tutorial (scroll down to ‘Facing the Buttonhole’ near the end):

This is my favourite bound buttonhole method because it has produced my best results to date! It is a ‘true’ bound method where the raw edges really are bound, rather than turned out. I particularly like how flat the finished appearance is – both the buttonhole welts and the area around the buttonhole have a similar finished thickness. This equalising of bulk helps to reduce pressing impressions, and makes this method suitable for heavier weight fabrics.
Hope this helps for happier sewing!
Sherry

Wow! What a great pictorial! Thank you for taking the time to share your techniques with us.
LikeLike
Bookmarked!
LikeLike
Lovely, this is how a tailor here in my city taught us in a tailoring class as well. Her welt pockets and bound buttonholes were gorgeous, as are yours.
LikeLike
Great info! Your buttonholes are wonderful!
LikeLike
Great tutorial, the result is outstanding. Thanks for sharing once again.
LikeLike
Fantastic. Makes me want to go start a coat right now.
LikeLike
Beautiful buttonholes… One of my sewing books demonstrates a similar method, and I tried to improve by it doing it more like welt pockets (much like your earlier tutorial). I never realized that the latter, while saving a bit more time, adds another layer of fabric to the ends–I struggled to keep them squared in spongy wool–good to know for heavier fabrics! Thanks for sharing; I really love learning from other's lab experiments and refinements, and suddenly going, 'a-ha! that's why…'
LikeLike
Wonderful tutorial, you remind me that I haven't done any of those in ages..
LikeLike
This is the best tutorial for bound buttonholes I've ever seen! I love that it is truly 'bound', as before I've only ever seen turning the edges under and making little rectangles into “lips” that add a lot more bulk! Genius!
BeckyMc
LikeLike
Thanks for sharing your knowledge Sherry. Love the updated tute.
LikeLike
Fabulous! Thank you for taking the time to write and photograph this tutorial. Your notes are very clear and the photos are perfectly timed.
*Looking around now for a project that needs bound buttonholes….”
LikeLike
That,'s exactly how I make them – a friend who trained as a tailor taught me the method.
LikeLike
Always love reading your tutorials – Perfection!!!
LikeLike
Wonderful! Thanks for sharing. I'm sorry your misaligned first set led to you having to redo them, but I'm glad you were able to perfect your technique. Especially since you took the time to share with all of us. Thanks!
LikeLike
Thanks for thaking the time to do another tutorial! I find the facing bit the really difficult bit, lining up the facing exactly… the last time I did a bound buttonhole was using silk hessian which frays like crazy. I beat it into submission but it was not as perfect as your gabardine ones, not by a long stretch!
LikeLike
surely you must be the queen of tutorials! I am not brave enough for bound buttonholes although maybe one day…
I love the cape although I never got a chance to say so last post. Have you seen any out and about on the streets? They strike me as a good option in an Auckland winter – not so much body heat kept in and a little draftier can be good in our tepid winters.
LikeLike
I've recently 'mastered' bound buttonholes. They are my favourite option for coats etc. Your method has refined some of my problem points – ie. those pesky corners. I agree with Mary Nanna that you are the 'queen of tutorials'. Always well presented and methodologically correct.
LikeLike
Thank you so much for this post . I do my buttonholes the same way but its the hints about 1/2 a machine foot width and using machine basting to get the lines precise that are soo good cause they come from so much experience . Do you do your pockets in the same way? Mem
LikeLike
Sherry, your tutorials are so clear and i have printed this for my reference. I would really love to see how you complete a collar stand too, including grading of the collar itself. i know in a previous entry you said you would do one and am hoping it will be sooner rather than later. thank you for sharing your knowledge. Look forward to more tute's….
Lexley
LikeLike
Sherry, another great tutorial! I will try your method very soon!
LikeLike
I like this method better than the previous one. Thanks.
LikeLike
Wow! You make that look so easy! Even if I never use this on anything, I so have to try this so I know how to do it! Thanks for a great blog. I'm loving reading all your handy tips.
LikeLike