For the jumpsuit I just made, I read through the sewing instructions thoroughly – like all good seamstresses should do – but I chose to totally ignore them!

I thought the order of construction for these* was a bit of a challenge. Now I love a challenge, but there is no need to make things harder when you don’t need too! The instructions said to attach the pockets and front band after the shell was sewn together. If I followed this plan I would have put my quick-unpick to good use trying to topstitch those all pockets on, or finishing the lower end of the placket, and I am sure a relative beginner would have struggled too.

The order of garment construction can make a big difference in the ease of sewing, and whether or not a garment looks amateur or professional. In business I had to specify the best order of construction for the sewing contractor – writing sewing instructions was part of my day job. Although in the trade these are considerably briefer than the instructions included in a commercial pattern – no pretty diagrams or anything!
Anyway, I thought it would be interesting to compare some of Vogue’s methods with the ones I used. Below I’ve listed five things that I did differently, and I’ve listed Vogue’s instruction in brief, then described what I did, and why. It will be interesting to hear what you would have done too – we all have our favourite methods!
1

Vogue: Stitch and clip inner corner of front.
What I did: I applied a small square of lightweight fusing to the corner. I clipped when I was ready to turn the front corner.
Why: Fusing is quick and reinforces the whole corner not just the stitching line. Clipping into the corner several stages before you are ready increases the risk of fraying or stretching.

Vogue: Assemble shell.
What I did: Attached front pockets. Next I partially sewed the front crotch seam and completed the front band, before assembling the full shell.
Why: Sewing pockets (neatly) is much easier when the front is a single flat panel, compared to a front with attached pieces that pull in all directions. Likewise sewing the front band is easier when the back has not yet been attached.
The only reason I imagine Vogue get you to assemble the shell is so that you can try it on at this stage. I thought I should mention that this is a good way to stretch all those raw edges (neckline, CF, armholes, clipped corners) out of shape! Even when I make a calico, I fusetape those raw edges to prevent stretching. Most of the time. At least I should do…
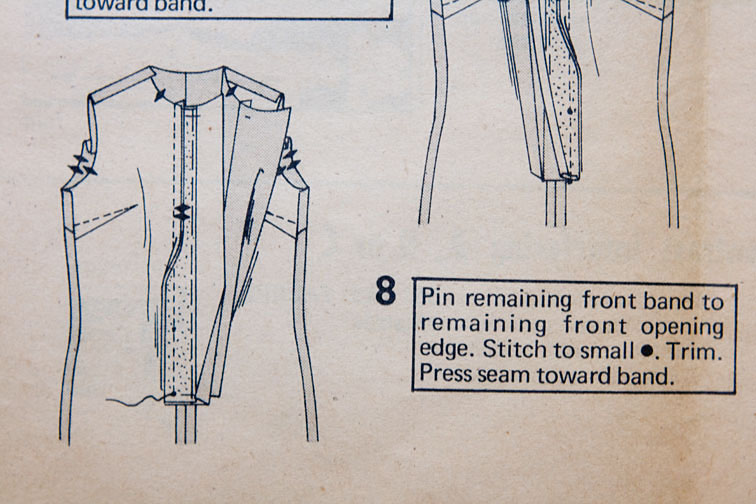
Vogue: Sew long edges of front bands, then staystitch neckline and assemble/attach collar, then finish bottom edge of front band.

What I did: Sewed long edges of front band, clipped into corner, then finished bottom edge of front band. Then I sewed the shoulder seams and attached the collar.
Why: Finishing the front band while the fronts are flat is easier than when they are attached to other pieces.

Vogue: Staystitch neckline
What I did: Nothing
Why: If my neckline edges stretch a little during handling, they will soon be unstretched when they are sewn to the collar! I would only stabilise a very unstable/loosely woven fabric here, and my method of choice would be fusing, unless the fabric was sheer.

Vogue: Attach collar
What I did: Much the same as their instructions, except I wrapped the collar around the front band rather than the front band around the collar, because I inserted a lining at this stage. I also turned under the CB neckline like in my convertible collar tutorial rather than hand sewing it into place.
Why: This made it easier!
But I did make things harder for myself by using the large (1.5cm/5/8″) seam allowances of the pattern around the collar – I tried, and will not try again. It is too fiddly to sew the opposing curves accurately, and I spent about ten minutes clipping and trimming it all – I think 6mm/1/4″ is the only way to go here!
I also did a lot of minor things differently – I blockfused all interfaced pieces, pressed the side bust darts up rather than down, and understitched the facings by machine rather than by hand. I do love hand understitching though, ever since doing it on my totally unnecessary cocktail dress. I might adopt this as my method of choice for my own clothes – when I have time!

I suppose we all develop our favourite methods of construction with time, and inevitably this means varying from the instructions. But don’t you think beginners be shown the easiest way to put a garment together – the way where the best possible outcome is obtained? i don’t think that was the case with this pattern. Do you often see things that you would do differently in pattern instructions? Do you even read them?!
*And when you refer to a jumpsuit, do you talk about these or this?!

Thanks for walking us through your process. I love hearing all of your tips and tricks. With practice and much more experience, I hope to be able to be able to see ways to ease the construction process as well.
LikeLike
I do read all my instructions, scratch by head and then look at the pictures – oh, is that what they means…..This post is very interesting as I have to sew my sister's swiss national costume – pattern in High German and no pictures!!!! EEEKK. I do have one to view while I'm nervously sewing into her very expensive fabric!! This I will post much later. Thanks for your post, always love your work.
LikeLike
I do read the instructions, and mostly follow them, but like you, I often change the order around. I definitely like to do all the flat stuff (like the pockets and front band) first. I have learned so much from you, too!
*I think I would say this.
LikeLike
Very interesting as always Sherry. Yes the instructions should be easy for beginners – that's how frustration sets in … and why don't they state when the raw edges need to be finished?- again, beginners wouldn't be able to figure when and where it is necessary. I'm thinking that this is an older Vogue, I don't think the newer ones would have you put on the pockets at the end … but I'm no expert!
LikeLike
Your ways make much more sense!
I love that term – the “quick-unpick”.
(A seam ripper, correct? quick-unpick sounds more fun!)
LikeLike
Read instructions – is that what they're there for? Sorry – I do glance at them if there is something unusual in the pattern, but otherwise – I've figured out what's most efficient for me, and so often the instructions are just plain confusing.
LikeLike
I'd have to go with “this,” but I can understand wanting to use “these,” too. 🙂
And I will *never* again use 5/8″ SAs for collars (or any convex-to-concave seam, for that matter). I tried 1/4″ once – it went together like a DREAM – you couldn't pay me enough to go back to the old way.
LikeLike
*Handmade – that would be handy for a beginner, and no doubt save some unpicking!
*a little sewing – yes it is a seam ripper, it was a brand name that has kind of stuck, although I think it was spelt qic-un-pic! Here in NZ 'to rip' means 'to tear' like you do to straighten the grain on your lining, we'd never 'rip' our seams unless we were having a real tantrum, hehe!
LikeLike
So cool to see your process… thank you for teaching about approach. There wasn't that much available information when I learned to sew as a teen, so the instructions (or mom's guidance) were all I had… (and I remember Simplicity had such confusing instructions, all the time, that I'd beg my mom to let me buy Vogues, which were more expensive, but a little clearer). I don't really use them much now unless it's something I don't know how to do. The internet has everything now! The big thing I stopped doing was stay-stitching and so I feel affirmed by your post–I felt like I was stretching delicate fabrics unnecessarily just by stay-stitching, so I use fusible strips or just be very careful!
(I'd say *this* jumpsuit, but *these* trousers 😉
LikeLike
coming, as I do, from a long line of folk who don't do what the instructions say, I'd probably be inclined to read it all and then decide which bits I'd follow and which I wouldn't.
I would say “this” jumpsuit, these trousers. I think jumpsuit is singular.
LikeLike
I read the instructions for a new pattern, but find that I largely ignore them in favor of methods that are: 1. More familiar to me 2. Easier to accomplish (as your suggested methods of flat-when-you-can construction) 3. Better for the particular application than pattern instructions suggest (as in the stay-stitching tips you gave us).
Why don't pattern companies design pattern instructions for beginners? I would guess that they don't see an immediate profit in attracting and developing the beginners' market. People who already sew are largely the people who buy their patterns. People who don't already sew don't buy patterns.
LikeLike
Great post. I never follow the instructions, especially for dresses, the instructions often serve to confound beginning sewers. I sew complete front and back, and then join at top, sew side seams last, if the style allows for it. Plus so much easier for fitting.
LikeLike
Fascinating. I have learned so much from following Burda instructions – they are difficult to understand, but they do produce great results. Ottobre instructions are also excellent – they really get you to do things in a way that produces a professional finish. The big 4 pattern companies often do things quite differently from the pattern magazines and “dumb down” their instructions to suit beginner sewers – in so many small ways – often I end up using the techniques I've learned from Burda (or here!) instead.
Actually you have influenced my sewing quite a lot – I always use your invisible zipper and facing tutorial and your facing tutorials for that clean finish. Since the jacket sewalong I've adopted some of those techniqes too – we are so lucky you are willing to share your time and expertise with those of us who learn through the love of the hobby and don't have access to professional training.
LikeLike
Thank you for this. I enjoy the 'educative quality' of your blog. I agree with Mary Nanna about the Burda instructions. I also believe that as you become more skilled you do develop an intuitive sense of how to put a garment together and whether the instructions make sense or not.
LikeLike
It was interesting reading your process. I especially agree with your statement that the patternmakes are not giving the easiest techniques or best sewing order.
LikeLike
I just finished a dress with a lapped zipper, which went swimmingly until I got to installing the zip and found that I was supposed to have left 1.5cm of overhang for it. NOWHERE in the instructions did it say that. It was sort of shown in a diagram, but only if you knew to look for it. Maybe a more experienced sewing person than I would have figured it out, but here's the thing: my notches all matched perfectly. I ended up having to unpick the whole bodice from the skirt and resew it. *shakes head*
LikeLike
I so agree with you. Pattern instructions don't always lead you down a happy path!!
LikeLike