
I must be a bit of a nerd because I love making jet pockets – so much so that I voluntarily made one this morning for this sewalong tutorial. Would you believe me if I said that a double jet pocket with a flap has only 10 sewing steps? It’s true!
I am going to use an old pattern of mine where the pocket opening transits the front dart and side body seam. Here are the pattern pieces:
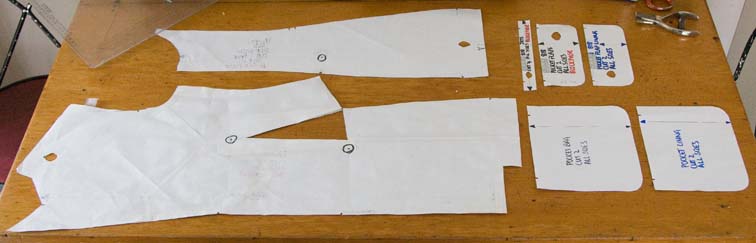
There is a waist dart in the front with a pocket slash, a side body with a notch that matches the slash, and three drill holes – one located 1cm below the bust dart apex, and two located 1cm inside the ends of the finished pocket. The front, side body, pocket welts and the pocket flaps are blockfused, the pocket bag is cut in fabric, and there is a pocket bag lining and pocket flap lining.
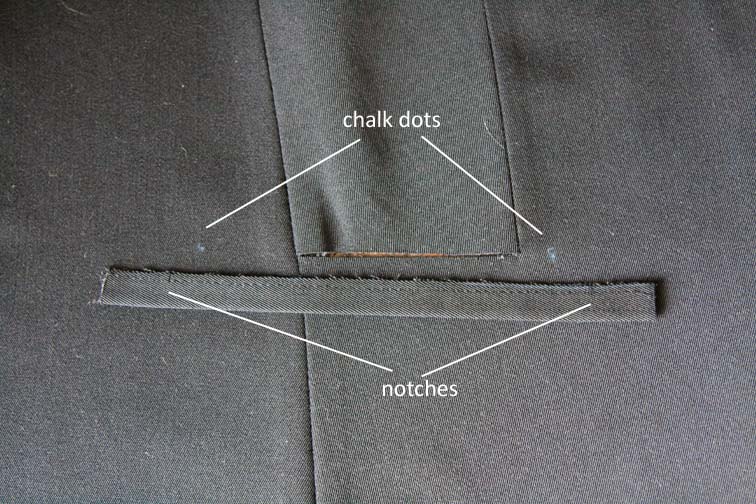
The pocket welts are 20mm wide, giving a finished width of 5mm. They are 4cm longer than the finished length of the pocket. The notches are located at endpoints of the pocket, with a 2cm extension either side:
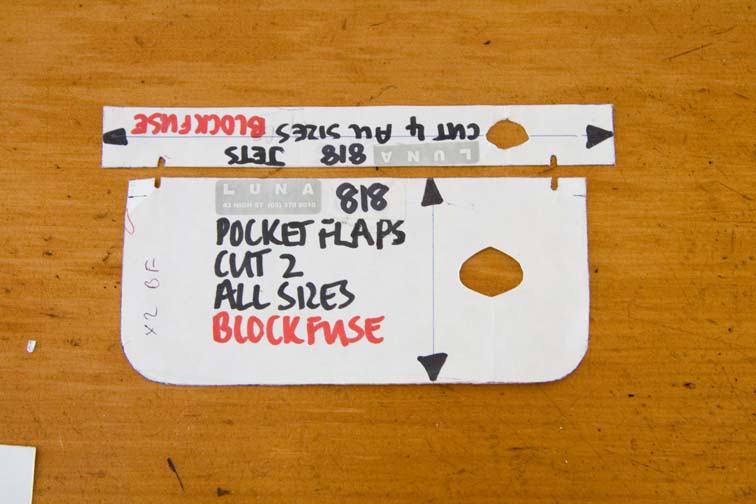
The pocket flap has 1cm seam allowances, and its finished width (marked by notches) is 3-4mm wider than the finished width of the pocket – the flap is slightly eased to allow it to curve around the body (think cloth allowance).
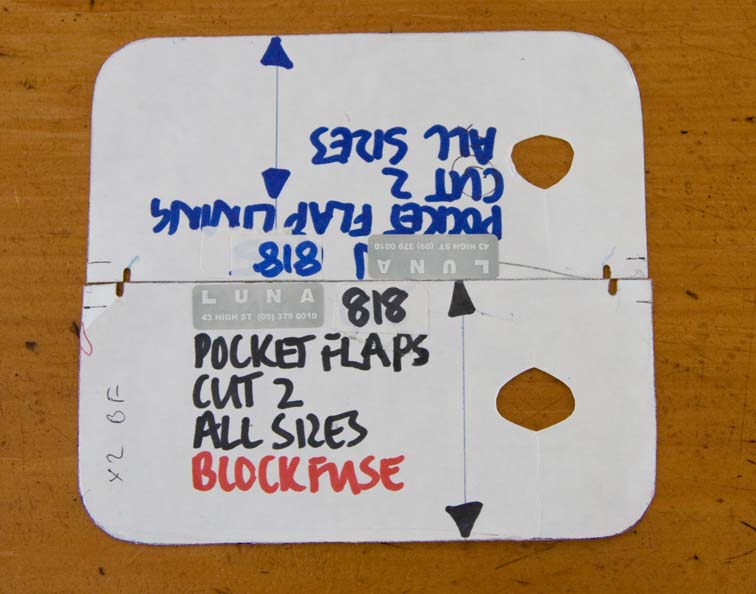
The pocket flap lining is 2mm narrower around the curved edges, to enable the lining to turn readily to the wrong side and remain invisible:
The pocket bag is cut the same width as the welt, with matching notches:

The pocket lining is cut the same as the pocket bag, but 1cm (total width of welts) shorter:

And here are the cut and fused pieces ready to sew, the chalk dots will need to be on the wrong side, I have marked them on the right side so they are easier for you to see:

Over to the machine…
Sew the front dart – this has a 6mm seam and I taper 1cm past the chalk dot at the bust apex (if you are not sure what I mean, check out this post on darts):


Sew the side body to the front – the notch on the side body should match the front slash:


You’ll end up with a partially pre-cut pocket opening:

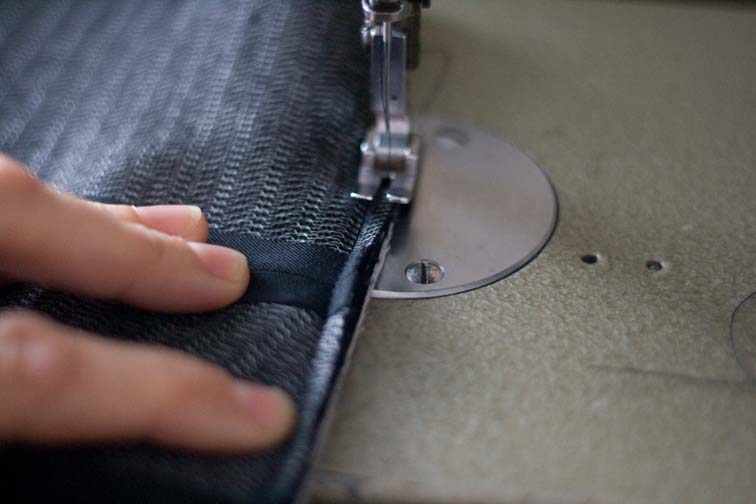
Fold your welts lengthwise and machine baste close to the raw edges, you should have four of these so they are ideal for chain piecing:

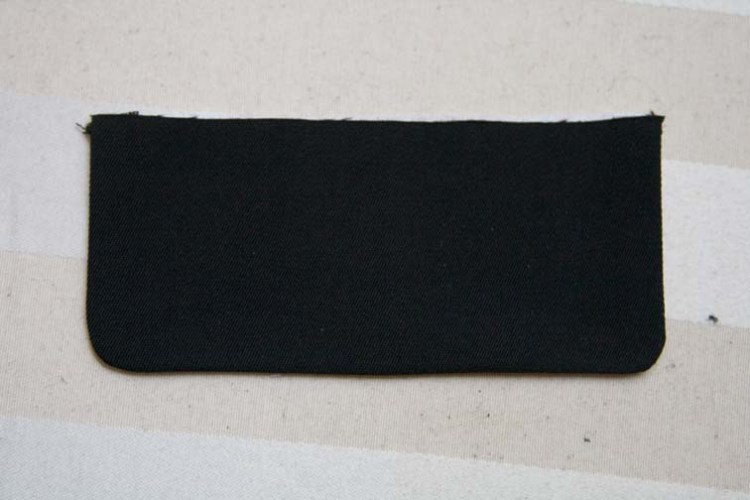
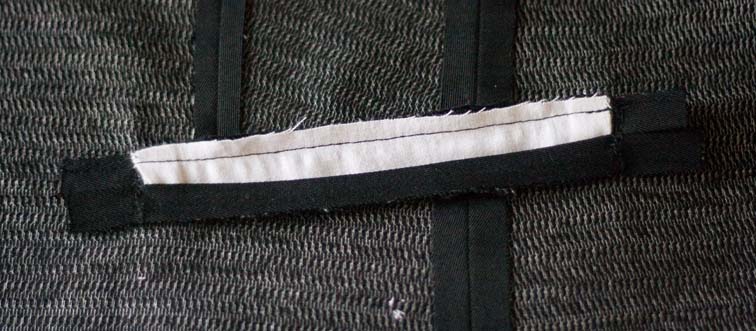
Bag out your pocket flap – see how the seam practically wants to turn to the wrong side by itself, because of the way we have cut the lining:

Over to the ironing board…
Press open the side body seam, and the dart seam – you will need to clip one side of the dart near the pocket slash to open it:

Give those welts a quick press so they are flat and straight:

Trim the corners of the pocket flaps:

Turn and press – the slightly smaller lining will bring the stitching line towards the wrong side:

The pocket corners should be symmetrical:
Back to the machine…
Stitch the welt to the pocket opening. The raw edges of the welt are butted up to the raw edges of the slash, the notches on the welt are placed 1cm outside the dots, remember the notches denote the finished end of the pocket:
Here the upper welt is sewn, sew down the centre of the welt from notch to notch:

I align the edge of my presser foot to the edge of the jet, as it is the correct width at 5mm:

Check that both stitching lines are parallel, the same length, and that they start and finish exactly at the notch:

This is often easiest to assess from the reverse side, if it’s not quite right, fix it now or it’s too late!:

Cut the opening to the chalk dots, which are 1cm from the finished end of the pocket:

Then clip diagonally into the corners. Clip to within 1mm of the end of the final stitch, never past it:

Now you can carefully turn the ends of the welts through to the wrong side:

Mmm, obviously we need to go back to the ironing board!
Back to the ironing board…
Press the welts into place from the wrong side, as you can see I’ve given them a rather hard press with the iron!

The right side before the ends are sewn:

Sew the ends by folding back the body panel, and using your forefinger to hold the jets so they are abutting. Sew across the end:

After stitching:

If you are making a flap pocket, slot the flap into place as shown:

Flip to the wrong side, and sew the flap to the seam allowance of the upper welt:

It’s quite narrow, but as long as you sew inside the seam allowance it’s OK:
As you begin, flip the upper front up to check that the flap covers the lower welt sufficiently:

And do the same thing as you finish – the flap needs to reach right to the end of the welt:

Once sewn, the reverse will look like this:
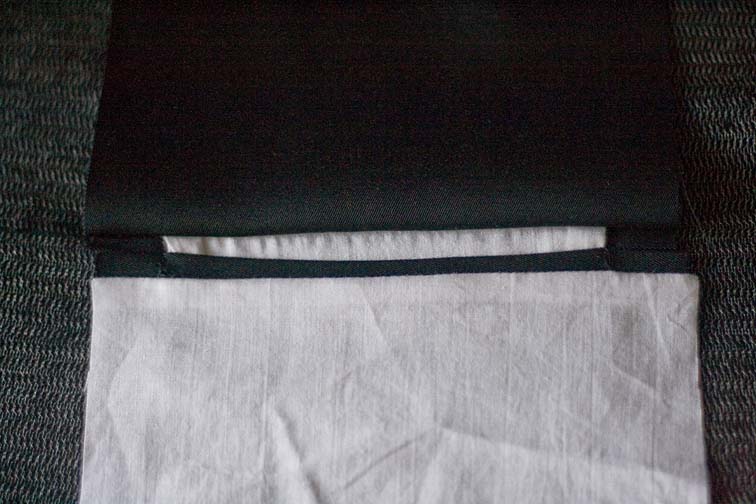
Lay the pocket bag in place, right side facing down:

And sew it to the seam allowance of the upper welt, giving the pocket bag a slightly bigger seam allowance:

Likewise, sew the pocket lining to the seam allowance of the lower welt:

It should look like this:
Now you can sew the pocket bag and pocket lining together – start at one edge of the welts and sew down:

My pocket bags are slightly misaligned, but only you and I will know that! Sew around both corners:

and up the other side to finish:

That’s it! This is before a final press:

And I don’t think I’ll bother because I’m not exactly going to wear this partial front out and about am I?!

I should mention that you need to final press over a ham or something – see how the ends don’t wrap around the body and want to flip out – that’s bad.
So there we have it – double welt pockets with flap in 10 easy steps! And there are only eight steps if you abandon the pocket flap 🙂
Happy Sewing xx Sheryll

This post was originally published as #9 of the Ready-to-Wear Tailoring Sewalong.
Click Here for a full list of sewalong posts.

Yippee! my exact pocket, and same exact side seam. What a fabulous tutorial. Now if only I had one of those unobtrusive industrial feet so I could get in close. I have a domestic straight stitch foot but it's kind of a beast.
LikeLike
Sherry, your tutorial is fantastic! You make it seem so straight-forward. The pocket looks really nice, and now I need to find some pattern that has pockets like that. Very smart looking.
Thanks!
LikeLike
This is definitely one to bookmark for my next project. Thanks!
LikeLike
Amy- I ripped the guide off my quilter's seam foot and it's exactly like Sherry's.
LikeLike
Ohhh, all excited to see this post. My pattern has fake pockets (basically just the flap) and I now can do real pockets. Thank you!
LikeLike
I'm finding your RTW tailoring tutorial very informative and interesting. Too nervous to try a jacket yet, but when I do I will be ready :>
Also found your fusing bits & pieces post very useful. Thanks Sherry!
LikeLike
I'm not doing the sewlaong but I've bookmarked all the posts for future reference. As a beginner I always wondered how the jet/welt-pockets were constructed (especially how they managed to get the flap bit to sit correctly LOL! And, now I know – thank you so much for sharing this with us :)!
LikeLike
I'm having so much fun following this! I love a great jet/welt and can't wait to try this one.
I just decided on my jacket and now have almost a week to get some sewing done. Hope to get pix up soon!
LikeLike
Your tutorials are always so clear and easy to follow. As with any “problem” – if you break things down into steps, they're easy to solve.
LikeLike
Wowza! Fabulous tutorial! I am soooo behind..haven't gotten my pattern in the mail yet but I look forward to jumping right in!
LikeLike
Hi Sherry,
This is such a treat! Thank you for so generously sharing your time and obvious expertise. I have been wanting to make a jacket for ages and this will be a big help. I haven't registered, but will certainly be following along.
Thanks so much,
Gaylene
LikeLike
What a beautiful tutorial, great photos and explanation. I had to think a minute about jet pockets – then I saw the photo and realized I call them welt pockets 🙂 I add a couple of steps, for some reason I learned to steam and stretch the jets, I guess that keeps them from losing their shape later.
I have to get going on my jacket!
LikeLike
Fabulous!!!!! Thank you, again.
I have not started yet; I am having issues with the lining of my WIP pea jacket. I feel that I have so much too catch up that I don't know if it is still worth participating despite my engagement to this fabulous SAL. What do you all think?
LikeLike
~Beth – I notice they are called welt pockets in USA – I think jet might be of English origin, which is where our NZ English derives from. I wonder why they stretch them – would that be for bias cut jets maybe?
I discovered a method in an old tailoring book yesterday (after I posted this of course!) where the jet seam is pressed open – I like this idea as it would reduce some bulk, so I'll be giving it a go next time!
~Maricou – Keep going – I'm sure you'll catch up!
LikeLike
This is so clear. Thanks for posting all this.
LikeLike
Thanks for taking the time to share your sewing skills with us. I'm sure I'll be using these tutorial's in future projects.
LikeLike
Thank you so much for this tutorial . I have couple of questions. When you are placeing the welts (jets) together to sew them onto the jacket, do you ever allow for turn of the cloth and separate them a little (say a couple of MM)? I wondered about this as I am making an overcoat out of a beefy cashmere wool. Also I have made the flaps for my pockets and made the inside surface out of coat lining silk to avoid too much bulk , I am a bit unhappy with them as they seam a bit wimpy compaired to the coat itself I did fuse the coating side of the flaps with the same interfacing as the coat but maybe should have used 2 layers but then was worried they might stand out and sort of be like wings at the side of the coat . What do you do?
LikeLike
YAY – It's a beautiful thing! I just followed your superb instructions and have completed one lovely pocket with a flap and jets ….. now I just hope the other one tomorrow goes as smoothly – thanks again!!
LikeLike
Thanks Sherry. You gave very easy to follow directions with great pictures. I just finished my first pocket on my jacket. Burda's instructions are a bit different. They have you wrap the pocket jets around the seam allowance to make the welt, instead of folding them first and stitching them on. Interesting, but that is what is great about this tutorial, we are learning the RTW way. Thanks again.
LikeLike
~MushyWear – binding them the Burda way is slightly less bulky, but has more handling, so both methods have a tradeoff! It is good to know both so you can decide which is best for your application, for instance if your fabric is bulky you might choose the bound method rather than the one I have shown. Can't wait to see your jacket!
LikeLike
I like how you set up your instructions with ironing and sewing machine headings.
LikeLike
You are a true sewing guru! Thanks for this your tutorial is amazing, its really helped. Keep sewing.
LikeLike
Thanks for the tutorial. It has really helped break it down into simple steps. Your a true sewing queen! Thank you for sharing this. Keep sewing!
LikeLike
Thank you for sharing your knowledge with us. Your tutorial is simple and easy to follow.
LikeLiked by 1 person