Welcome to our first official RTW Tailoring Sewalong post! By now hopefully you have your toile/muslin fitted, and any pattern alterations done. If you are having any problems, post some photos in our Flickr pool or in the discussion board, and we’ll all do our best to give you helpful feedback. And if you’re not having problems, post photos anyway because we’d love to see what you’re making!
As promised, we are first going to make some small but important changes to our pattern to allow faster assembly. It will also enable all of us to follow the same construction method – well, the same as can be with lots of different styles!

In this post I’ll cover the amendments I make to the outer shell to get it ‘speed ready’, so today you’ll need the following pieces:
- Back
- Side Back
- Side Front or Side Body
- Front
- Sleeve or Top Sleeve
- Under Sleeve
We are going to adjust the seam allowances, place markers where needed, and adjust the hem allowance for bagging out. This will only take about 5 minutes for each piece and you might find some of your pattern pieces don’t need changing at all, but it is a good exercise to go over your pattern and ‘get to know it’ – so when you sew a seam and it doesn’t match you know it isn’t your pattern that’s wrong!
A little note on seam allowances:
Most commercial patterns use 1.5cm (5/8″) seam allowances, but if you have already made and fitted a muslin there is no need for such a wide allowance (unless perhaps you are sewing a thick coating fabric, or you are doing wide topstitching). In the industry we use 1cm (3/8″) or 6mm (1/4″) seam allowances, and contrary to popular belief it is not just to save cloth! There are many advantages of using a smaller seam:
- the stitching line is more accurately gauged by eye when the seam allowance is smaller
- sewing around curves such as princess seams is easier with less bulk in the seam allowance
- setting in sleeves is easier with less bulk in the seam allowance
- Clipping is reduced and often unnecessary
- Trimming seams is reduced and often unnecessary
- There is less distortion at cross seams
- All the above lead to smoother and quicker assembly
Also, we will only need to adjust seam allowances on the shell pieces, because I’m going to show you how to make your own facings and lining directly from these pieces in the next post or two – so this is really more of a pattern-along at the moment!
Another little note:
These instructions are designed for a standard tailored style similar to this, if your design varies considerably (gathers, raglan sleeve, fancy bits and pieces, etc) you will need to apply your own judgement accordingly!

OK – let’s get started:
The Back:
- Trace around the pattern piece on the stitching lines including all markings, then add 1cm seam allowances. Alternatively you could trace the cutting line and take off 5mm.

- Mark your darts as outlined in this post
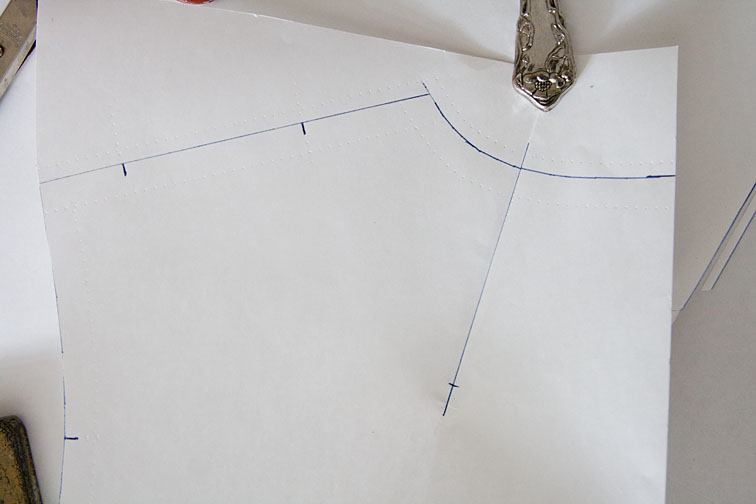
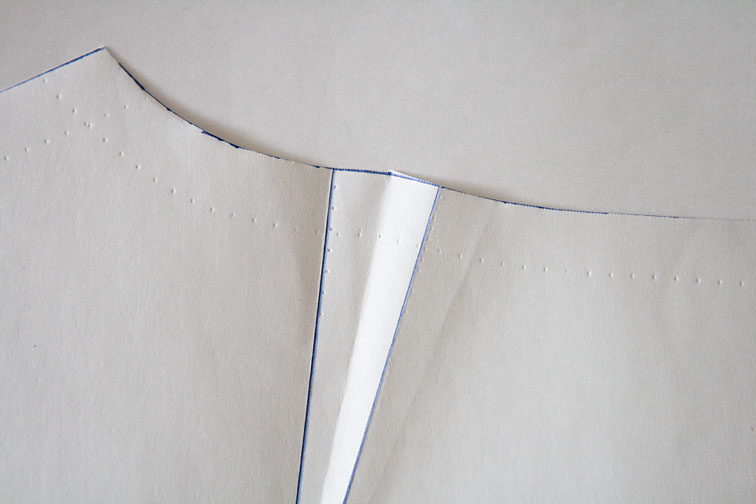
- I like to add a step to the side back seam at the armhole. We don’t do this at work – the cutters just chop them off! I personally like this trick when sewing as it gives you an accurate point for the end of the seam and helps to stop any mismatching of the easily distorted bias parts. Essentially the seam allowance continues in it’s full width until the end of the stitching line, and the end of the ‘step’ should be 1cm wide like the seam allowance:

- Confirm the length of your garment and mark a 4cm hem allowance. This is the exact amount required for our bagged out hem. If you are making a coat with a loose hem lining, you can use a larger hem, eg 5cm (2″):

- When cutting out your pattern, first fold hem up along hem fold, then cut while folded so the hem allowance mirrors the shell, and place a notch at the fold:


- When cutting out darts, first fold them into their finished position – as they will be pressed – then cut while folded, so when opened out the dart extension is the correct shape:

- Now cut out your new Back, and label it – style, size, name of piece, grainline and cutting instructions:

- Trace around pattern and mark 1cm seam allowances as you did for the Back
- Mark 4cm hem allowance, and notch the hem fold:

- Step the armhole, you need to trim the point square to the stitching line, so it is 1cm wide

- Before you cut the Side Back out, walk the Back pattern along the side back seam stitching line, to check that the seam lengths are the same and that all notches and the armhole step match:


- Cut it out and label – Side Back, cut 1 pair, grainline:

- Do the same as you did for the Side Back – 1cm seam allowances, 4cm hem and notches, armhole step, etc. Don’t forget any pocket markings.
- Before you cut it out, walk the Side Back (or Back) pattern along the side seam to check that the seam lengths are the same and all notches match
- Cut out and label – Side Front/Body, cut 1 pair, grainline, blockfuse:

- Trace around front, including all markings, add 1cm seam allowances

- Mark 4cm hem allowance, hem notch on side front seam only
- Armhole step – as for Back
- Mark the break point with a notch:

- Mark the roll line. This may be marked on your pattern but you should check it against your toile/muslin. Draw the roll line on your muslin, and transfer it accurately to your pattern. Usually the roll line is located 2.5cm from the Neck Point (stitching line)
- Walk pattern side front seam to ensure everything matches
- Walk the shoulder seam, note any ease. My pattern has a back neckline dart instead, which I will probably transfer to the shoulder as ease:

- Cut out and label – Front, cut 1 pair, grainline, blockfuse
- My coat has a one piece sleeve, so I’ll use the sleeve from another jacket as an example. Trace around sleeve, include all markings, add 1cm seam allowances

- Add armhole step on hindseam and foreseam
- Mark 4cm hem allowance, 4cm extension for sleeve vent, and this sleeve has the excess at the mitre trimmed across diagonally:


- This is much easier to get accurate now with pen and paper, than fussing around with fabric at the machine!
- Cut out and label – Top sleeve, cut 1 pair, grainline
The Under Sleeve:

- Same as top sleeve, but before you cut it out walk the top sleeve along the hindseam and foreseam to check seam lengths and notches. You may find that there is some ease on the top sleeve hindseam, which will probably be noted in the sewing instructions.

- Same as top sleeve, but fold one sleeve seam over the other to check the seam and notches line up. Check for any ease – my example has the topsleeve eased at the elbow between the notches:

Let’s check now that the sleeve fits the armhole, and how much ease you are going to have to handle. Overlap each piece at the armhole by 2cm to form the shape of the armscye:


Now you know what to expect when you are inserting your sleeve, and you can gauge whether your fabric choice will ease in well or not.
That’s enough for today, tomorrow we will be doing the collar, facings and fusing patterns. Do ask in the comments if you aren’t sure about anything – remember the only dumb question is the one not asked! If you need to post photos regarding any queries the Flickr group is a great way to do this – plus you can check out all the gorgeous fabrics and designs being made up by fellow sewalongers!

Wow, I am two steps behind you. I want to participate but have too much on at the moment. So I'm gathering the info and catching up. I think you are the best online tutor there is.
LikeLike
Wicked. Now I can start. Thanks!
Totally didn't know about stepping.
LikeLike
Can you please tell me what type of ruler you pictured in the tutorial (the triangle one with all the lines)? Also, maybe I missed it, but what is the hole puncher used for – or is that what it is?
LikeLike
~Faye – I'm using a grading set square, very handy! Quilting stores also have graded rulers if you find the set square hard to find. And the other tool is a pattern notcher – it cuts out the notches on the pattern, but you could just clip a triangle with scissors as I have on one of the pictures.
LikeLike
Ooh, yay, this is like Christmas coming early since April is still tomorrow over here 🙂
Erm, here's a stupid question: would it be better to opt for a free or bagged hem on, say, a coat with an A-line skirt just shy of knee length? I'm leaning towards bagged but I'm not quite sure what the guidelines are.
Happily, I made my own seam allowances and they are indeed 1cm (except where they're .6cm… I hope that's ok). I like the stepping thing, though, and I should definitely go re-walk a couple of the seam lines. Speaking of which, I discovered this morning that my front skirt pattern-piece was more than an inch longer than my rear-skirt pattern piece. On its own, this isn't that surprising, but what disturbs me is a) how straight the hemline looks on my muslin, and b) how the heck did I manage to sew those two seams together (perfectly matching). The joy of easing on a bias, I guess…
LikeLike
Hrmm.. I'm in the middle of working on the pattern and just want to be sure- since it's a waist seam and a peplum, I put the bagged out hem allowance on the peplum pieces? That's probably an obvious question, but I'm wondering if I should approach the jacket and peplum as two separate lined pieces joined together towards the end (as per instructions) or make the whole jacket and the whole lining and then bag it out. I'll have to think about it.
LikeLike
~Tanit-Isis – I'm doing a free hem on my coat which is about the same length as yours. I think a bagged hem is best on shorter garments like a jacket. It will also be a bit easier with your pleaty bits!
~Steph – I would tend to make the whole jacket and the whole lining and then bag out. You should still be able to attach the layers together on the inside at the waistline towards the end. I could be missing something though, so do check!
It sure is handy having the Flickr group to check what you're making!!
LikeLike
I'm also behind, I really want to make BWOF 10/2007/119, here is a very detailed review on PR – http://sewing.patternreview.com/cgi-bin/readreview.pl?readreview=1&reviewnum=57943. I still need to do a muslin, this weekends plan, however want to know if this coat will work for your Sew Along?
LikeLike
~Sharon – from what I can see it is a stand collar and raglan type of sleeve? It's a little bit off tangent but I am sure you can apply some techniques.
LikeLike
I have most of my pattern pieces cut out, I still have to do initial fit (the ones I KNOW I need) and make a muslin. I'm taking notes!
LikeLike
Wow I've just taken a few minutes break to browse this post.
My goodness, it's awesome I am going to learn so much about pattern tracing. I can't thank you enough. I can't wait to start
LikeLike
Wow, amazing tutorial! A lot of these techniques seem like they would be useful for all sorts of patterns. Like a lot of people I am running behind. I had wanted to make a Kwiksew blazer (3334) but I'm still in the middle of working on a jacket I cut out last fall, and then redoing a skirt…
anyway I will be checking in because these posts look like they will be so helpful. thanks so much for doing this!
LikeLike
Yay, Sherry, I love this! It's so clear. I actually really like taking the time to perfect the pattern, probably more than sewing. I like the little step idea. It might be a few days before I can get to this part because I'm just starting to cut out my muslin… whoops!
I have a question about one of my pattern pieces. On the front piece, there is a vertical dart that ends in a welt flap pocket, and the pattern is slashed from the side seam up through the dart. I just put a picture of it in the flickr pool. I've never sewn a jacket like this before so am unfamiliar with this detail. Would love some advice!
LikeLike
~Amy – First you will sew the dart, then attach the sidebody pretending the split doesn't exist, and then make your welt pocket in the split. Usually the pocket extends into the sidebody a bit so you need to split into that too.
LikeLike
Thank you Sherry, I will see if there is another coat/jacket that may fit the sew along better, have camel hair wool, cashmere and boiled wool waiting to made up so have a few options.
LikeLike
Sherry, it is such a great material – I have read many books but this is better than many of those! Are you also teaching online classes on PatternReview? Now, I have to catch up with the jacket….
LikeLike
Sherry, when you cut the mitre on the front and under sleeve, are you cutting the mitre on the stitch line? Or a quarter inch out from the stitch line? Thanks!
LikeLike
~Karin – I cut the mitre with a seam allowance out from the stitch line, usually 1cm, but for some reason here I have used an inch. I only mitre the top sleeve, and the under sleeve corner is bagged out square. This makes it easier to adjust if you somehow end up with it a bit longer!
LikeLike
Thanks Sherry!
LikeLike
Hi Sherry, I'm just finishing this part but was curious about my back vent. Is it sewn the same way as the sleeve vent (the top part mitered, one bottom folded)?
LikeLike
~Amy – yes I would do it the same way on the outer shell. There are a couple of extra things I would do to the lining though: I would add 1cm to the CB length between the neckline and the top of the vent for vertical ease, which prevents the vent pulling up. And you will need to cut separate R and L back linings as the inside vent seams are not centred. I might post a diagram on Flickr!
LikeLike
Thanks Sherry, that makes sense. My back already has a center seam which is slightly curved. A diagram would be great–thanks! I'm not sure how to draw the vent on the lining piece for either sleeves or the back. For your 2-piece sleeve linings, I couldn't see how the bottom half looked… I'm getting close to done on the pattern and will just leave the vent parts on lining patterns uncut till I know what I'm doing 😉
LikeLike
I have nominated you for the Versatile Blogger Award. You can copy and paste the icon from my site, add it to yours. The rules are posted there. I love your blog!
SewBarbie
LikeLike
Hi Sherry, first of all i really want to thank you for sharing all these skill and knowledge to us. It's impressive!! 🙂
Im currently working on my own suit and have just come across the set-in sleeves. Eventhough i got the same measurement for both armhole and the sleeve, there are still eases as you have shown. Should be redraw the sleeve head and fit it again? or should we gather and distribute them evenly around the armhole?
LikeLike
Thanks sherry for sharing all these skill and knowledge with us.
Im currently working out my own suit and now comes across this set-in sleeves stage.
As you have shown here, i got the sleeve ease even with the correct measurement on both armhole and the sleeve head.
Should we redraw and fit it again? or Should we gather and distribute the ease evenly to fit the armhole?
LikeLike
Hi Keiv, you need to gather and distribute the ease to fit the armhole.
LikeLike
Sherry, Thank you so much for this tut. You have done a great job. I finished my first blazer with your help. But now I am working on my second blazer. The hem lines are slightly curved. I drafted the 4 cm seam allowance but when I tried to fold the seam up I couldnt. Can I still use your technique for the lining?
LikeLike
I forgot to add its burda style 1/2014#120
LikeLike
Would it be better to make hem facings? And do they have to end before the vent? I dont want to do the extra work but in the end it might save time not fighting with the curved hem? Thank you so much.
LikeLike