Progress continues on my burgundy satin dress – #125 from Burda 11/2006…

Lost in Translation:
“Work from the inside to baste support strips to lower edges of sleeves so that the edge lies even with the hem allowances. Overlap ends of support strips. Neaten hem allowances, catching outer edge of support strips. Sew inside edges of support strips on at the seams. Lay hem allowances to inside, but do not press the edges. Sew hem allowances in place by hand.”
Maybe I’m thick, but it took several reads, many huh?’s, wtf’s, umms and errs, biting of nails and even reading slowly aloud to self, to finally click that Burda’s sewing instructions are basically saying “insert sleeve hem stiffening“! It all makes sense once you know, but isn’t it amazing how the gist of things can get lost in translation? I have read quite a few comments in blogland about Burda’s confusing instructions, and I think I now know what you all mean!
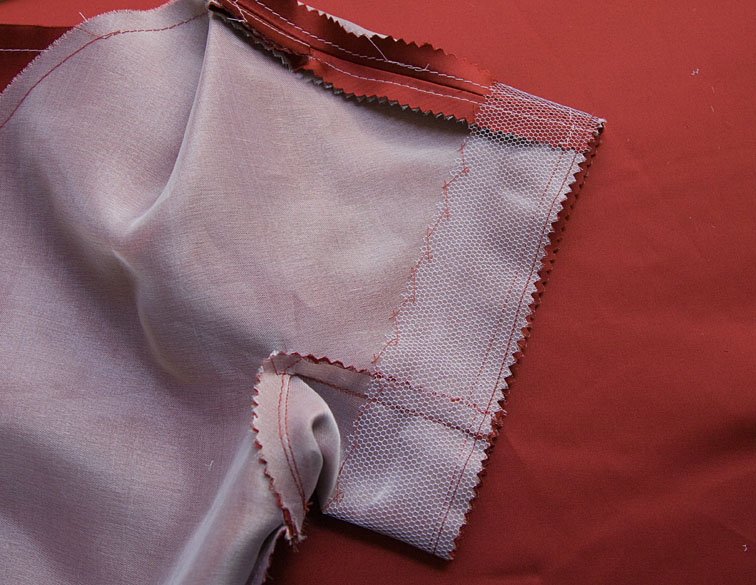
So here’s my interpretation of what to do, in case you are like me and suffered mental paralysis when you read that paragraph. I cut my sleeve support strips in some fairly stiff nylon petticoat net:

Baste them to the sleeve hem, overlapping the ends:

Neaten the hem edges if you are not lining the dress. I will line my dress, so I’m leaving the hem edges as is.

Attach the other edge of the net strip to the dress at the three seams, or in my case I am catchstitching the whole thing to the organza. This is the beauty of underlining – you can attach everything seamlessly inside!
Now turn up the 3cm sleeve hem, folding it around the net, and sew your hem.

The idea is to have a smooth folded edge for the hem, so don’t press it flat!
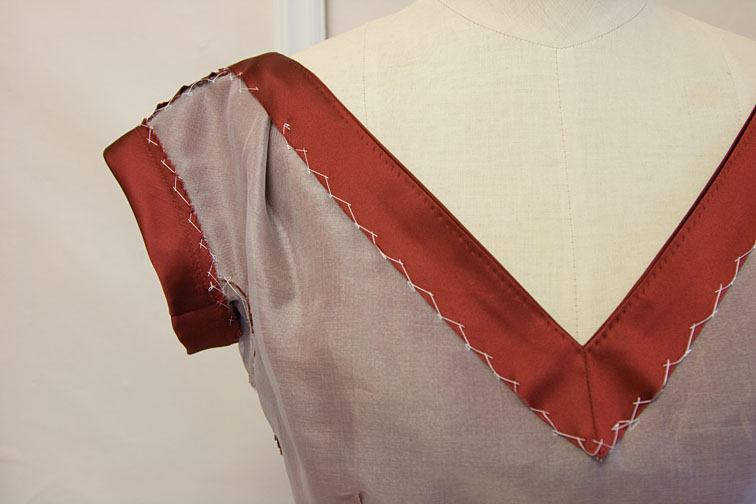
Attaching the facing:
I blockfused my facings using a lightweight knit fusing. Because my main fabric is quite stretchy, I applied the fusing in the opposite direction to normal to minimise stretch, ie crossgrain of fusing to lengthwise grain of fabric.


I understitched around the facing by machine – I actually wanted to do it by hand for this dress but I machined it out of habit! I suppose I could unpick it and redo it when I install the zip, which I also want to do by hand…..
Yay, it fits!
At this stage I hadn’t even tried the dress on, and needed to check the fit properly before I attached the skirt. I sewed in a temporary invisible zip and it fitted really well – sorry no pics! Usually I have to shorten the bodice because I am short-waisted but it looks like it is sitting correctly at the waist – so if you are normal-waisted you might have a length alteration to do!
The skirt underlining:
I underlined the skirt with silk organza too, but used a slightly different method to the bodice. I first sewed the skirt panels together, then the organza panels together. Then placing them wrong sides facing together I stitched the pleats in place through both layers – don’t they look luscious?!

The end of the zip:
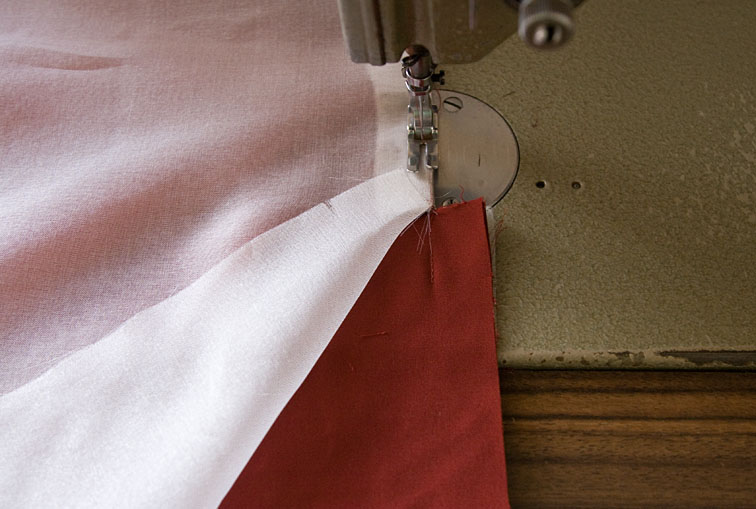
At the CB seam, I did a trick that I often do when I use double layers – I sewed the main fabric from the hem up to the zip notch, then clipped to the seamline 1″ below the zip notch:
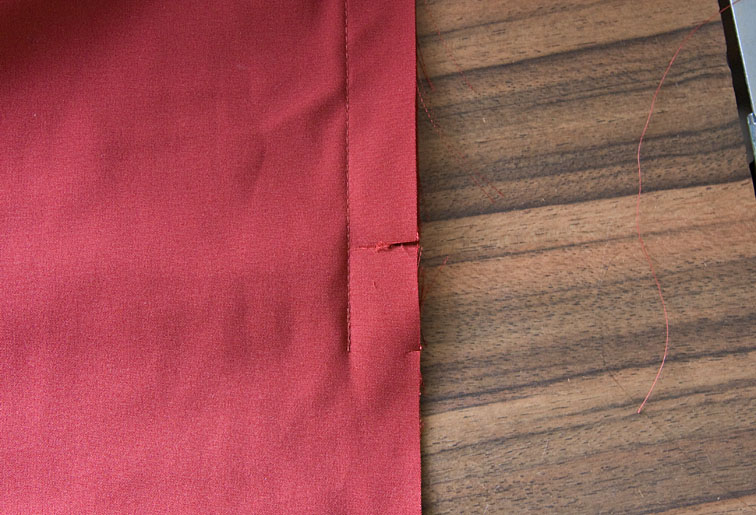
but sewed the organza to only 1″ below the zip notch:

Clip the organza seam at this point and press the lower part open so it faces the main fabric, but press the upper 1″ to the inside. Now bring the pieces wrong sides together, and sew the last 1″ altogether:

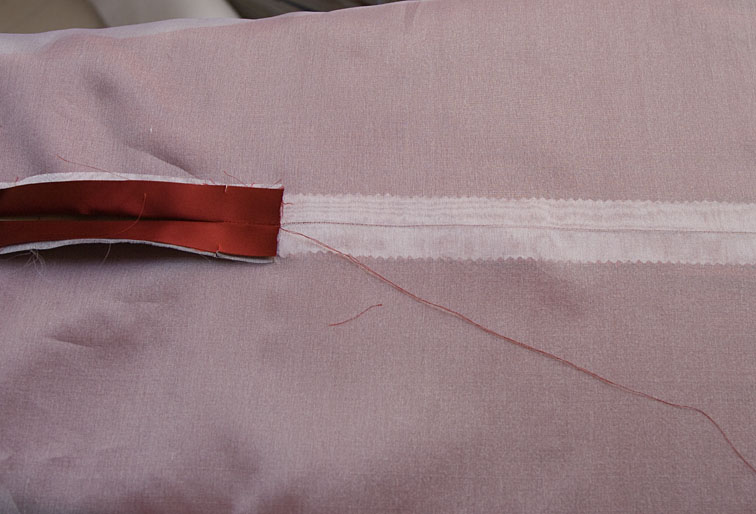
You need to be accurate when you do this so you don’t get a bump in the seam, but making the clip away from the stress point makes the end of the zip stronger.. Here’s what you end up with on the wrong side:
and the right side:

all ready to insert a zip – which is what I am going to do tomorrow!
After attaching the skirt, I spent a while this afternoon catch-stitching everything together, and I also taped the waistline to the pattern measurement. Here’s some pics of the inside pre-lining:


Just the lining, zip and hem to go now – hopefully we’ll have some pics of the outside soon!

Oh wow – this is going to be an absolute stunner!
LikeLike
Seu vestido é mais que uma roupa, é uma obra de arte.
Abraços
Eilane – Brasil
LikeLike
I have to say I'm drooling over the construction of this dress (I have no idea why I get so excited about things like catch-stitching seam allowances to underlining – surely any normal person would find that unimaginably dull?) Anyway, I think it's so lovely, you should wear it inside out, to show off your 'mad sewing skillz'!
LikeLike
Oh, I'm really excited. I've been thinking about making this dress for April but hadn't really seen a detailed iteration of it. Can't wait!
LikeLike
I think your sewing skills are amazing. I would love to learn the skill of catch stitching like that!!! The dress is beautiful on the inside, can't wait to see the finished product!!
LikeLike
You are good with the whole suspense thing, I can't wait to see it 🙂
LikeLike
I LOVE that I have to stare at your photos and reread your explanations in order to really get it. Not that you are unclear, just that you stretch me! thank you! What a fantastic challenge and an exquisite dress.
LikeLike
Watching you make this is so much fun! Reading those instructions, I was thinking “why do they want you to put boning in the sleeve?”… netting makes so much more sense! Is this a fairly common (couture?) technique, reinforcing the sleeve hem? I've never run across it before…
LikeLike
This looks great! Can't wait to see your finished project.
Do you think you can do a tutorial on lining the dress? Thank you!
LikeLike
Oh wow, this looks amazing. I can't wait to see it on you. That satin (is it duchesse satin?) looks absolutely gorgeous and luxurious.
LikeLike
Looking good! Just goes to prove that the insides have to look good for the outside to look beautiful. It will certainly be well worth all the work in the end. Can't wait to see the finished dress!
LikeLike
This is FANTASTIC! Wow..the inside looks fantastic! I agree with Janice…a tutorial would be fab!
LikeLike
Another enthusiastic process-watching fan here! Following this project is an education. I have one question – why (sorry, I always want to know why) did you attach the underlining differently on the skirt? I wondered if it would make the skirt hang a little more softly this way?
LikeLike
Another – WOW. I love the dress – even inside out. Your explanations are incredible and so easy to understand. I've had the same problem with Burda – definitely translation issues. Can't wait to see the finished dress and you must wear it!!!!
LikeLike
~Tanit-Isis – I think rounded hems, rather than flat-pressed, are a couture thing. I have padded skirt hems on gowns to round them out, but not a sleeve before! I probably could have eliminated the net in this dress because the organza pads out the hem quite well, but it is fun to try new things!
~Janice and Debi – ok, I'll show you how I do the lining too!
~didyoumakethat – it looks like duchesse doesn't it! It is actually a polyester/elastane satin.
~Judy – I did it this way so the seam allowances in the skirt are not exposed – when lined the skirt won't be fully enclosed like the bodice. I also think it is less bulky than hong kong seams. I always want to know why too!
LikeLike
I cannot wait to see your totally unnecessary cocktail dress. And while you are at it, would you mind making one for me? 🙂
LikeLike
Wow! It looks beautiful even inside out without lining! I love watching your construction. I've never made anything so complicated. It's fascinating. And I like to think that I am learning something for the future too!
LikeLike
This is coming along so well!
Yes, to the Burda instructions. I've had a few head-scratching moments over the long-winded convoluted nature of their instructions, once you “get” it, it is fine, but it's the “getting” it that can be a challenge in the first place!
LikeLike
This is beautiful work, I can't wait to see it finished!
LikeLike
The one that always gets me with Burda is the way they describe understitching. The detailed description is far more confusing than a simple 'understitch the facjng' which you could at least Google if you didn't know how to do it. I do think the translations add a certain charm though. I wonder if German doesn't have versions of some of the same sewing terms as English and so Burda has to spell things out a bit more?
Really enjoying seeing the construction of the dress!
LikeLike
Wow! Your dress is going to look amazing Inside and out!
LikeLike
I've just awarded your blog with Versatile Blog Award.
Take a look at my blog for the award rules.
Best, AnaJan
LikeLike
Wow that catchstitching is just beautiful! I can't wait to see this dress from the outside!
LikeLike
Sherry, I think I'm hopping across the ditch for a few lessons! I love your tutorials. I've had my eye on this pattern for while, but don't really have a need for it either.
LikeLike
I believe this dress is from 11/2007 not 11/2006
LikeLike
Your photographs and details are just amazing! It looks gorgeous!!
LikeLike
Wow, this dress is going to look fabulous. Couture houses eat your heart out! x
LikeLike