I was prompted by a couple of questions in the comments on yesterdays post about my pink jacket to write this post. First I started with a brief reply in the comments, but ended up with a complete essay instead! Cloth allowance (or turn of cloth) is a simple but really important concept to understand if you want a professional finish to your sewing.
So what is ‘cloth allowance’?
It is an allowance to compensate for the extra millimetres taken up when fabric is folded. See this pink fabric – when folded it uses about 4mm of fabric just to turn the corner:

This fabric is quite thick, most fabrics will use about 2mm, and chiffon will use hardly anything. The thicker the fabric, the more cloth allowance you need.
Why do you have cloth allowance in a garment?
On most bagged out edges we don’t want the seam to be visible, we want it to sit slightly underneath the edge out of view. It just looks better!
For instance – the edge of this pocket flap, so the lining is concealed:

The edges of these neckline and armhole facings:


The edges of this collar:


How do you add cloth allowance?
To enable the seam to lie underneath the edge, we need to add an additional allowance to the edges of the outside piece (or alternatively trim some off the edges of the inside piece).
For example:
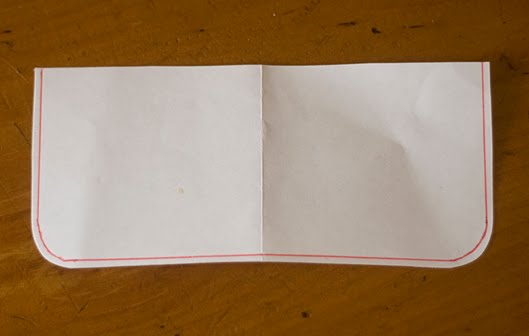
The pocket flap – make a separate pocket flap lining, but trim 2mm from all bag out edges (red line):
For the neck/armhole facing, trace the outer bodice and trim 3mm from the neckline and armhole edges (red line):

Collars (and lapels) are a little different, because they have two folds – the roll line, and the bagged out edge:

To accommodate the bagged out edges, I added about 5mm to the outer edge of the top collar.
To accommodate the fold over the roll line I added an additional 6mm. This was done by adding 3mm at the neck edge for the stand, and 3mm to the outer edge for the fall.

So a total of 11mm extra length was added at the centre back for my pink fabric. This is quite a lot, most fabrics only need about half this amount.
The front facing on a typical jacket deserves a special mention too. The front facing is outermost at the lapel, and becomes innermost below the break point. You need to add cloth allowance to the front facing around the lapel, taper it to zero at the break point, and subtract it from the front facing at the front edge, like this:

You can compensate for cloth allowance whilst sewing, by purposely misaligning raw edges or pinning tucks, but I’m not a fan of that method. As a patternmaker I prefer to do this at the pattern stage because it is more precise, and maintains consistency for bulk production.
Note that in some cases you will not require cloth allowance – if for instance you are going to pipe or bind an edge, you will want both raw edges to meet exactly.
Your pattern may or may not have cloth allowance incorporated – to find out lay the pieces on top of each other and see if there is any difference, or enough difference for your type of fabric – and adjust accordingly.
How do I know how much to add on/take off?
The amounts noted above are what I actually used in those examples, so you can use that as a guide. You will need to add more or less depending on the thickness of your cloth, and you soon get a feel for what you need with experience.
You can also gauge approximately how much you need by using a dress stand, or a friend. Cut two pieces of equal width, pin them together at the neckline, and fold your mock collar down – your ‘top collar’ will fall short like this:

This excess is intentional, and trust me it will sew together alright, just make sure the centre notches match! If you do have difficulty (I sometimes have problems getting small slippery pieces like pocket flap linings to fit) sew with the longer edge underneath, so the feed dogs of your machine assist you to ease the longer layer in. Once you turn and press, everything will fall into place just like magic!
Now you can make your cloth go around the bend, instead of it making you go around the bend! Here’s to happier sewing!


Thank you for a MOST useful tutorial. Love your work.
LikeLike
Thank you! I love your tricks of the trade :). My head understands turn of cloth, but I have a hard time making myself actually apply the concept. Your examples are nice and concrete—very helpful! 🙂
LikeLike
You have such excellent attention to detail! Thanks for the very thorough tutorial.
ps. I tagged you in a game of Eight Questions, if you care to play…
http://sewaholic.net/ive-been-double-tagged/
LikeLike
Thank you – that was extremely useful. I am going to bookmark this for my next project!
BTW – the photography on your site is just gorgeous.
LikeLike
Thank you yet again for a thorough and so-helpful tutorial. I've always allowed for turn of cloth at the sewing stage but I much prefer the idea of doing it at the pattern stage – just hadn't thought through the process of working out what I need!
LikeLike
Thank you so much for this tutorial!
LikeLike
This is a great tutorial! Very clear to understand. Thank you! Roberta
LikeLike
Wow, this is so great! I'm doing the “homework” for the RTW Sewalong and this tutorial is exactly what I need to reach the next sewing level. Thank you so much!
LikeLike
Me too, on the RTW homework, and I love it! And you lay this concept out there so clearly that I can think “AHA!” and “Of course!” at the same time. many thanks
LikeLike
Huh! You have just de-mystified why some patterns have facings that don't quite “fit” the shell, and others that do. Not to mention how to make sure my own do allow for the turn of cloth, and how to sew it all together in the end.
Thanks heaps!
By the way I have really been enjoying your blog 🙂
LikeLike
Thank you for explaining this! I wish I had seen it before my jacket project earlier this month.
LikeLike
Great tutorial for both home AND professional sewing. I really appreciate you posting this!
LikeLike
great great tip! It is the little things that makes a garment look professional and this is definitely one of them!
LikeLike
I am absolutely in love with your blog. I am sure U are one of the best teacher in the net. I am thankful to people who waste ( or use) her or his time in letting other people to learn from them. Thanks, thanks and more thanks to U from Spain. I hope what I´m telling be understood. Bye
LikeLike
This was so helpful! I sew a lot of indie patterns and often the designer will recommend doing this with collars but I hadn’t thought about it with everything especially lining where you really don’t want the seam (or lining!) to show. Thank you again for such thoughtful tips.
LikeLiked by 1 person